Address all significant moisture problems before insulating. The most important single moisture-control measure is installing a ground-moisture barrier. See also "Preparing for Foundation or Floor Insulation" on page 186.
11.2.1 Insulating Mobile Home Roof Cavities
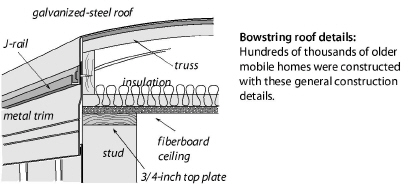
Blowing a closed mobile home roof cavity is similar to blowing a closed wall cavity, only the insulation doesn’t have to be as dense. Use fiberglass blowing wool because cellulose is too heavy and absorbs water too readily for use around a mobile home’s lightweight sheeting materials.
If existing insulation is attached to the underside of the roof, blow the insulation below it. If existing insulation lays on the ceiling, blow the insulation above it. If you find insulation at both the ceiling and roof, blow the new insulation in between the two existing layers of insulation.
There are three common and effective methods for blowing mobile home roof cavities.
1. Cutting a square hole in the metal roof and blowing fiberglass through a flexible fill-tube.
2. Disconnecting the metal roof at its edge and blowing fiberglass through a rigid fill-tube.
3. Blowing fiberglass through holes drilled in the ceiling.
Preparing to Blow a Mobile Home Roof
Perform these steps before insulating mobile home roofs.
ü Reinforce weak areas in the ceiling.
ü Inspect the ceiling and seal all penetrations.
ü Take steps to maintain safe clearances between insulation and recessed light fixtures and ceiling fans.
ü Verify that gas, water, and electrical lines are secured at least every 4 feet to a floor joist or framing member.
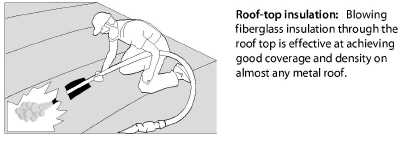
Blowing Through the Top
Blowing through the roof top does a good job of filling the critical edge area with insulation, and the patches are easy to install if you have the right materials. It is important to complete the work during good weather, however, since the roof will be vulnerable to rain or snow during the job.
If the roof contains a strongback running the length of the roof, the holes should be centered over the strongback, which is usually near the center of the roof’s width. A strongback is a 1-by-4 or a 1-by-6, installed at a right angle to the trusses near their center point, that adds strength to the roof structure.
1. Cut 10-inch square holes at the roof’s apex on top of every second truss. Each square hole permits access to two truss cavities.
2. Use a 2-inch or 2-1/2-inch diameter fill-tube. Insert the fill-tube and push it forcefully out to within 6 inches of the edge of the cavity.
3. Blow fiberglass insulation into each cavity.
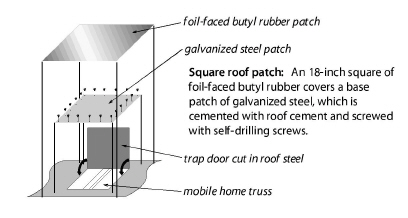
4. Stuff the area under each square hole with a piece of unfaced fiberglass batt so that the finished roof patch will stand a little higher than the surrounding roof.
5. Patch the hole with a 14-inch-square piece of stiff galvanized steel, sealed with roof cement and screwed into the existing metal roof.
6. Cover the first patch with a second patch, consisting of an 18-inch-square piece of foil-faced butyl rubber.
Blowing Through a Round Hole on the Roof
Consider this alternative to cutting a square hole as suggested above.
1. Drill a 3-inch or larger hole between each truss.
2. Use a 2-inch or 2-1/2-inch diameter fill-tube. Insert the fill-tube, and push it forcefully out to within 6 inches of the edge of the cavity.
3. Blow fiberglass insulation into each cavity to fill the entire cavity.
4. Patch the holes with galvanized steel, plastic caps, and roofing material that is compatible with the existing roof.
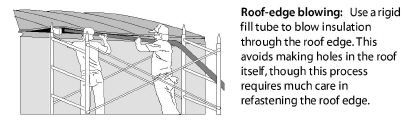
Blowing a Mobile Home Roof from the Edge
Erect scaffold to do this procedure safely and efficiently. Mobile home metal roofs are usually fastened only at the edge, where the roof joins the wall.
1. Remove the screws from the metal j-rail at the roof edge. Also remove staples or other fasteners, and scrape off putty tape.
2. Pry the metal roof up far enough to insert a 2-inch-diameter, 10- to 14-foot-long rigid fill-tube. Two common choices are steel muffler pipe and aluminum irrigation pipe. Inspect the cavity with a bright light to identify any wires or piping that could be damaged by the fill tube.
3. Insert the fill-tube, and push it forcefully out to within 6 inches of the edge of the cavity.
4. Blow insulation through the fill-tube into the cavity. Turn off the insulation-material feed and blower on the blowing machine when the tube is a couple feet from the roof edge, in order to avoid blowing insulation out through the opening in the roof edge. Stuff the last foot or two with unfaced fiberglass batts.
5. Fasten the roof edge back to the wall using galvanized roofing nails, a new metal j-rail, new putty tape, and larger screws. The ideal way to re-fasten the metal roof edge is with air-driven galvanized staples, which is the way most roof edges were attached originally.
The re-installation of the roof edge is the most important part of this procedure. Putty tape must be replaced and installed as it was originally. This usually involves installing a layer of putty tape or a bead of high quality caulk under the metal roof and another between the metal roof edge and the j-rail.
The advantages of blowing through the edge is that if you have the right tools, including a powered stapler, this method can be very fast and doesn’t require cutting into the roof. The disadvantages of this procedure are that you need scaffolding to work at the edges, and it won’t work on roof systems with a central strongback that stops the fill tube from reaching all the way across the roof.
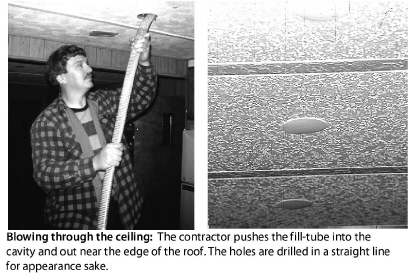
Blowing a Mobile Home Roof from Indoors
The advantage to this method is that you are indoors, out of the weather. The disadvantages include being indoors where you can make a mess — or worse, damage something.
Blowing the roof cavity from indoors requires the drilling of straight rows of 3-inch or 4-inch holes and blowing insulation into the roof cavity through a fill tube.
Follow this procedure.
1. Drill a 3-inch or 4-inch hole in an unseen location to discover whether the roof structure contains a strongback that would prevent blowing the roof cavity from a single row of holes.
2. Devise a way to drill a straight row of holes down the center of the ceiling. If a strongback exists, drill two rows of holes at the quarter points of the width of the ceiling.
3. Insert a flexible plastic fill tube and push it forcefully out to within 6 inches of the edge of the cavity.
4. Fill the cavity with tightly packed fiberglass insulation.
5. Cap the holes with manufactured plastic caps. Care must be taken not to damage the holes so that the plastic hole covers fit properly. You can also install a piece of painted wood trim over the line of holes.
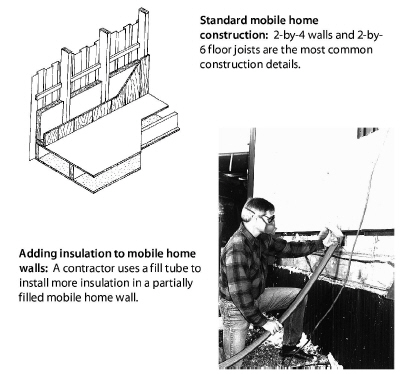
11.2.2 Mobile Home Sidewall Insulation
The sidewalls of many mobile homes are not completely filled with insulation. This reduces the nominal R-value of the existing wall insulation because of convection currents and air leakage. Consider the following steps for adding insulation to partially filled mobile home walls.
1. Check the interior paneling and trim to make sure they are securely fastened to the wall. Repair holes in interior paneling and caulk cracks at seams to prevent indoor air from entering the wall. Note the location of electrical boxes and wire to avoid hitting them when you push the fill tube up the wall.
2. Remove the bottom horizontal row of screws from the exterior siding. If the vertical joints in the siding interlock, fasten the bottom of the joints together with1/2-inch sheet metal screws to prevent the joints from coming apart. Pull the siding and existing insulation away from the studs, and insert the fill tube into the cavity with the point of its tip against the interior paneling.
3. Push the fill tube up into the wall cavity until it hits the top plate of the wall. The tube should go in to the wall cavity 7-to-8 feet. It is important to insert the tube so that its natural curvature presses its tip against the interior paneling. When the tip of the fill tube, cut at an angle, is pressed against the smooth paneling, it is least likely to snag the existing insulation on its way up the wall. If the fill tube hits a belt rail or other obstruction, twisting the tube will help its tip get past the obstruction.
4. Stuff a piece of fiberglass batt into the bottom of the wall cavity around the tube to prevent insulation from blowing out of the wall cavity. Leave the batt in-place at the bottom of the wall, when you pull the fill tube out of the cavity. This piece of batt acts as a temporary gasket for the hose and insulates the very bottom of the cavity after the hose is removed. This batt also eliminates the need to blow fiberglass insulation all the way to the bottom, preventing possible spillage and overfilling. If you happen to overfill the bottom of the cavity, reach up inside the wall to pack or remove some fiberglass insulation, particularly any that lies between the loose siding and studs.
5. Draw the tube down and out of the cavity about 6 inches at a time. Listen for the blower fan to indicate strain from back-pressure in the wall. Watch for the fiberglass insulation to slow its flow rate through the blower hose at the same time. Also watch for slight bulging of the exterior siding. These signs tell the installer when to pull the tube down.
6. Carefully refasten the siding using the same holes. Use screws that are slightly longer and thicker than the original screws.
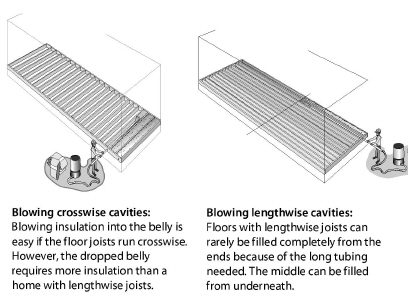
11.2.3 Mobile Home Floor Insulation
|
SWS Details: 4.1302.1 Prepare Belly Floor Cavity for Insulation, 4.1303.1 Insulation of Floor Cavity with Blown Material |
Mobile home floor insulation is a good energy-saving measure in cool climates. The original insulation is usually fastened to the bottom of the floor joists, leaving much of the cavity uninsulated and subject to convection currents. This greatly reduces the insulation’s R-value. Blown-in belly insulation also tends to control duct leakage.
Preparing for Mobile Home Floor Insulation
Prior to installing floor insulation, always perform these repairs.
ü Repair plumbing leaks.
ü Secure gas, water, and electrical lines at least every 4' to a floor joist or framing member
ü Tightly seal all holes in the floor.
ü Inspect and seal ducts.
ü Repair the rodent barrier.
ü Install a ground-moisture barrier in the crawl space if the site is wet.
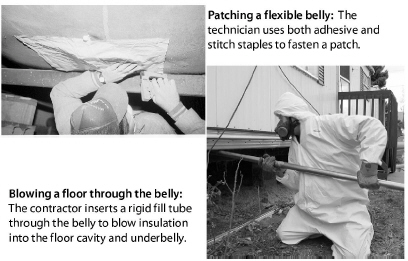
Patching the Belly
Mobile homes have two common types of belly covering: rigid fiber board and flexible paper or fabric. The fiberboard is normally stapled to the bottom of the floor joists. To patch a rigid belly, simply screw or staple plywood or another rigid material over the hole.
Flexible belly material may have no solid backing behind the hole or tear because the material forms a bag around the main duct, which is installed below the floor joists. In this case, use both adhesive and stitch staples to bind the flexible patch to the flexible belly material.
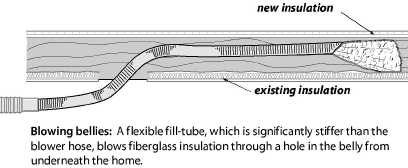
Insulating the Floor
Two methods of insulating mobile home floors are common. Blown fiberglass is recommended over cellulose for either method.
1. Drilling through the 2-by-6 rim joist and blowing fiberglass through a rigid fill tube into the belly.
2. Blowing fiberglass insulation through a flexible fill tube or a rigid fill tube into the underbelly.
First repair all holes in the belly. Use mobile home belly-paper, silicone sealant, and stitch staples. Use these same patches over the holes cut for fill-tubes. Screw wood lath over weak areas if needed.
When blowing through holes from underneath the home, consider blowing through damaged areas before patching them.
Identify any plumbing lines, and avoid installing insulation between them and the living space if freezing could be an issue. This may require running a piece of belly-paper under the pipes, and insulating the resulting cavity, to include the pipes in the heated envelope of the home.
Unfaced fiberglass batts may also be used to insulate floor sections where the insulation and belly are missing. The insulation should be supported by lath, twine, or insulation supports. This is a good approach when it isn’t cost-effective to insulate the entire belly.