This chapter presents specifications and procedures for improving the airtightness and thermal resistance of windows and doors.
Use lead-safe weatherization methods for all tasks relating to window and door weatherization, repair, and replacement. See "Lead-Safe Procedures" on page 48.
Use low-VOC sealants when installing sealants indoors in all window and door work.
A storm window is an additional window installed outside or inside the primary window.
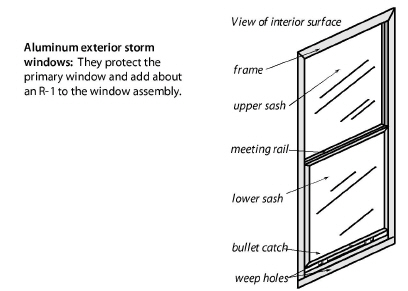
8.1.1 Exterior Aluminum Storm Windows
|
SWS Detail: 3.0201.7 Exterior Fixed Storm Window Installation; 3.0201.8 Exterior Operable Storm Window Installation |
Exterior storm windows can save energy and preserve old worn primary windows from destructive weathering. You can attach exterior operable storm windows to the blind stop or exterior window casing of a double-hung window. Or, attach a fixed storm to any flat surface of a window frame or sash if the window is fixed or if a movable sash can support the extra weight.
Metal exterior storm windows are the best choice if they are well designed and installed properly.
• Choose operable storm windows to install on operable windows. Choose fixed storm windows to install on fixed windows or on sashes that open along with the movable primary window.
• If operable, make sure that the storm window opens and closes to allow the maximum amount of ventilation and egress area.
• Measure the storm-window dimensions according to where you’ll attach the storm: blind stop, window casing, or sash.
• Storm-window frames should have sturdy corners so they don’t rack out-of-square during transport and installation.
• Sashes must fit tightly in their frames.
• The gasket sealing the glass should surround the glass’s edge.
• Consider selecting a hard-coat low-e glass for the storm window, which should face the primary window to protect the low-e coating.
• The storm window should be sized accurately and should fit tightly in the opening.
• The storm window’s sashes should be removable from indoors for cleaning.
Installation of Exterior Storm Windows
Follow these guidelines when installing storm windows.
✓ Seal storm windows around the frame at time of installation with sealant tape or caulk.
✓ Don’t allow the tape or caulk to interfere with the weep holes at the bottom of the frame. If weep holes aren’t manufactured into new storm window, drill weep holes or leave at least 2 two-inch spaces in sealant to allow water on the sill to escape.
✓ Don’t allow storm windows to restrict emergency egress or ventilation through movable windows.
See also "Mobile home double window" on page 538.
|
SWS Detail: 3.0201.5 Interior Fixed Storm Window Installation; 3.0201.6 Interior Operable Storm Window Installation |
Interior storm windows are usually more airtight than exterior storm windows because they must be airtight to avoid condensation and icing on the primary window during winter. Interior storm windows are usually a metal or plastic frame enclosing some type of plastic glazing.
Consider these specifications when selecting interior storm windows.
• Don’t install fixed interior storm windows on egress windows.
• Interior storm windows should have an airtight edge seal to prevent warm moist air from passing by the interior storm window and condensing or icing the interior of the glass on the primary window.
• Interior storm windows should be easily removable for storage.
• The home should have a safe place to store the storm windows seasonally.
• Consider using low-e glass or plastic for glazing to increase thermal resistance.
8.2 Window Repair and Air Leakage Reduction
|
SWS Detail: 3.0201.1 Window Air Sealing; 3.0201.2 Window Sash Replacement; 3.0201.3 Window Sill Replacement; 3.0201.4 Glass Replacement |
With the exception of broken glass or missing window panes, windows aren’t often the major source of air leakage in an existing home.
Window weatherstripping may solve comfort problems around windows, even though it may not be cost-effective. Avoid expensive or time-consuming window repair measures that are implemented to solve minor comfort complaints if the weatherization budget is limited.
8.2.1 Double-Hung Window Weatherization
Re-glazing window sashes in a quality manner is time consuming. This task is best accomplished as part of a comprehensive window rehabilitation project. Re-glazing wood windows may not be a durable repair without thorough scraping, priming, and painting. Use lead-safe work practices when working on windows. See page 48.
Repair measures may include the following.
✓ Replace missing or broken glass. Use glazing compound and glazier points when replacing glass in old windows.
✓ Caulk the window frame where appropriate to prevent air leakage, condensation, and rain leakage. Use sealants with adhesion and joint-movement characteristics appropriate for both the window frame and the building materials surrounding the window.
✓ Replace missing or severely deteriorated window frame components.
✓ Fill damaged wood with epoxy, before priming and painting.
✓ Adjust window stops if gaps exist between the stop and jamb. Ensure that the window operates smoothly following adjustment.
✓ Weatherstrip large gaps between the sash and the sill or stops. Weatherstrip the meeting rails if needed.
✓ Replace or repair missing or non-functional top and side sash locks, hinges, or other hardware if this significantly reduces air leakage.
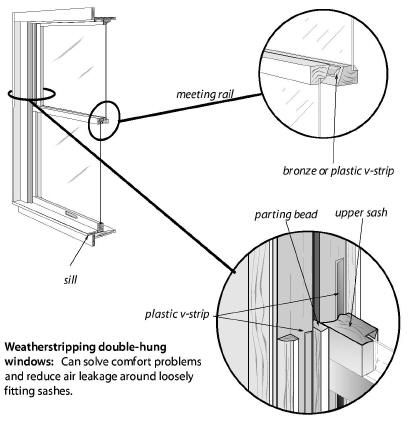
8.2.2 Weatherstripping Double-Hung Windows
Window weatherstripping is mainly a comfort retrofit and not a high weatherization priority.
Paint is the primary obstacle when weatherstripping double-hung windows. Often the upper sash has slipped down, and is locked in place by layers of paint, producing a leaking gap between the meeting rails of the upper and lower sashes.
✓ To make the meeting rails meet again, either break the paint seal and push the upper sash up, or cut the bottom of the lower sash off to bring it down.
✓ To lift the upper sash, cut the paint around its inside and outside perimeter. Use leverage or a small hydraulic jack to lift the sash. Jack only at the corners of the sash. Lifting in the middle can break the glass.
✓ Block, screw, or nail the repositioned upper sash into place.
✓ To weatherstrip the window, remove the lower sash. Cut the paint where the window stop meets the jamb so the paint doesn’t pop off in large flakes as you pry the stop off. Removing a stop is sufficient to remove the bottom sash.
✓ Scrape excess paint from the sashes and the window sill.
✓ Apply vinyl V-strip o the sides of the jambs where they meet the window sash frame.
✓ Apply bronze V-strip to the meeting rail on the top sash where it meets the bottom part of the upper sash. The point of the bronze V goes skyward.
✓ Apply bronze V-strip to the bottom part of the lower sash where it meets the sill. The point of the bronze v goes outward.
✓ The weatherstripping is caulked on its back side and stapled in place, as shown in the illustration above.

8.3 Window Replacement Specifications
The purpose of these specifications is to guide the selection and installation of replacement windows. Improper window installation can cause water leakage, air leakage, and noise leakage.
Existing window openings may have moisture damage and air leakage. Repair these conditions before or during window replacement.
Included here are specifications for two special window safety considerations.
1. Windows in high risk areas, such as around doors and walkways, must have safety glass.
2. Some bedroom windows function as a fire escape (egress). Recognize and accommodate this egress function.
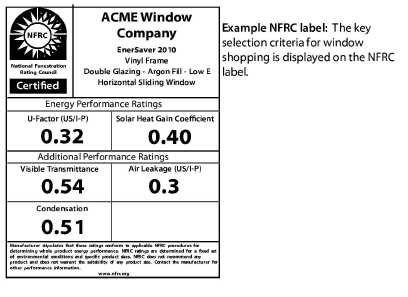
8.3.1 Window Energy Specifications
Installing new windows incurs a large labor expense so they should be as energy-efficient as budget allows.
1. Replacement windows must have a U-factor less than or equal to what is required by State standards. Lower is better, especially in cold climates.
2. Replacement windows facing east or west in air conditioned homes should have a solar heat-gain coefficient (SHGC) that is equal to or less than what is required by State standards. Lower is better in hot climates.
Remove existing windows without damaging the home’s interior finish, siding, exterior trim, or the water-resistive barrier (WRB) if possible.
1. Protect the interior of the home from construction debris. See "Lead-Safe Procedures" on page 48.
2. Remove window sashes, jambs, or siding, depending on the window-replacement method chosen.
3. Repair moisture damage to the rough opening before installing the new window.
8.3.3 Installing Replacement Windows
The most important considerations for installing new windows are that the window installation is watertight and airtight.
Water leakage deteriorates building components around the window. To prevent water leakage in frame buildings, the window must be integrated, if possible, into the home’s water resistive barrier (WRB).
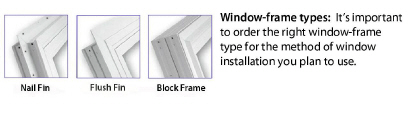
8.3.4 Replacing Nailing-Fin Windows
Install replacement windows with nailing fins in the rough opening after removing the existing window frame and exterior trim. Fasten the nailing fins directly to the house’s sheathing or framing, but support the window’s weight on the sill with or without shims before fastening the window to the building.
Water-Resistive Barrier (WRB)
Designers and builders assume that some rain water penetrates through the siding. The WRB is the building’s last defense against water. House wrap and asphalt felt are the most common WRBs. Window replacements that expose the home’s WRB must incorporate the WRB in the window installation. Install a sill pan below the window and flashing on the side fins. Use flashing to connect the window opening to the WRB so water that penetrates the siding, trim, or window exits the building by way of the WRB.
Windows are exposed to wind and rain. Install replacement windows so water that penetrates the siding or trim drains to the outdoors. If water leaks underneath the existing WRB or the new flashing, the water eventually damages the building. With proper flashing, the fins and flashing create a drainage system that drains water to the outdoors rather than relying on caulked siding and trim to prevent rain water from penetrating the building’s surface.
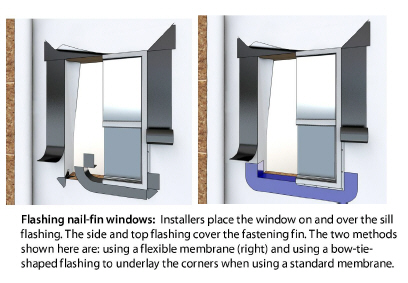
Follow these steps to install a nailing-fin window in the rough opening.
1. At the sill, insert the flashing underneath the existing siding, over top of existing building paper, and under the bottom nailing fin of the window.
2. Use flat shims to provide a level surface and support under the vertical structural members of the new window frame. Don’t allow the fins to support the window’s weight.
3. Use fasteners with heads wide enough in diameter to span the holes or slots in the window fin.
4. Avoid over-driving the fasteners or otherwise deforming the window fin.
5. Flash the window around its perimeter with 15-pound felt, house wrap, or a peel-and-stick membrane.
a. Flashing procedures may vary. However, always install flashing materials to overlap like shingles.
b. Insert the new building paper or flashing underneath the existing siding and underneath existing building paper on the sides and top of the window opening.
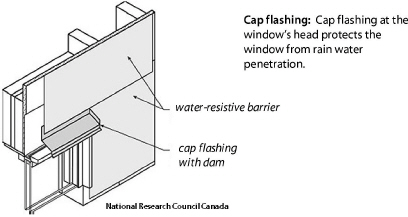
6. Windows that are exposed to wind-driven rain or without overhangs above them or without WRB integration should have a rigid cap flashing (also called head flashing) to prevent rainwater from draining onto the window. The cap flashing should divert water away from vertical joints bordering the window with an overhang or dam.
7. Tuck the cap flashing up behind the WRB or exterior siding. Metal cap flashing must have downward bending lip of at least 1/4 inch on the front and ends.
8. Fill gaps between the new window and existing frame with low-expanding foam.
9. Thoroughly caulk all filler and trim pieces surrounding the replacement window.
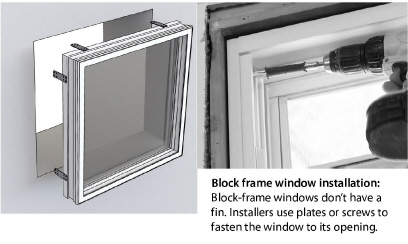
8.3.5 Block-Frame or Finless Windows
Contractors install windows using a block-frame or finless installation when they can’t remove the existing window frame or in a masonry window opening. Block-frame windows rely on caulk or rigid flashing to create a weatherproof seal around the window perimeter. Take care when installing caulk so that it is durable and effective for as long as possible.
Comply with the following requirements when installing block-frame or finless windows.
1. Block-frame or finless windows may require a sufficiently wide gap between the new window and the existing window frame or masonry opening to allow for the following.
a. Allowing for a slightly out-of-square opening.
b. Leveling the window.
c. Insulating the gap with foam.
2. Access the window-weight cavities, remove the weights, and fill the cavities with insulation, and seal the cavities.
3. Protect the existing sill with a metal or plastic sill pan or rigid sill flashing if necessary for drainage and to protect the existing sill that protrudes from the exterior wall. Or, install a new sill as part of the window replacement.
4. Support block-frame or finless windows under their main vertical supports with shims that level the window.
a. Use flat shims for support if the sill surface is flat.
b. Use tapered shims or a sill angle for support if the sill surface is sloping.
5. Windows without fins must be secured to the rough opening within 4 inches of each side corner and a minimum 12 inches on center along the remainder of the frame with one of these fastening methods.
a. Screws fastened through the window frame. Use screws that are designed for fastening block-frame windows if available.
b. Jamb clips or plates that are fastened first to the window and then to the opening in separate steps.
6. Fill gaps between the new window and existing frame with low-expanding foam.
7. If possible, flash block-frame windows between the opening and the replacement-window frame and extend the flashing out far enough to slip under or into the siding.
a. Tuck the flashing up behind the exterior siding at least 1 inch.
b. Sill and cap flashing should have a downward bending lip of at least 1/4 inch on the front that sheds water away from the building.
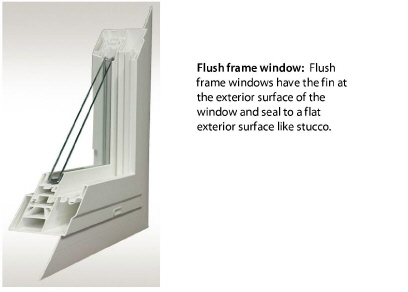
8.3.6 Flush-Fin Window Replacement
Flush-frame windows are replacement windows that fasten to the window opening and mount directly over the flat siding surrounding the window opening. Replace windows in stucco walls using windows with flush fins, also called stucco fins, that have no nail holes. Flush-fin windows work well for any window opening with a flat water-resistant finished surface surrounding the window opening.
This flush-fin window-replacement technique is similar to block-frame window installation.
1. Support the replacement window on the existing sill with one of the following materials.
a. A flat or tapered continuous wood support.
b. Flat shims under the window’s main vertical supports.
c. Tapered shims under the window’s main vertical supports if the sill is sloping.
2. Apply a sealant that remains flexible to the back of the flush fin of the replacement window in order to seal it to the surface of the exterior wall. Interrupt the caulking at the bottom fin for one inch on each side of the window’s weep holes.
3. Fasten the flush-fin window to the window opening by driving screws through the replacement window’s frame.
8.4 Window Safety Specifications
Windows have special requirements for breakage-resistance in areas that are prone to glass breakage, and for fire escape in bedrooms.
8.4.1 Windows Requiring Safety Glass
Safety glass is required in locations that the IRC 2012 considers hazardous to the building’s occupants. Safety glass must be either laminated glass, tempered glass, organic coated glass, or annealed glass bearing a permanent label identifying it as safety glass, manufactured in compliance with CPSC 16 CFR 1201 or ANSI Z97.1.
Instead of safety glazing, glazed panels may have a protective bar installed on the accessible sides of the glazing 34 to 38 inches above the floor. The bar must be capable of withstanding a horizontal load of 50 pounds per linear foot without contacting the glass and be a minimum of 11/2 inches in diameter.
Safety glass or a protective bar is required in the following hazardous locations.
✓ Glazing wider than 3 inches in entrance doors.
✓ Glazing in fixed and sliding panels of sliding doors and panels in swinging doors.
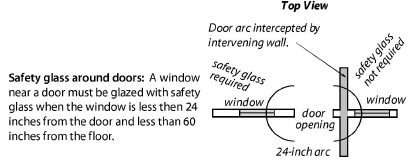
✓ Glazing in fixed or operable panels adjacent to a door where the nearest exposed edge of the glazing is within a 24-inch arc of the vertical edge of the door in a closed position and where the bottom edge of the glazing is less than 60-inches above the floor or walking surface. Exception: If there is an intervening wall or permanent barrier between the door and the glazing, safety glass isn’t required.
✓ Glazing adjacent to the landing of the bottom of a stairway where the glazing is less than 36 inches above the landing and within 60 inches horizontally of the bottom tread.
✓ Glazing with a bottom exposed edge that is less than 36 inches above the walkway surface of stairways, landings, and ramps.
✓ Glazing in any portion of a building wall enclosing showers, hot tubs, whirlpools, saunas, steam rooms, and bathtubs where the bottom exposed edge is less than 5 feet above a standing surface or drain inlet.
Glazing in an individual fixed or operable panel that meets all of the following conditions must also have safety glass:
1. An exposed area of an individual pane greater than 9 square feet, and
2. An exposed bottom edge less than 18 inches above the floor.
3. An exposed top edge greater than 36 inches above the floor.
4. One or more walkways within 36 inches horizontally of the glazing.
Windows are the designated fire escape for bedrooms and should offer a minimum opening for a person’s escape. If the window installation requires a code-approved egress window, observe these specifications.
1. Each bedroom must have one egress window.
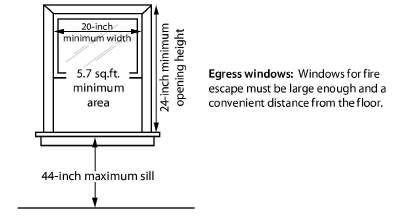
2. Egress windows must provide an opening that is at least 20 inches wide and at least 24 inches high.
3. Egress windows must provide an opening with a clear area of at least 5.7 square feet except for below-grade windows, which must have at least 5.0 square feet of opening.
4. The finished sill of the egress window must be no higher off the floor than 44 inches.
5. You may install security bars, screens, or covers over egress windows as long as these security devices are easily removable from indoors.
Single-pane, unshaded windows transmit about 85% of the solar heat striking them. This high transmittance accounts for up to 40% of the heat a building accumulates.
Consider these factors when deciding which windows to shade.
• Direction the windows face. South windows transmit the most solar heat. West windows contribute solar heat in the afternoon, just when summer comfort is most difficult to provide. East windows begin heating the home early in the morning, causing more hours of potential discomfort.
• Location of natural shade from trees, overhangs, and other objects. If windows are already shaded by trees, nearby buildings, or large overhangs, additional shading is unnecessary.
• Total surface area of windows. Shading devices for larger windows are generally more cost-effective than for smaller windows.
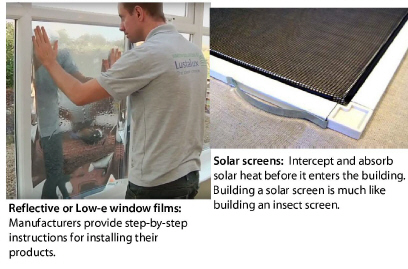
Solar screens are often the least expensive window-shading option to retain a view through the window. Installers stretch the solar-screen fabric over an aluminum frame much like assembling an insect screen. The fabric absorbs and dissipates 65% to 70% of the solar heat before it enters the home.
Install solar screens on the exterior of a window to be effective at keeping solar radiation from penetrating the window. Therefore, they’re not practical for outwardly opening windows, such as awning or casement windows, unless attached to the movable sash’s exterior.
Metalized plastic window films (similar to those applied to automotive windows) can block 50% to 75% of the solar heat on single-pane glass. Unlike sun screens, reflective window films don’t obstruct the operation of any kind of window.
A microscopic layer of metal on the film reflects solar radiation. Installed on the interior side of single-pane glass, reflective window films reflect solar heat, decrease glare, and reduce fading of fabrics and paint. The most effective films look like a mirror when viewed from outdoors during the daytime. Tinted transparent films that merely darken the glass aren’t as effective in blocking the sun as metalized films.
Installing reflective window film requires some skill and experience. Professionals stress thorough preparation and careful installation to an absolutely dirt-free glass surface and surrounding sash.
8.6 Door Repair and Weatherstrip
Door operation affects building energy-efficiency, security, and durability, so doors are often an important weatherization priority. A leaky door may be an important comfort problem, and weatherstripping the door can be a high-value energy conservation measure.
Only weatherstrip doors that operate well, as described below. Perform all door adjustment and repair in a lead-safe manner. See "Lead-Safe Procedures" on page 48.
8.6.1 Evaluating Exterior Doors
Before weatherstripping a door, evaluate the door’s operation.
• Does the door bind or scrape against its jambs, indicating a need for hinge adjustment, cutting, planing, or sanding?
• Does the door close and latch tightly and evenly against its stops or is there an uneven space between the door and stop when the door latches?
• Can you move the latched door back and forth against its stops, indicating a need for adjustment of the stop or strike plate?
• Can you move the open door up and down, indicating loose hinges?
You can adjust binding doors by moving the door within its opening. The clearance between a door and its jamb should be between 1/16 and 3/16 of an inch (2-to-5 mm).
Be aware that the distance that you move the door to adjust it is small — 1/16 inch or 1-to- 2 millimeters. The goal of adjustment is to solve a door-binding problem so that the door closes and latches correctly and that weatherstrip seals air leakage without causing a problem.
Consider these door-operating problems and possible solutions.
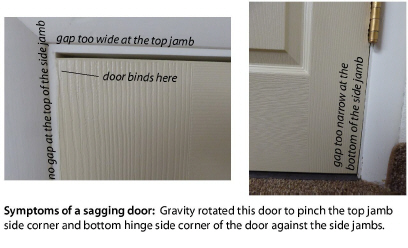
Loose, Sagging, or Misaligned Hinges
The most common door problem is that gravity has pulled the door down and toward the top-latch side corner and inward the bottom hinge-side corner.
✓ The hinge screws are loose. Tighten the screws on the jamb and door. Add longer screws if necessary. If longer screws penetrate the stud behind the door jamb, those screws can pull the door and its jamb back a little at the top hinge side.
✓ Gravity bent the top-hinge knuckles over time, creating an excessive gap between the top jamb and the top latch side of the door. This made the door’s top latch-side corner lean toward the top of the latch-side jamb and bind the door there. Use an adjustable wrench to bend the hinge knuckles, fastened to the door, very slightly. The hinge screws must be very tight so they don’t pull out when you bend the knuckles.
✓ There is excess room on the hinge side and inadequate room on the latch side. Chisel the hinge mortise deeper to allow the screws to pull the door away from the latch-side jamb.
✓ There is excess room on the latch side and inadequate room on the hinge side. Shim the hinges outward with cardboard or sheet plastic. Loosen the hinge screws and place the shims between the hinge and jamb, then tighten the screws. If the latch-side gap varies, use shims of varying thickness behind the hinges.
✓ Closing the door creates a spring effect because the door is pulling on the hinge. Rotate the hinge slightly by shimming so that the hinge sits flat and in the same plane as the door.
Door-Frame or Structural Problems
1. The hinge-side door jamb moved slightly toward the latch-side, wracking the door frame slightly out of square and binding the door at the top latch side and the bottom hinge side.
a. Drive long screws through the top hinge or the upper part of the hinge jamb.
b. Or, loosen the bottom hinge and the middle hinge if necessary. Install cardboard or plastic shims behind the hinges that move the door up and away from the bottom hinge side jamb and toward the bottom latch side.
2. The building has settled near the door.
a. Cut, plane, or sand the door so it closes without rubbing or binding against its jambs.
b. Use a jack to level the floor if practical — the building has a basement, for example. Devise a way to support the floor in its newly adjusted position.
3. Temperature and humidity changes swell and shrink the door seasonally. Or, the door is permanently swollen.
a. If the door swells and shrinks, wait until it shrinks and apply oil-based paint or urethane varnish to seal the door and prevent future swelling.
b. If the door is permanently swollen, plane and/or sand the door. Or if there is room between the jambs and framing, try to move the jambs outward slightly after removing the casing on one side.
4. Paint has built up and reduced the door’s operating gap.
a. Plane or sand off the excess paint. Planing and sanding are a last resort, so try the previous suggestions first.

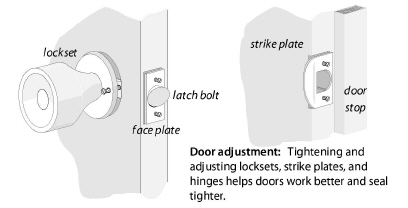
8.6.3 Adjusting Door Stops and Latches
Tighten loose door knobs, face plates, and strike plates before concluding that there is a problem with the stops or latches.These steps should precede weatherstripping.
Problems with the Door Stop
There are two different types of door stops: the nailed-on type and the integral type. You can move the nailed-on type
If a door won’t latch, inspect the door stops, door jambs, hinges, and weatherstripping to see if they’re causing the binding.
✓ If the door is warped and doesn’t fit well against its stops, adjust the stops by moving them against the door if they are nailed-on stops.
✓ If the stops are integral to the door jambs, plane them so door closes snugly against its stops.
Problems with the Latch
The strike plate is mortised into the latch side of the door frame The latch bolt seats into a hole in the strike plate and the door jamb under it. Often the latch bolt doesn’t seat because of problems with the hinges or the jambs as discussed earlier.
If there’s no obvious problem with the stops, hinges, weatherstrip, mark the strike plate to evaluate how far you have to move it. Put lipstick or crayon wax on the latch and close the door and then notice the mark on the strike plate. Move the strike plate or use a rotary file to remove some metal from the strike plate, enough to allow the latch bolt to seat itself.
✓ Remove the two screws from the strike plate.
✓ Move the strike plate enough to seat the latch bolt. Use toothpicks to fill existing screw holes.
✓ Consider driving slightly longer screws, if you have to move the strike plate.
✓ Install weatherstrip only on doors that operate properly as described previously.
✓ Consider how much the weatherstrip narrows the width of the door, when weatherstripping a door with a lot of traffic.
✓ Ask the customer whether they want to locate a foot-wiping rug on the floor, adjacent to the door. Make sure that the threshold is high enough to accommodate the rug.
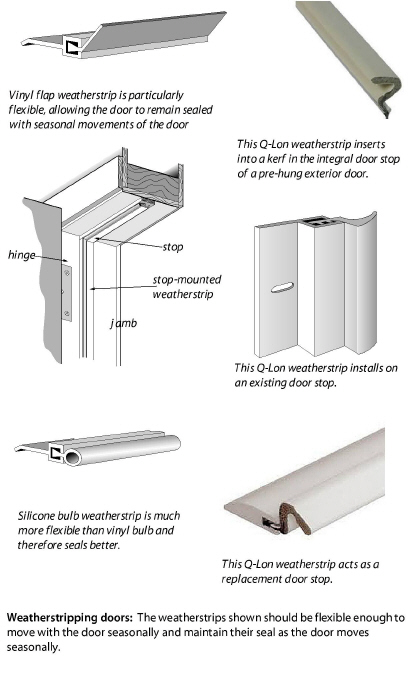
Weatherstrip Specifications
✓ When possible, consider replacing the existing nailed-on door stop with a door stop that includes the weatherstrip to avoid reducing the existing width of the door.
✓ Select a durable and flexible weatherstrip to seal the door’s side jambs and head jamb.
✓ Seal the threshold and bottom corners of the door with caulk and/or gaskets.
Installing Weatherstrip
Consider these suggestions when weatherstripping doors.
✓ Seal the back of the weatherstrip to prevent air from leaking behind the weatherstrip.
✓ Install thresholds and door sweeps, if needed to prevent air leakage at the door bottom. These air seals shouldn’t bind the door. Caulk underneath and on both sides of the door seal.
✓ Install corner seals to close the gaps at the bottom corners of the door jambs.
✓ Seal gaps between the stop and jamb with caulk.
✓ Install a door sweep if you don’t install a door bottom.
✓ The door must operate smoothly after you weatherstrip it.

Sometimes you can replace an exterior door for less labor compared to repair and readjustment. The labor just to replace the threshold on an existing pre-hung door is itself very challenging.
Install flashing around doorways according to the specifications in“Installing Replacement Windows” on page 254.
You can replace an exterior door, as an efficiency measure, if you can justify the cost under program rules. Use RRP methods to ensure occupants and workers aren’t exposed to lead dust during door replacement. See "Lead-Safe Procedures" on page 48.
8.7.1 Replacement Door Standards
Observe the following standards when replacing exterior doors.
✓ Select an exterior-grade insulated door-blank or a pre-hung insulated door, preferably without glazing.
✓ Choose a foam-insulated door with a U-factor of less than 0.17 (R-value of 6 or greater).
✓ Size the door assembly, including the door frame and threshold to be 1½–2 inches narrower and at least ¾ inch shorter than the rough opening.
✓ The replacement door must have three hinges and a threshold.
✓ If your selected door has glazing, specify an appropriate U-factor and solar heat-gain coefficient appropriate for the climate.
✓ Use sealants compatible with fire-rated assemblies to seal door casing, jambs, and thresholds when you replace fire-rated doors in fire-rated assemblies.
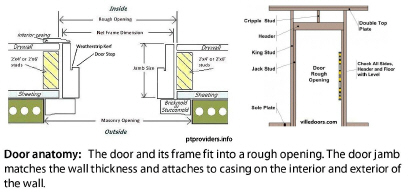
8.7.2 Replacement Door Installation
Follow these steps to install a pre-hung replacement door.
1. Remove the existing door casing, the door, and its frame.
2. Remove the old threshold and check the floor underneath the door for level. Check the rough opening for square with a framing square or by measuring the diagonals.
3. Level the floor across the door width and make sure it aligns with the nearby floor.
4. Make sure that the door will clear the existing floor with extra room for a foot-wiping rug, if appropriate. This may require the floor, directly under the threshold, to be a little higher than the existing interior floor.
5. Prepare the door’s rough opening thoroughly to create a continuous air barrier and water barrier using the air sealing and water sealing procedures specified in “Window Replacement Specifications” on page 252.
6. If the door frame has no exterior casing, fasten two pieces of 1-inch lumber 4 inches longer than the frame is wide horizontally to the door jambs across the new door frame. These are temporary braces to hold the door flush with the interior or exterior finish wall material while you fasten the door to the jambs.
7. Install a bead or caulk on the floor where the exterior edge or the threshold will sit.
8. Place the door in the opening and level the hinge side using three sets of 2 opposing wedges behind each hinge.
9. Drive one or more long screws through the top hinge, jamb, and wedges into the framing lumber. Then fasten through the hinge-side jamb and wedges near the other two hinges.
10. Check the frame for square with a framing square or by measuring the door frame’s diagonals. Move the frame slightly if necessary to make it square.
11. Install wedges and screws at the strike plate and then at the top and bottom of the lock side of the door frame.
12. Read the directions and adjust the new threshold for proper fit against the new door’s weatherstripped bottom.
13. Install interior casing and exterior casing if the door didn’t come equipped with casing.
|
Field Guide Topic |
SWS Detail |
|---|---|
|
3.0201.2 Window Sash Replacement |
|