Leaks in air barriers cause energy and moisture problems in many homes. Air-barrier leak-testing avoids unnecessary visual inspection and unnecessary air sealing in hard-to-reach areas.
Advanced pressure tests measure pressure differences between zones in order to estimate air leakage between zones. Use these tests to make decisions about where to direct your air-sealing efforts, for example.
• Evaluate the airtightness of portions of a building’s air barrier, especially floors and ceilings.
• Decide which of two possible air barriers to air seal — for example, the floor versus foundation walls.
• Determine whether building cavities like porch roofs, floor cavities, and overhangs are conduits for air leakage.
• Determine whether building cavities, intermediate zones, and ducts are connected together through air leaks.
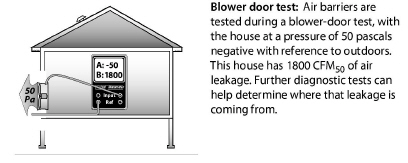
• Estimate the air leakage in CFM50 through a particular air barrier, for the purpose of estimating the effort and cost necessary to seal the leaks.

Air-Barrier Test Results
Air-barrier tests provide a range of information from simple clues about which parts of a building leak the most, to specific estimates of the airflow and hole size through a particular air barrier.
The next table shows examples of how common building materials perform as air barriers. This information is helpful in interpreting blower door tests and selecting air-sealing materials.
12.3.1 Primary Versus Secondary Air Barriers
A home’s air barrier should be a material that is continuous, sealed at the seams, and impermeable to airflow. Where there are two possible air barriers, in an attic for example, the most airtight barrier is the primary air barrier and the least airtight is the secondary air barrier.
The primary air barrier should be adjacent to the insulation to ensure the insulation’s effectiveness. We use pressure-diagnostic testing to verify that the insulation and the primary air barrier are together. Sometimes we’re surprised during testing to find that our assumed primary air barrier is actually secondary, and the secondary air barrier is primary.
Intermediate zones are unconditioned spaces that are sheltered within the exterior shell of the house. Intermediate zones can be located inside or outside the home’s primary air barrier. Intermediate zones include: unheated basements, crawl spaces, attics, enclosed porches, and attached garages.
Intermediate zones have two potential air barriers: one between the zone and house and one between the zone and outdoors. For example, an attic or roof space has two air barriers: the ceiling and roof. You should know which air barrier is the tightest.
Blower door tests give us valuable information about the relative leakiness of rooms or sections of the home. Listed below are five simple methods.
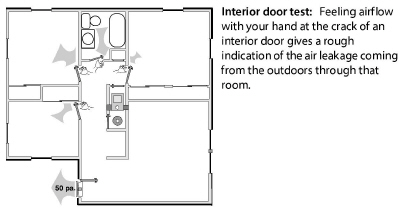
1. Feeling zone air leakage: Close an interior door partially so that there is a one-inch gap between the door and door jamb. Feel the airflow along the length of that crack, and compare that airflow intensity with airflow from other rooms, using this same technique.
2. Observing the ceiling/attic floor: Pressurize the home and observe the top-floor ceiling from the attic with a good flashlight. Air leaks will show in movement of loose-fill insulation, blowing dust, moving cobwebs, etc. You can also use a small piece of tissue paper to disclose air movement.
3. Observing smoke movement: Pressurize the home and observe the movement of smoke through the house and out of its air leaks.
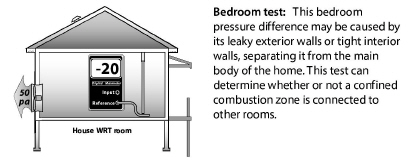
4. Room pressure difference: Check the pressure difference between a closed room or zone and the main body of a home. Larger pressure differences indicate larger potential air leakage within the closed room or else a tight air barrier between the room and main body. A small pressure difference means little leakage to the outdoors through the room or a leaky air barrier between the house and room.
5. Room airflow difference: Measure the house CFM50 with all interior doors open. Close the door to a single room, and note the difference in the CFM50 reading. The difference is the approximate leakage through that room’s air barrier.
Tests 1, 2, and 3 present good customer education opportunities. Feeling airflow or observing smoke are simple observations, but have helped identify many air leaks that could otherwise have remained hidden.
When airflow within the home is restricted by closing a door, as in tests 4 and 5, it may take alternative indoor paths that render these tests somewhat misleading. Only practice and experience can guide your decisions about the applicability and usefulness of these general indicators.
12.3.3 Simple Zone Pressure Testing
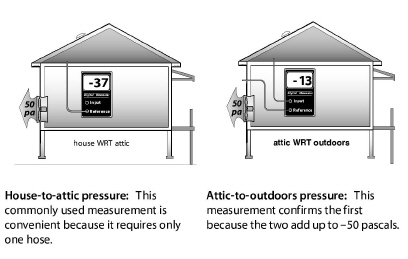
Manometers aren’t limited to finding indoor WRT outdoor differences. They can also measure pressure differences between the house and its intermediate zones during blower-door tests. The purpose of these tests is to evaluate the air-tightness of the home’s interior air barriers.
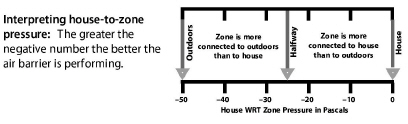
The blower door, when used to create a house-to-outdoors pressure of –50 pascals, also creates house-to-zone pressures of between 0 and –50 pascals in the home’s intermediate zones. The amount of depressurization depends on the relative leakiness of the zone’s two air barriers.
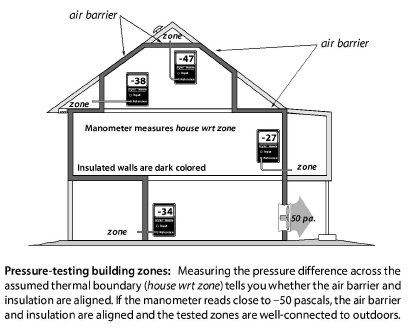
For example, in an attic with a fairly airtight ceiling and a well-ventilated roof, the attic will indicate that it is mostly outdoors by having a house-to-zone pressure of –45 to –50 pascals. The leakier the ceiling and the tighter the roof, the smaller that the negative house-to-zone pressure will be. This holds true for other intermediate zones like crawl spaces, attached garages, and unheated basements.
Depressurize house to –50 pascals with a blower door.
1. Find an existing hole, or drill a hole through the floor, wall, or ceiling between the conditioned space and the intermediate zone.
2. Connect the reference port of a digital manometer to a hose reaching into the zone.
3. Leave the input port of the digital manometer open to the indoors.
4. Read the negative pressure given by the manometer. This is the house-to-zone pressure, which will be –50 pascals if the air barrier between house and zone is airtight and the zone itself is well-connected to outdoors.
5. If the reading is significantly less negative than –45 pascals, find the air barrier’s largest leaks and seal them.
6. Repeat steps 1 through 5, performing more air-sealing as necessary, until the pressure is as close to –50 pascals as possible.
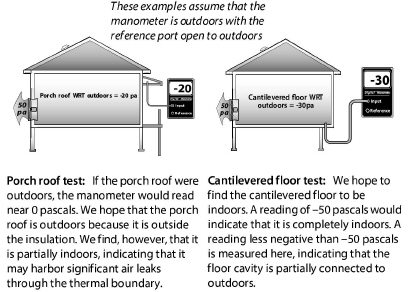
Leak-Testing Building Cavities
Building cavities such as wall cavities, floor cavities between stories, and dropped soffits in kitchens and bathrooms can also be tested as described above to determine their connection to the outdoors as shown here.
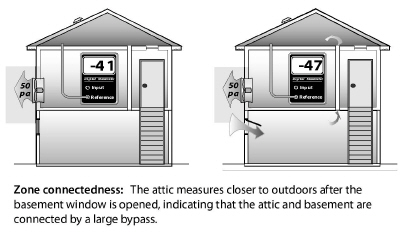
Testing Zone Connectedness
Sometimes it’s useful to determine whether two zones are connected by a large air leak. Measuring the house-to-zone pressure during a blower door test, before and then after opening the other zone to the outdoors, can establish whether the two zones are connected by a large air leak. You can also open an interior door to one of the zones and check for pressure changes in the other zone.
Leak-Testing Building Cavities
You can also test building cavities such as wall cavities, floor cavities between stories, and dropped soffits in kitchens and bathrooms with a digital manometer to evaluate their possible connection to the outdoors by way of air leaks.
12.3.4 Locating the Thermal Boundary
When retrofitting, you need to decide where to air-seal and where to insulate. Zone pressures are one of several factors used to determine where the thermal boundary should be.
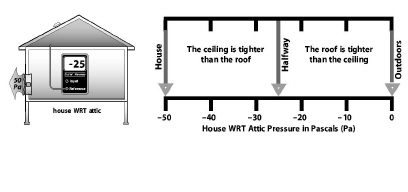
For zone leak-testing, the house-to-zone pressure is often used to determine which of two air barriers is tighter.
• Readings of negative 25-to-50 pascals house-to-attic pressure mean that the ceiling is tighter than the roof. If the roof is almost completely airtight, achieving a 50-pascal house-to-attic pressure difference may be difficult. However if the roof is well-ventilated, achieving a near-50-pascal difference should be possible.
• Readings of negative 0-to-25 pascals house-to-attic pressure mean that the roof is tighter than the ceiling. If the roof is well-ventilated, the ceiling has even more leakage area than the roof’s vent area.
• Readings around –25 pascals house-to-attic pressure indicate that the roof and ceiling are equally airtight or leaky.
Pressure readings more negative than –45 pascals indicate that the ceiling (typical primary air barrier) is adequately airtight. Less negative pressure readings indicate that air leaks should be located and sealed.
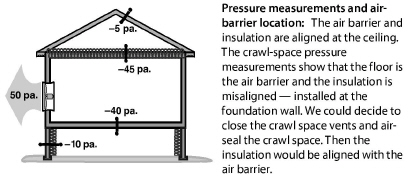
Floor Versus Crawl Space
The floor shown here is tighter than the crawl-space foundation walls. If the crawl-space foundation walls are insulated, holes and vents in the foundation wall should be sealed until the pressure difference between the crawl space and outside is as negative you can make it — ideally more negative than –45 pascals. A leaky foundation wall renders its insulation nearly worthless.
If the floor above the crawl space were insulated instead of the foundation walls in the above example, the air barrier and the insulation would be aligned.
If a floor is already insulated, it makes sense to establish the air barrier there. If the foundation wall is more airtight than the floor, that would be one reason to insulate the foundation wall.
Attic Boundary
Generally, the thermal boundary (air barrier and insulation) should be between the conditioned space and attic. An exception would be insulating the roof to enclose an attic air handler and its ducts within the thermal boundary.
The air barrier should always be between the conditioned space and a tuck-under or attached garage, to separate the living spaces from this unconditioned and often polluted zone.
Duct Location
The location of ducts either within or outside the thermal boundary is an important factor in determining the cost-effectiveness of duct-sealing and insulation. Including the heating ducts within the thermal boundary is preferred because it reduces energy waste from both duct leakage and duct heat transmission.