4.1 Air-Sealing Attics and Roofs
Air sealing attics and roofs may be the most important and cost effective weatherization measure and one of the most challenging. The attic or roof is a prominent location for air-leakage and moisture damage. Building fires tend to spread through large air leaks in the attic. Air-sealing can prevent these problems.
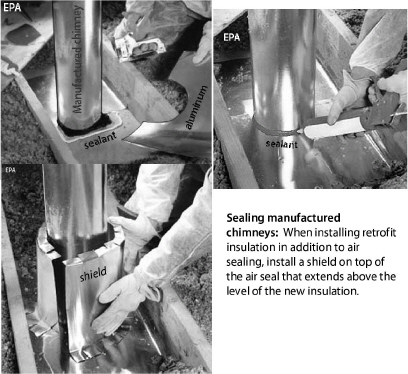
4.1.1 Sealing around Manufactured Chimneys
Several types of manufactured chimneys are common in residential buildings. We explain these in “Manufactured Chimneys” on page 283. Observe the required clearances listed in “Clearances to Combustibles for Common Chimneys” on page 283. Install the chimney’s air seal with an insulation shield if you’ll retrofit insulation after air sealing.
ü Remove existing insulation from around the manufactured chimney.
ü Cut light gauge aluminum or galvanized steel in two pieces with half-circle holes for the chimney that create small caulk-able cracks.
ü Bed the metal in sealant and staple, nail, or screw the metal in place.
ü Caulk around the junction of the chimney and the metal air seal with non-combustible caulk labeled ASTM E136.
ü Cut and assemble a metal insulation shield that creates a 3-inch space between the shield and chimney and extends above the planned level of the retrofit insulation.
ü Move the existing insulation that you removed back into place around the insulation shield before installing the retrofit insulation.
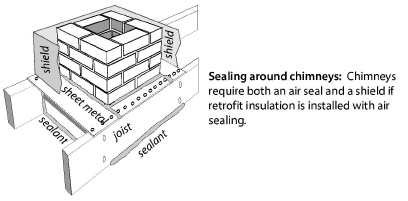
4.1.2 Sealing around Fireplaces and Chimneys
Leaks around fireplace chimneys are often severe air leaks. Use this procedure to seal air leaks through the chimney chase.
ü Cut sheet metal to fit the gap that borders the chimney with overlaps connecting to nearby attic framing lumber.
ü Bed the sheet metal air seal in sealant, and then fasten the sheet metal to the attic framing with staples, nails, or screws.
ü Seal the metal patch to chimney or flue with a non-combustible sealant labeled ASTM E136.
ü Seal other gaps between the attic and the chimney chase.
ü For large chimney chases, cover the chase opening with structural material such as plywood. Maintain clearances between the structural seal and the metal or masonry chimney as listed in “Clearances to Combustibles for Common Chimneys” on page 283.
4.1.3 Air Sealing Recessed Lights
|
SWS Details: 3.1003.5 Dropped Ceiling with Light Boxes and Fixtures, 3.1003.6 Dropped Soffits, 4.1001.1 Non-Insulation Contact (IC) Recessed Light |
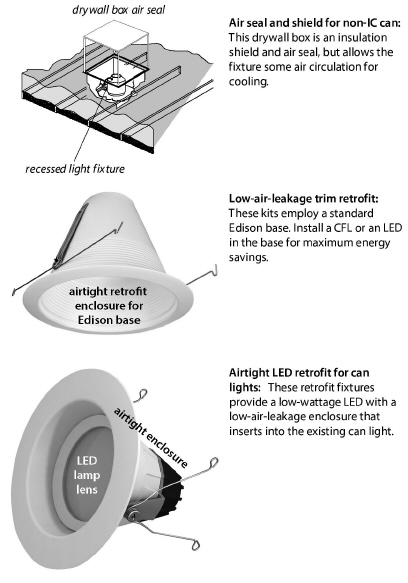
The most common type of recessed light fixture is the round can. However all recessed light fixtures are potential air leaks and air-leakage conduits. Many recessed light fixtures have safety switches that turn them off at around 150° F. Too much insulation covering the fixture or foam insulation could cause the safety switch to cycle.
There are three kinds of recessed can lights found in buildings. (IC means insulation contact. AT means airtight.)
1. Older cans that aren’t rated for contact with insulation, known as non-IC-rated cans.
2. IC-rated cans that may be covered with fibrous insulation but not foam insulation.
3. ICAT-rated cans that are airtight in addition to being rated for insulation contact.
Consider the following options for reducing air leakage through recessed can lights.
• Build a drywall box over the fixture leaving at least 3 inches clearance from insulation on all sides and to the lid of the enclosure. Seal the airtight box to surrounding materials with foam to form an airtight assembly.
• Install an airtight trim assembly in the existing can that will greatly reduce the can’s air leakage. Install a compact fluorescent or LED light as a replacement for the hot inefficient incandescent bulb.
• Install an airtight LED-retrofit assembly in the existing can. This option assures that the light is energy-efficient and low heat because you can replace an incandescent bulb with an LED.
• Replace the recessed fixture with a new one, designed to be airtight and carefully seal around the airtight fixture.
Recessed light fixtures should contain 60-watt bulbs or less. Compact fluorescent lamps (CFLs) or LED lamps are preferred for recessed light fixtures because CFLs and LEDs operate cooler than incandescent lamps.
Caution: Don’t cover IC-rated or airtight IC-rated fixtures with spray foam insulation. The foam’s high R-value and continuous contact could overheat the fixture.
See also "Safety Preparations for Attic Insulation" on page 122.
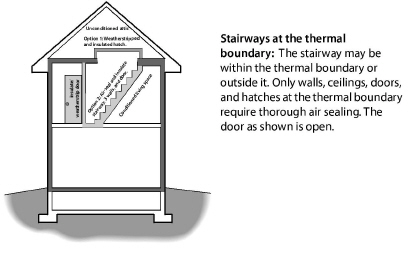
4.1.4 Sealing Stairways to Unconditioned Attics
|
SWS Details: 3.1002.1 Interior with Sloped Ceiling, 3.1002.2 Stairwell to Attic—Door at Bottom with No Ceiling Above, 3.1002.3 Stairwell to Attic—Door at Top with Finished Ceiling Above |
There are a variety of stairways and hatchways that provide access from the building to an unconditioned attic.
The following components of these stairways may need air sealing and insulation depending on whether they are at the thermal boundary.
• The risers and treads of the stairways
• The surrounding triangular walls
• Vertical or horizontal doors or hatches
• The framing and sheeting surrounding the doors or hatches
• Sloping ceilings above the stairways
Consider the following air-sealing measures.
ü Study the geometry of the stairway and decide where to establish the air barrier and install the insulation.
ü Weatherstrip around doors and hatches if the door or hatch is at the thermal boundary.
ü Seal the walls, stair-stringer space, and ceiling if they are at the thermal boundary.
ü Seal gaps between the door frame and the framing with one-part foam, two-part foam, or caulking.
ü If attic insulation is or will be above the level of the attic-access hole, build a dam that extends above the top of the floor joists around attic access hatch. Make the dam strong enough to support the weight of anyone entering the attic. Air seal this dam to the surrounding structure of the attic access hatch.
ü With existing insulation dams, clear existing fibrous insulation from around dam around the hatch framing. Spray two-part foam around the perimeter to reduce heat loss through the hatch framing.
See also "Walk-Up Stairways and Doors" on page 144.
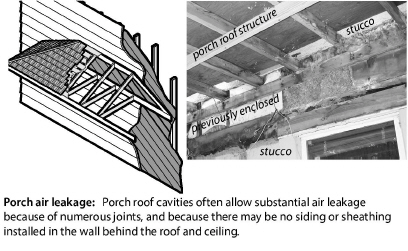
4.1.5 Sealing Porch Roof Structures
Porch roofs on older homes were often built at the framing stage or before the water resistive barrier (WRB) and siding were installed. The porch’s roof sheathing, roofing, and tongue-and-groove ceiling aren’t air barriers. The loosely fitting wall sheathing or unsheathed wall allows air into the wall cavities where it migrates into the conditioned space or convects heat into or out of the building.
Consider these options for air sealing leakage through a porch roof.
• Remove part of the porch ceiling and install a rigid air barrier or cover the area with closed-cell spray foam.
• Dense-pack the porch-roof cavity to reduce the airflow through the porch roof and wall cavities.
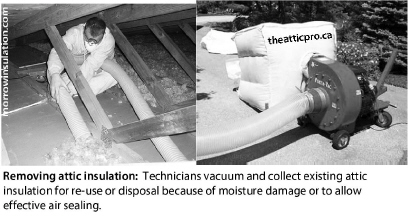
4.1.6 Removing Insulation for Attic Air Sealing
Attic air sealing is essential for successful air sealing jobs. Removing insulation from an attic for the purpose of air sealing may be worth the cost and effort. Batts and blankets can be rolled up, moved out of the way, and re-used. Loose fill insulation can be vacuumed with commercial vacuum machines available from the same suppliers that sell insulation-blowing machines. Many insulation companies own large vacuums for loose-fill insulation.
4.1.7 Sealing Joist Cavities Under Knee Walls
|
SWS Detail: 4.1004.1 Preparation for Dense Packing, 4.1004.2 Preparation for Batt Insulation |
Floor joist cavities beneath knee walls allow air from a ventilated attic space to enter the floor cavity between stories. This is a problem of homes with a finished attic, also known as story-and-a-half homes.
Connect the knee wall with the ceiling of the space below by creating a rigid seal under the knee wall. Use a combination of rigid foam with one-part or two-part foam sealing the perimeter. Or, use fiberglass batt with spray two-part foam as a strong airtight seal covering over the fiberglass batt.
4.1.8 Sealing Kitchen or Bathroom Interior Soffits
|
SWS Detail: 3.1001.1 Penetrations and Chases, 3.1001.2 Chase Capping, 3.1003.6 Dropped Soffits |
Many modern homes have soffits above kitchen cabinets and in bathrooms. Large rectangular passages link the attic with the soffit cavity. At best, the air convects heat into or out of the conditioned space. At worst, attic air infiltrates the conditioned space through openings in the soffit or associated framing.
ü Seal the soffit with plywood or drywall, bedded in sealant and fastened to ceiling joists and soffit framing with screws, nails or staples.
ü Seal the patch’s perimeter thoroughly with two-part foam or caulking.

4.1.9 Sealing Two-Level Attics
|
SWS Detail: 3.1001.3 Walls Open to Attic—Balloon Framing and Double Walls |
Split-level and tri-level homes have a particular air leakage problem related to the walls and stairways dividing the homes’ levels.
ü Seal wall cavities below the ceiling joists from the attic with a rigid material fastened to studs and wall material.
ü Or insert folded fiberglass batt into the wall cavity and spray with at least one inch of two-part foam to create a rigid air seal.
ü Dense-pack the transitional wall or insulate it with fiberglass batts. Either way install an air barrier on the attic side of the wall.
ü Seal all penetrations between both attics and conditioned areas.

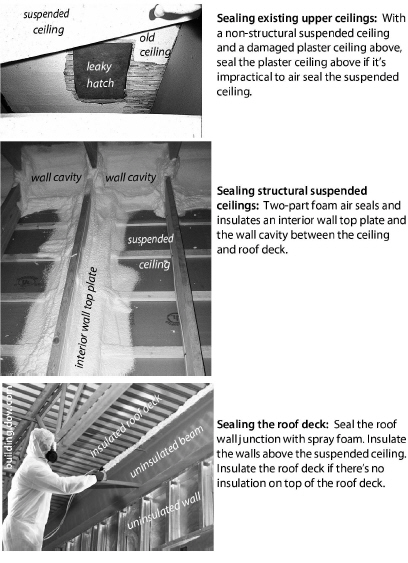
4.1.10 Sealing Suspended Ceilings
Suspended ceilings are seldom airtight, especially the T-bar variety. T-bar ceilings and other non-structural suspended ceilings may not be a practical location to establish an air barrier.
• The ceiling was installed room by room.
• The amount of spray foam necessary to seal the joints may be too heavy for the non-structural suspended ceiling to support.
• Technicians may need access to the crawl space above the suspended ceiling in multiple locations to work on utilities installed above the ceiling.
Take down some panels of a suspended ceiling to inspect the suspended ceiling or gain access from above. Consider these options for air-sealing non-structural suspended ceilings.
• The plaster ceiling above a non-structural suspended ceiling is weak and failing. If you install insulation on top of existing insulation above the failing ceiling, make the old ceiling the air barrier. Reinforce the existing plaster with screws and plaster washers. Screw drywall over areas of missing plaster. Seal the ceiling’s joints and perimeter with spray foam or other sealant.
• An insulated roof deck above a non-structural suspended ceiling may be the only practical place to establish an air barrier. The perimeter walls and the wall-roof junction may be leaky and uninsulated. Insulate and air seal the perimeter walls above the suspended ceiling if necessary to complete the insulation and air barrier at the thermal boundary.
Ceilings suspended using lumber or steel studs, on the other hand, may be structural enough to walk on.
• The suspended ceiling is strong enough to walk on its structure. Seal the ceiling joints, penetrations, and perimeter with spray foam or other sealant. Insulate the walls between the suspended ceiling and upper ceiling. Either insulate above the suspended ceiling or above the upper ceiling.