
Baseload energy consumption accounts for a large part of home energy use. This chapter discusses energy savings for refrigeration, entertainment, lighting, laundry, and water heating.
|
Indicator |
Low |
Medium |
High |
|---|---|---|---|
|
kWh per Year |
<4500 |
4500–8500 |
>8500 |
|
kWh per Month |
<375 |
375–700 |
>700 |
|
kWh per Day |
<12 |
12–23 |
>23 |
|
kWh per Person (Annual) |
<1900 |
1900–3500 |
>3500 |
|
Doesn’t include heating, cooling, or water heating. Assumes 2.4 persons per household and average annual consumption of 6500 kWh per household. |
|||
10.1 Refrigerator Replacement and Maintenance
Refrigerators built after 1993 use less electricity than refrigerators built before that year. Another efficiency increase occurred in 1999 in the refrigerator industry.
10.1.1 Refrigerator Replacement
Refrigerator replacement is an allowable DOE and LIHEAP cost. Indiana requires comprehensive metering of the existing unit, and a NEAT or MHEA audit must be performed. Comply with the following requirements when replacing refrigerators.
ü The new refrigerator must fit the existing space.
ü The new refrigerator must be 40% more efficient than the minimum federal standards or be labeled Energy Star.
ü The new refrigerator must have a minimum one-year warranty.
ü Take refrigerators that are replaced to a facility that is licensed to reclaim their refrigerant and recycle the refrigerator’s parts.
ü No refrigerator, taken out of service, may be returned to service by sale, barter, or for free.
ü Instruct the client about location and operation of energy controls such as the thermostats for the refrigerator and freezer.
Some clients use two or more refrigerators in their homes, and this practice results in high electricity usage. Suggest to these clients to consolidate food storage into a large single refrigerator.

10.1.2 Refrigerator Cleaning and Tuning
|
SWS Detail: 7.8001.2 Cleaning and Tuning Existing Refrigerators and Freezers |
Cleaning and tuning an existing refrigerator can increase its efficiency. Follow these procedures.
ü Clean dirt off clogged coils.
ü Move objects that block airflow around the refrigerator, and ask the client to store the objects elsewhere.
ü Measure refrigerator temperature and verify that it is between 35° and 40° F. Otherwise re-set the thermostat to this temperature range.
ü Measure the freezer temperature, and verify that it is more than or equal to 0° F. If it is colder that 0°, re-set the freezer’s thermostat to 0° F.
ü Check the condensation-control switch. If the condensation control is on, the refrigerator door or door frame is being heated. Try turning the switch to “energy saver” which turns the heating elements off. If frost forms on the door, turn the control back on.
ü Explain the function of the condensation control to clients. If the energy-saver setting isn’t adequate for very humid weather, the occupants could toggle setting.

10.1.3 Refrigerator Metering Protocol
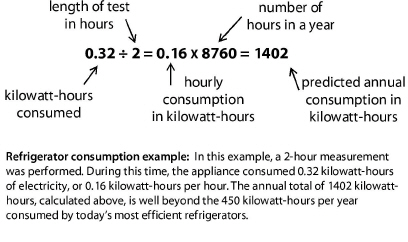
Older refrigerators use from 1000 to 2000 kWh per year. Newer Energy Star refrigerators use less than 400 kWh per year. You need a minimum of two hours to accurately measure refrigerator energy consumption using a recording watt-hour meter.
There are three (3) common options for evaluating refrigerator energy consumption for replacement.
1. The first option is to follow the metering procedure presented here.
2. If metering isn’t practical, use the database housed in the Weatherization Assistant (WA) Software.
3. If the refrigerator doesn’t work find another source of usage information such as The Refrigerator and Freezer Energy Rating Database.
Metering Accuracy Issues
A number of unusual circumstances could reduce the accuracy of the metering, including the following.
• A quantity of warm food recently placed in the refrigerator.
• Abnormally high or low ambient temperature. For example: refrigerators in garages during the summer or winter; or refrigerators in vacant homes where heating or cooling systems aren’t operating.
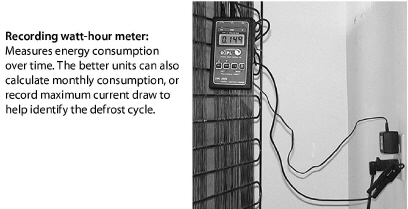
Refrigerator Metering Procedure
1. Connect the refrigerator to a recording watt-hour meter. Run the test for at least two hours. You don’t need to stop at two hours, and a longer measurement is better. During the test, avoid opening the refrigerator, or do so briefly.
2. At the end of the test, read the kilowatt/hours of consumption measured by the meter. Divide this number by the number of hours in the test. This gives you the number of kilowatt-hours consumed each hour. Multiply this number times the total number of hours in a year (8760 hours per year). The product of this calculation is the annual kilowatt-hours of electrical usage.
3. Remove the meter and plug the refrigerator back into its outlet.
|
kWh/hour |
kWh/year |
kWh/hour |
kWh/year |
|---|---|---|---|
|
0.23 |
2000 |
0.16 |
1400 |
|
0.22 |
1900 |
0.15 |
1300 |
|
0.21 |
1800 |
0.14 |
1200 |
|
0.19 |
1700 |
0.13 |
1100 |
|
0.18 |
1600 |
0.11 |
1000 |
|
0.17 |
1500 |
0.10 |
900 |
10.2 Electronic Entertainment and Computers
|
SWS Detail: 7.8002.1 Entertainment and Computer Systems and Components Replacement |
The purpose of this section is to help clients conserve electricity and identify major electricity users among their computer and entertainment systems. Use this section as part of your client education.
ü Advise clients to buy equipment labeled Energy Star.
ü Advise clients to buy electronic equipment that doesn’t need to be left on when not being used.
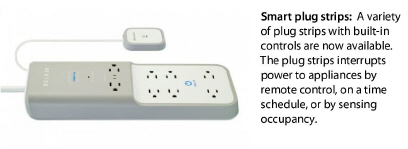
ü Recommend power strips that can be turned off when electronic equipment is not being used.
ü Standby losses for electronic equipment should be one watt or less.
ü Typical Set-top boxes consume between 30 and 50 W even when they’re switched off. Most energy efficient models still consume more than 10 W when they’re off.
ü Read the operating manual and enable all energy-saving features of an appliance. Explain the energy-saving features to the client.
ü Verify that clients have operating instructions for their electronic equipment or that they know how to access instructions using the Internet.
ü Recycle or dispose of equipment using principles of the Environmental Protection Agency (EPA) Responsible Recycling (R2) Initiative.
10.3 Lighting-Efficiency Improvements
Lighting-efficiency improvements include bulb (lamp) replacement, daylighting, fixture replacement, and energy-efficient lighting controls.
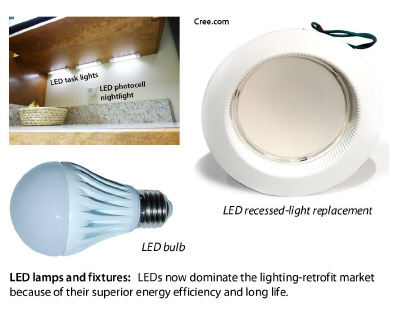
CFLs were the dominant energy-saving alternative to incandescent for at least 20 years. Now, LEDs have largely captured the lighting-retrofit market because of their superior energy efficiency, long life and low cost.
Indiana is approved to use LEDs by DOE, and CFLs should no longer be installed.
Some clients are sensitive to light color. Manufacturers design and label commercial lamps with a color temperature (°K), depending on their “coolness” or “warmness.” People perceive colors at the blue-green end of the color spectrum as cool and those at the color spectrum’s red end as warm. Morning sunlight from the north is a cool blue-green and from southwest evening sunlight is a warm red-yellow.
Office workers perform better under cool light sources for visual tasks, since cool light produces better illumination and contrast at the printed page, workbench, or other task. People often prefer warm light sources for living spaces, because warm light seems to many to illuminate people’s skin and clothing in a flattering way.
Light color is a complex topic of color measurement by degrees Kelvin (°K) through a range of 1000°K (very warm) to 10,000°K (very cool). Light bulbs in the 2000-3000*K range are typically best suited for living areas in the home and emit a warm, yellow-white color. Light bulbs in the 3100-4500*K range emit a neutral, white light. This range is best suited to area where bright light is desired. Light bulbs in the 4600-6500*K emit a “daylight” type of light. These bulbs are a great choice for task lighting and for outdoor security lighting. The full discussion of this range of options is more relevant for commercial and industrial buildings than residential buildings. That discussion goes beyond the scope of this field guide.
Use daylighting as appropriate to save electricity.
ü Replace, adjust, or repair window coverings to maximize useful daylight where appropriate.
ü Design and use active and passive day lighting where appropriate.
10.3.4 Home Lighting Retrofit Equipment
Consider The following specifications when retrofitting lighting equipment.
ü Ask the client about their lighting usage, and explain the electrical savings potential for switching to light-emitting diodes (LEDs).
ü Demonstrate a LED bulb to the client if they’re hesitant about replacing their incandescent light bulbs.
ü Select the type of LED and its wattage, according to its use and the client’s accustomed light level.
ü Consider the color temperature of the LED — warm versus cool.
ü Turn on each LED after installation to ensure that it operates. Make sure that the client is satisfied with the light level.
ü Replace a halogen-torchiere lamp holder with an LED conversion kit for the torchiere.
ü Replace incandescent bulbs in candelabra fixtures with LEDs designed for this purpose.
ü Install bulbs, fixtures, and controls designed for their intended application (for example: enclosed, dimmable, indoor, outdoor).
ü Select bulbs, fixtures, and controls to provide the brightness and light quality required in that application (for example: task lighting, walkway lighting, night lights).
ü All bulbs, fixtures, and controls must be Energy Star® rated where applicable.
ü Bulb wattage must not exceed rated wattage of the light fixture.
ü Select bulb replacements based on expected life span, light quality, and lifetime energy use.
ü Install occupancy sensing controls where appropriate.
ü All bulbs, fixtures, and controls will be UL-approved and installed according to local code(s) and NFPA 70 National Electric Code.
ü Consider upgrading outdoor security lights bulbs if they are frequently utilized.
ü Inform clients about proper recycling of fluorescent bulbs by stores, municipal waste departments, or other recycling organizations.
ü Replace fluorescent light ballasts containing polychlorinated biphenyls (PCBs) according to the EPA’s Healthy Indoor Environment Protocols for Home Energy Upgrades.
ü Replace outdoor bulbs that are on a dawn to dusk timer if the bulbs have not been upgraded to energy efficient bulbs.
10.3.5 Reducing Fixture Wattage in Over-Lit Areas
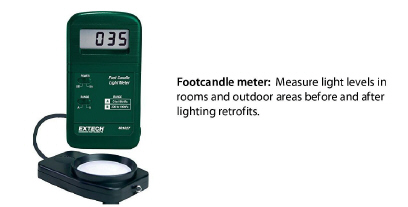
Many rooms and common areas of multifamily buildings are unnecessarily over-lit. Areas that, by reasonable standards, require between 2 and 15 footcandles sometimes measure 20 to 60 footcandles. Measure light levels before and after lighting retrofits. Occupants very seldom notice light-level reductions unless they know it happened.
• Clean lenses and fixtures as part of the retrofit.
• Consider replacing incandescent and CFL bulbs with LEDs of a reduced lumen output.
• Retrofit point-source fixtures in over-lit areas with the same bulb type of a lower wattage and reduced lumen output.
• Replace existing fixtures in intermittently occupied areas with fixtures equipped with integral occupancy sensors if available.
Multifamily Fluorescent Fixtures
Multifamily stairs, parking garages, hallways, and lobbies are some of the most over-let areas. Fluorescent fixtures light many of these areas. Consider these retrofits depending on the building’s budget and the cost of electricity.
• Clean lenses and fixtures as part of the retrofit.
• Replace T-12 lamps with T-8 lamps.
• Remove up to two tubes from 4-lamp fixtures or 1 lamp from a 2-lamp fixtures.
• Modernize existing magnetic-ballast fixtures to the Super T-8 standard.
• Replace fluorescent fixtures with LED fixtures with reduced lumen output.
|
Building Area |
Recommended Footcandles (FC) |
|---|---|
|
Corridors and stairways |
5-10 |
|
Kitchens and work areas |
25-50 |
|
Dining rooms and bedrooms |
10-20 |
|
Common bathrooms |
5-10 |
|
Parking garages |
1-2 |
|
Lobbies |
5-10 |
|
Outdoor walkways |
1-2 |
|
Outdoor building entrance |
2-5 |

10.4 Clothes Dryers Service and Venting
|
SWS Detail: 7.8004.2 Clothes Dryer Replacement, 6.6005.1 Clothes Dryer |
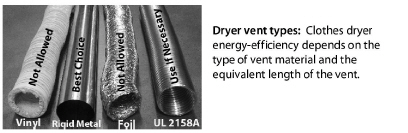
Clogged clothes-dryer vents are a leading cause of house fires. The drying time of a load of laundry depends first on the dryer installation. The original installation can also cause excessive drying time when flexible vents are excessively long, kinked, or restricted in some other way. The amount of lint in the dryer, vent piping, and vent termination also affects dryer safety and efficiency. Lint builds up over time and slows drying time and increases the fire hazard.
Vinyl flexible dryer vent isn’t an approved dryer vent material. To reduce energy cost and improve safety, replace vinyl flex duct with metal flexible dryer vent.
Service Procedures
As part of the client education process, recommend servicing clothes dryers to prevent fires, reduce drying time, save energy and reduce lint build-up. Unless the clients are capable, a service professional may be required to adequately clean lint from a dryer and vent.
Observe the following suggestions when servicing clothes dryers to prevent fires, reduce drying time, improve energy efficiency, and reduce lint build-up.
ü Unplug the clothes dryer before making any improvements.
ü Remove the vent pipe and vent termination and clean all lint out of them.
ü Clean lint out of the electric heating elements and the air-way around them.
ü Inspect the airway at the dryer’s vent connection, and clean the lint out of it.
Dryer Exhaust Venting Requirements
Follow these venting requirements for clothes dryers when servicing dryers.
ü Clean lint from the dryer and vent system when making modifications or improvements to the dryer vent system.
ü Dryer vents should be piped in 4-inch-diameter rigid aluminum or galvanized pipe whenever and wherever possible.
ü Don’t use screws or rivets to join rigid pipe sections because they collect lint. Join and seal the sections with silicone caulking.
ü Exhaust venting duct must be supported at maximum 4-foot intervals.
ü Use short, stretched pieces of flexible metal dryer vent, labeled UL 2158A, to connect the dryer to the rigid vent through difficult framing or to allow dryer to be moved in and out. Make connections using rigid fittings installed male-to-female in the direction of exhaust flow to prevent lint build-up.
ü Fasten UL listed foil-type vent or semi-rigid sheet metal with clamps.
ü Fasten other specialized duct fittings according to manufacturer’s specifications.
ü Seal duct connection with foil tape labeled UL 181B or 181B-M.
ü Insulate all dryer vents that run through unconditioned spaces to a minimum R-6.
ü Install a booster fan for dryer ducts exceeding 35 feet in duct equivalent length. When calculating duct length, add 5 feet for each 90º bend and 2.5 feet for each 45º bend.
ü Provide make-up air if you measure excessive depressurization or if the dryer moves 200 CFM or more.
ü Dryer terminations will not have a pest screen or other obstruction which could catch lint and hinder air flow.
10.5 Water-Heating Energy Savings
For safety information on combustion water heaters, see “Spillage and CO Testing” on page 260.
The most important tasks in evaluating hot water energy savings are determining the water heater’s insulation level, measuring the shower’s flow rate, and measuring the water temperature.
|
Number of Residents |
Annual kWh |
Annual Therms |
Gallons Per Day |
|---|---|---|---|
|
1 |
2700 |
180 |
25 |
|
2 |
3500 |
230 |
40 |
|
3 |
4900 |
320 |
50 |
|
4 |
5400 |
350 |
65 |
|
5 |
6300 |
410 |
75 |
|
6 |
7000 |
750 |
85 |
|
Author’s interpretation of data from single-family homes with existing water heaters from Energy Information Administration, Lawrence Berkeley Laboratory, Home Energy Magazine, and others. |
|||
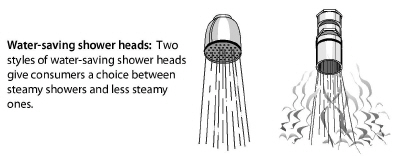
10.5.1 Water-Saving Shower Heads and Faucet Aerators
|
SWS Detail: 7.8101.1 Shower Head and Faucet Aerator; 7.8101.2 Low-Flow Retrofit Devices |
Most families use more hot water in the shower than for any other use. A low-flow shower head reduces this consumption.
ü Water-saving shower heads must be rated for a flow of 2.5 gallons per minute or less.
ü Water-saving aerators must be rated for a flow of 2.2 gallons per minute or less.
ü Measure flow if you are not certain of the flow of an existing fixture. It is not necessary to replace aerators or shower heads that currently meet the standards above.
ü Use caution in removing the existing shower head or aerator from old, fragile plumbing fixtures.
ü The shower or faucet flow rate must be satisfactory to the occupants and be documented.
ü Select features that meet any special needs of the occupant: swivel head, hand-held shower, for example.
ü Evaluate water quality for debris that may clog the shower head or aerator.
ü Use a non-hardening thread sealant when installing the device.
ü Check the fixtures after installation for adequate tightness to prevent leakage at the connection.
ü Recycle replaced shower heads and aerators.
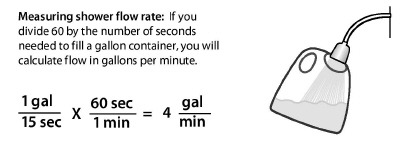
Measuring Shower or Faucet Flow Rate
You can determine flow rate by measuring the time needed to fill a one-gallon plastic container. If the one-gallon container fills in less than 20 seconds, your flow rate is more than 3 gallons per minute.
1. Start the shower and set it to the maximum showering rate.
2. Start a stopwatch at the same time you move the container underneath the shower, capturing its entire flow.
3. Record the number of seconds and divide 60 by that number to find gallons per minute.
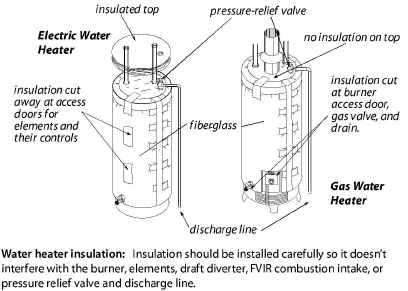
Install an R-11 insulation blanket on all water heaters unless the manufacturer’s label prohibits it. Follow these guidelines to avoid fire hazards and to simplify future service.
Gas Water Heaters
When you install insulation on gas water heaters, use these specifications.
ü Keep insulation at least 2 inches away from the gas valve and the burner access panel. Don’t install insulation below the burner access panel.
ü Don’t cover the pressure relief valve or discharge line with insulation.
ü Don’t insulate the tops of gas-fired water heaters because the insulation can obstruct the draft diverter.
ü Don’t insulate Flammable Vapor Ignition Resistant (FVIR) water heaters. The blanket may shift and unintentionally cover the combustion air openings.
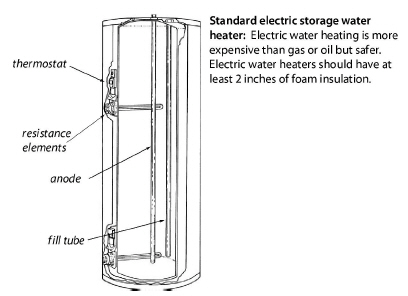
Electric Water Heaters
When you install insulation on electric water heaters, use these specifications.
ü Mark the blanket to locate the thermostat and heating element access plates and cut the blanket at these locations.
ü When you cut the blanket for the thermostats, cut the bottom and sides but not the top. This creates a hinge that allows the door in the insulation to swing open and closed.
ü Cover the top of the water heater with insulation.
ü Don’t cover the pressure relief valve and discharge line with insulation.
ü If you specify insulation for an existing water heater which has a relief valve but no discharge line, install a discharge line outside the insulation to within 6 inches of the floor.
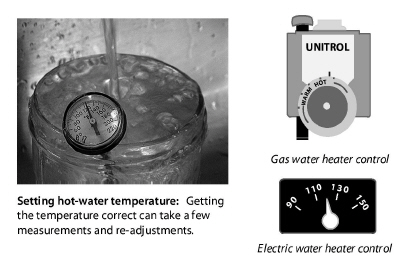
10.5.3 Measuring and Adjusting Hot Water Temperature
|
SWS Detail: 7.8103.1 Storage-Type Appliance, 7.8103.2 On-Demand Appliance |
Use the following instructions to adjust water temperature.
ü Shut off power to an electric water heater before opening thermostat access panels.
ü Measure the water temperature at the nearest faucet to the water heater. Reduce the temperature to no less than 120° F with the client’s permission.
ü On electric water heaters, set both upper and lower thermostats to the same temperature.
10.5.4 Heat Traps and Water-Heater Pipe Insulation
|
SWS Detail:7.8103.1 Storage-Type Appliance, 7.8103.2 On-Demand Appliance |
Heat traps are piping loops or valves that prevent thermo-siphoning of water in and out of the piping near the water heater. If thermo-siphoning appears to be a problem, install heat traps or some other method to stop hot water from leaving the tank.
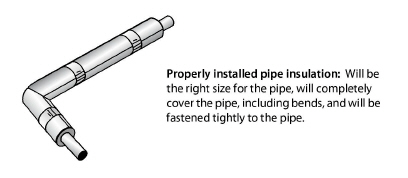
Install pipe insulation to slow convection of hot water into the water lines near the tank.
ü Interior diameter of pipe sleeve must match exterior diameter of pipe.
ü Insulate the first 6 feet of hot and cold water pipe from the water heater.
ü Use pipe wrap with a minimum thickness of 1 inch or a minimum R-value of 2. Cover elbows, unions and other fittings with the same insulation thickness as the pipe.
ü Corners must be mitered, tight fitting, sealed and secured with appropriate material to prevent failure.
ü Keep pipe insulation 6 inches away from single-wall vent pipe and 1 inch away from Type B vent.
ü Fasten pipe insulation with zip ties, tape, or other approved method.
10.6 Selecting Storage Water Heaters
Storage water heaters are the most common water heaters found in homes. For installation instructions, see page 461.
10.6.1 Determining a Storage Water Heater’s Insulation Level
|
SWS Detail: 7.8102.1 Water Heater Selection, 7.8102.2 Storage-Type Appliance |
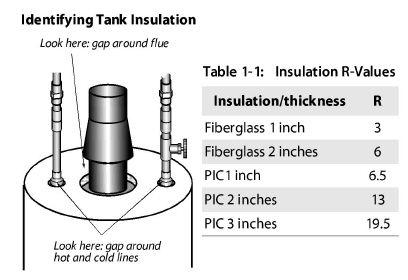
Common storage water heaters consist of a tank, insulation surrounding the tank, and an outer shell. There is typically either 1 or 2 inches of insulation surrounding the tank. The insulation is either fiberglass or polyisocyanurate.
Follow this procedure to determine the water heater’s insulation level.
ü Look for a listing of R-value on a label on the water heater.
ü Find a hole in the outer shell where the flue pipe emerges or where plumbing connects. Look around the hole for either fiberglass or polyisocyanurate insulation.
ü If the hole isn’t large enough to see the insulation level on an electric water heater, try removing the access panel for the heating element after disconnecting power from the unit.
ü You may just be able to see the gap between the tank and outer shell. If you can’t see this gap, use a ruler or probe to push through the insulation along side of a pipe connecting to the tank until the probe hits the steel tank to determine thickness. Make sure that the probe is against the tank and not against a nut welded to the tank.
ü If additional tank insulation is installed, it must be at least R-11. Don’t install insulation if the manufacturer’s label on the water heater prohibits it.
10.6.2 Storage Water-Heater Selection
|
SWS Detail: 7.8102.1 Water Heater Selection, 7.8102.2 Storage-Type Appliance, 7.8102.4 Storage Tank-Type Water Heater, 7.8102.8 Heat Pump Water Heater |
Existing gas water heaters, including propane, typically use 200 to 400 therms per year. New gas water heaters use as little as 175 therms per year, resulting in a savings of between 25 and 225 therms per year. Similar savings are possible by replacing electric water heaters. Consider the following recommendations for specifying water heaters.
• A replacement gas or oil storage water heater should have an energy factor of at least 0.67 and be insulated with at least 2 inches of foam insulation.
• A replacement electric water heater should have an energy factor of at least 0.93 and be insulated with at least 2.5 inches of foam insulation.
10.7 Alternative Water-Heaters
Weatherization programs sometimes choose alternative water-heating products to improve efficiency and safety. For installation instructions, see page 461.
10.7.1 Sidewall-Vented Gas Storage Water Heaters
|
SWS Detail: 2.0201.2 Combustion Safety - Make-up Air, 7.8102.1 Water Heater Selection, 7.8102.2 Storage-Type Appliance |
When gas storage water heaters cause persistent venting problems, specify a sidewall-venting water heater. Two common types of these water heaters are shown here.
ü Choose a sealed-combustion sidewall-vented gas water heater, if possible. Next best is a fan-assisted unit.
ü Install the replacement water heater in accordance with manufacturer specifications, 2012 IRC G2427.8.

10.7.2 On-Demand Gas Water Heaters
|
SWS Detail: 7.8102.1 Water Heater Selection, 7.8102.3 On-Demand Appliance |
On-demand gas water heaters are more efficient and cost less to operate compared to conventional gas storage water heaters. However, on-demand gas water waters are more expensive to install and may have shorter lifespans compared to storage water heaters.
Choose a sealed-combustion on-demand gas water heater, if possible. A fan-assisted on-demand gas water heater is the next best choice.
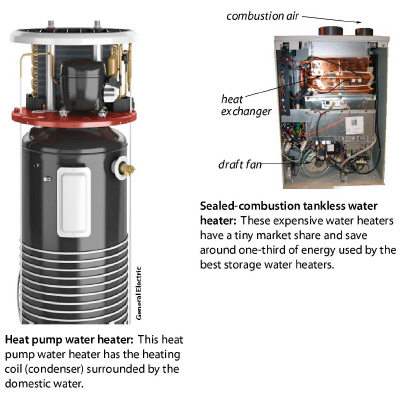
10.7.3 Heat Pump Water Heaters
Heat pump water heaters can heat water at up to 2.3 times more efficiently than electric-resistance storage water heaters. Heat pump water heaters use heat from surrounding air to heat water. They cost much more than conventional electric water heaters but are far less costly to operate.
|
Advanced Water Heater Type |
$ Savings* |
Expected Lifespan |
Major Advantages |
|---|---|---|---|
|
High-efficiency storage tank (Oil, gas, electric) |
≤$500 |
8–15 years |
Lowest first cost |
|
Instantaneous Tankless (direct fired) |
≤$1800 |
5-15 years |
Unlimited hot water |
|
Heat pump |
≤$3000 |
5-15 years |
Most efficient electric option |
|
From information supplied by EnergyStar.gov by the Environmental Protection Agency. * Lifetime savings compared to conventional water-heater models and same fuel. |
|||
10.8 Water Heater Installation
|
SWS Detail: 7.8102.3 On-Demand Appliance, 7.8102.2 Storage-Type Appliance, 7.8102.8 Heat Pump Water Heater |
Follow these procedures when installing a storage water heater or an alternative water heater.
ü Replacement water heater must have a pressure-and-temperature relief valve with a discharge line that terminates less than 6 inches from the floor into a floor drain or drain pan.
ü The discharge pipe should be made of rigid metal pipe or approved high-temperature plastic pipe.
ü Install dielectric unions as required and a backflow preventer as part of a water heater replacement if any of these components are missing from the existing installation.
ü Install an expansion tank for all storage water-heater replacements when needed.
ü If leakage would cause damage to the home, install an emergency drain pan with sides that extend a minimum of 4 inches above the floor under a replacement water.
ü Install a 3/4-inch drain line to the tapping on drain pan. Terminate the drain line in a floor drain or outdoors, at least 6 inches above grade.
ü Install heat traps on the water heater’s inlet and outlet piping if the manufacturer hasn’t provided traps.
ü Adjust water temperature to no lower than 120° F.
For a complete list of DOE installation requirements for water heaters, see SWS Detail 7.8102.2 Storage-Type Appliance.
The choice of fuel and model for a storage water heater isn’t easy and it involves many factors including safety, reliability, efficiency, and installed cost. See Residential Energy Dynamics free comparison tool.
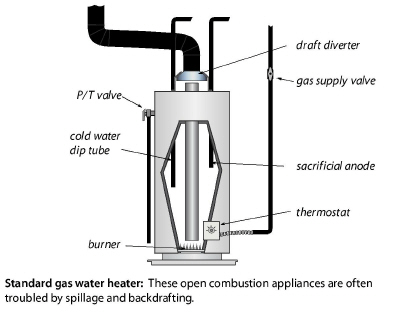
Conventional direct-fired gas water heaters vent their combustion by-products to a gravity vented chimney. They can spill products of combustion into the living space, especially if the chimney isn’t tall enough, warm enough, or sized properly. Sharing of a main chimney with another combustion appliance can cause venting problems. If the furnace or boiler is replaced with a sealed-combustion or horizontal-vented model, the chimney may then be too big for the remaining combustion water heater.
Electric water heaters have no chimney and need no combustion air, which makes them safer for buildings with low natural air leakage, compared to gas storage water heaters.
Electric water heaters have no products of combustion. However, because their recovery capacity is generally much slower than gas water heaters of the same size, there is a greater chance of someone trying to compensate for a cold shower by setting the electric water heater to an unsafely high temperature where occupants could be scalded.
Storage water heaters are popular because they are inexpensive and reliable. Both gas and electric storage water heaters are simpler and more reliable than more expensive and complex water heaters. The lifespan of storage water heaters depends on local water quality and the quality of the water heater’s storage tank.
Most heaters have glass-lined steel tanks which are typically warranted for five years. All types of heaters are available with larger or additional sacrificial anodes, which are pieces of metal that corrode before the tank does, thereby extending the tank life and maybe the warranty. If you buy a ten-year guarantee heater instead of a five-year guarantee heater, this choice might reduce the future cost of replacement and possible water damage from eventual storage-tank leaks.
10.9.3 Efficiency and Energy Cost Comparison
Conventional gas storage water heaters are rated at about 80% steady-state efficiency. However, whenever a storage water heater isn’t firing, it’s losing heat up the chimney. This happens when cold air, flowing through the heater, is warmed by the heater and escapes up the flue. This off-cycle heat loss reduces annual efficiency drastically and may result in the water heater’s energy factor (EF) being less than 0.60.
The exact EF for a particular storage water heater is difficult to estimate because of many factors including: chimney height, chimney diameter, wind, the home’s air-tightness, outdoor temperature, and water heater temperature setpoint. Considerable these variables, the actual EF can vary from 0.60 to 0.40 or even lower. Nevertheless, gas storage water heaters cost less to operate than electric water heaters with the same insulation level.
As a heating fuel, electricity is approximately 2.5 times as expensive as natural gas. However, electric water heaters have no chimney and therefore no chimney losses. Electric water heaters do lose heat through the insulation jacket, which results in an EF of around 0.90. Heat-pump water heaters have an operating efficiency of over 200% (COP = 2.3) because they heat water with heat from the surrounding air. But because the electricity production and transmission system in the U.S. is about 31% efficient, the overall energy use and cost for heating water with electricity is still higher than with gas.