
Mobile homes are covered by their own details and outcomes in the SWS, which refers to mobile homes as manufactured homes. These two names refer to the same type of housing. In this chapter we will use the term mobile-home and cover air sealing, insulation, windows, and doors.
Mobile home furnaces are similar to furnaces for site-built homes in some ways and different in other ways. Mobile home combustion furnaces have been sealed-combustion since the early 1970s. Gas furnaces are either the old atmospheric sealed-combustion type or the newer fan-assisted mid-efficiency type. Some older less-efficient sealed-combustion furnaces had draft fans too. For information on electric furnaces, see Electric Furnaces.
Mobile-home oil furnaces are a close relative to oil furnaces in site-built homes. However, they should have a housing that fits around the burner’s air shutter and provides outdoor air directly to the burner. See Oil Burner Safety and Efficiency Service.
Mobile-home furnaces are different from conventional furnaces in the following ways.
• A great majority of mobile homes are equipped with downflow furnaces, designed specifically for mobile homes.
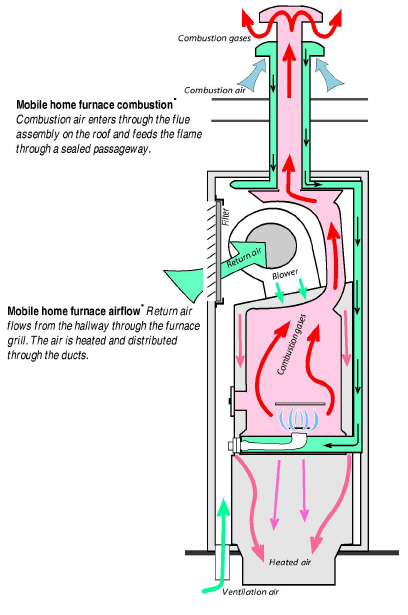
• Mobile home combustion furnaces are sealed-combustion units that use outdoor combustion air, unlike most furnaces in site-built homes. They don’t have draft diverters or barometric draft controls.
• Gas-fired furnaces have kits attached, containing alternative orifices, to burn either propane or gas.
• Return air enters the furnace through a large opening in the furnace rather than through return ducts.
Important Note: Install only furnaces—designed for mobile homes—in mobile homes.
11.1.1 Furnace Maintenance and Energy Efficiency
Mobile home furnaces should comply with this guidebook’s combustion safety and efficiency standards. See Gas Burner Safety & Efficiency Service and Oil Burner Safety and Efficiency Service.
Mobile home furnaces must be replaced by furnaces designed and listed for use in mobile homes.
Consider replacing the existing furnace with a sealed-combustion, downflow, condensing furnace. One manufacturer makes condensing furnaces, approved for mobile homes.
Consider replacing a mobile home furnace when you observe any of the following.
• The furnace has a cracked heat exchanger.
• Repair and retrofit exceed half of the replacement cost.
• The furnace is not operating and not repairable.
Mobile home furnaces require an outdoor source of combustion air. Mobile home furnaces have either a manufactured chimney that includes a passageway for combustion air or a combustion-air chute connecting the burner with the crawl space.
✓ Install a new furnace base unless you are sure that the existing base exactly matches the new furnace.
✓ Attach the furnace base firmly to the duct, and seal all seams between the base and duct with mastic and fabric tape before installing the furnace.
✓ Support the main duct underneath the furnace with additional strapping if necessary.
✓ When replacing mobile home furnaces, note the differences between old furnace and new, in the way each supplies itself with combustion air.
✓ Install a new chimney that is manufactured specifically for the new furnace.
✓ Often the old chimney opening doesn’t exactly line up with the new furnace’s flue. In these cases either use an offset pipe, provided by the manufacturer, or else cut the opening larger so that the new chimney can be installed absolutely vertical. Also make sure the chimney cap is installed absolutely straight.
Mobile home furnaces have short chimneys, and their combustion process depends on a delicate balance between combustion air entering and combustion gases leaving. The furnace demands a vertical, leak-free chimney, and a properly installed chimney cap. Follow manufacturer’s installation instructions exactly.
11.2 Mobile Home Cooling and Ventilation Systems
Mobile home cooling systems are, in most ways, identical to single-family cooling systems, which we document in Evaluating Ducted Central Air-Conditioning Systems
11.2.1 Air-Conditioning Systems
Mobile home central air-conditioning (A/C) systems are very similar to those of single-family homes. Mobile home split-system central A/C systems have the condenser and compressor outdoors and the air handler indoors. Packaged A/C systems have all the components in one cabinet.
Consult the following field-guide topics as necessary.
• Duct Leakage and System Airflow
• Evaluating Air-Conditioner Charge
Evaporative coolers for mobile homes are essentially the same as those of single-family homes.
11.2.3 Mobile Home Ventilation Systems
|
SWS Detail: 6.6204.1 Commissioning Ventilation Systems 6.6205.1 Manufactured Housing Exhaust-Only Strategies, |
Consult the SWS links above and the links listed below for information on mobile home ventilation systems.
• Whole-Building Ventilation Systems
The location and relative importance of mobile home air leaks was a mystery before blower doors. Some mobile homes are fairly airtight, and others are very leaky. Air leakage serves as ventilation in most mobile homes. Comply with the whole-building ventilation standards outlined in ASHRAE Standard 62.2–2016 Ventilation.
A duct airtightness tester, which pressurizes the ducts and measures their air leakage, is the best way to measure and evaluate duct air sealing. See Evaluating Duct Air Leakage For simply locating duct leaks, the blower door used in conjunction with a pressure pan does a good job. See Pressure Pan Testing
Most mobile home duct sealing is performed through the belly. This work is more difficult once the belly has been re-insulated. Inspect the ductwork and seal any major leaks, such as disconnected trunk lines, before insulating the belly.
|
Air Sealing Procedure |
Typical CFM50 Reduction |
|---|---|
|
Patching large air leaks in the floor, walls and ceiling |
200–900 |
|
Sealing leaky water-heater closet |
200–600 |
|
Sealing leaky supply ducts |
100–500 |
|
Installing tight interior storm windows |
100–250 |
|
50–150 |
Mobile home shell air leakage is often substantially reduced when insulation is installed in roofs, walls, and belly cavities. Prioritize your efforts by completing a Manufactured Housing Energy Audit (MHEA) and performing these tasks in this order.
1. Evaluate the insulation levels. If adding insulation is cost-effective, perform the usual pre-insulation air sealing measures that also prevent spillage of insulation out of the cavity.
2. Install cavity insulation. Perform duct sealing first if the belly is to be insulated.
3. Re-check the air leakage rate.
4. Perform additional air sealing as needed.
11.3.1 Shell Air Leakage Locations
Blower doors have pointed out the following shell locations as the most serious air leakage sites.
✓ Plumbing penetrations in floors, walls, and ceilings. Water-heater closets with exterior doors are particularly serious air leakage problems, having large openings into the bathroom and other areas
✓ Torn or missing underbelly, exposing flaws in the floor to the ventilated crawl space
✓ Large gaps around furnace and water heater chimneys
✓ Severely deteriorated floors in water heater compartments
✓ Gaps around the electrical service panel box, light fixtures, and fans
✓ Joints between the halves of double-wide mobile homes and between the main dwelling and additions
Note: Window and door air leakage is more of a comfort problem than a serious energy problem.
Blower doors have pointed out the following duct locations as the most serious energy problems.
✓ Floor cavities used as return-air plenums — These floor return systems should be eliminated and replaced with return-air through the hall or a large grille in the furnace-closet door.
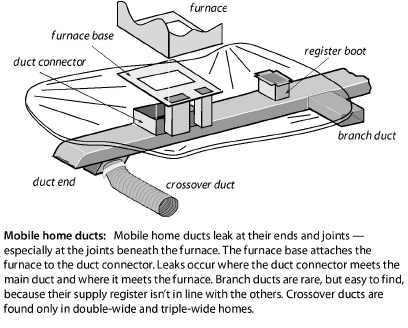
✓ Joints between the furnace and the main duct — The main duct may need to be cut open from underneath to access and seal these leaks between the furnace, duct connector, and main duct. With electric furnaces you can access the duct connector by removing the resistance elements. For furnaces with empty A-coil compartments, you can simply remove the access panel to seal the duct connector.
✓ Joints between the main duct and the short duct sections joining the main duct to a floor register
✓ Joints between register boots and floor
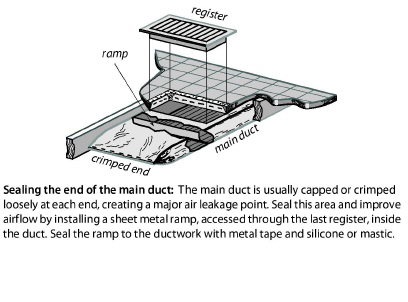
✓ The poorly sealed ends of the duct trunk, which often extend beyond the last supply register
✓ Disconnected, damaged or poorly joined crossover ducts
✓ Supply and return ducts for outdoor air conditioner units
✓ Holes cut in floors by tradesmen.
✓ New ductwork added to supply heat to room additions
Sealing a Floor Return
Close off existing return air openings and sealed with a durable material equivalent in strength to the surrounding material.
Seal floor penetrations and ductwork before performing belly repair. Otherwise repair work could distribute crawl space pollutants into the home and its ducts. Provide an alternate return air opening into the furnace closet, for example a louvered door or a large filter grille.
See Pressure Pan Testing See Sealing Supply Ducts
Measuring Duct Air Leakage with a Blower Door
Use the blower door subtraction method to measure mobile home duct system leakage after the standard blower door test-up is completed.
✓ Perform an initial blower door test and record the result as the Initial CFM50.
✓ Seal all ducts at the supply registers and at the return air grille completely using tape, plastic film, sheets of paper or other temporary air-impermeable material.
✓ Perform a second blower door test.
✓ Insert a tube, or probe attached to a tube, into the cavity between the mobile home floor and the belly board and measure the pressure difference of the living space WRT the cavity containing the duct system. The pressure difference must be greater than 5 Pa.
✓ Assure that no air is moving through any openings from the return grille or supply registers. Examine the system to assure that all auxiliary or add-on air conditioner or heat pump grilles are also sealed.
✓ Record the blower door reading as the Taped Duct CFM50.
✓ Subtract the Taped Duct CFM50 reading from the Initial CFM50 reading to determine the amount of air leakage through the distribution system.
For the subtraction test to be accurate, there must be a pressure differential between the living area and the cavity where the mobile home ductwork is located. If there is little or no pressure difference between these two areas, there will be very little difference between the Taped Duct CFM50 and the Initial Duct CFM50.
Address all significant moisture problems before insulating. The most important moisture-control measure is installing a ground-moisture barrier. See also Preparing for Foundation or Floor Insulation
11.4.1 Insulating Mobile Home Roof Cavities
Blowing a closed mobile home roof cavity is similar to blowing a closed wall cavity, only the insulation doesn’t have to be as dense. Use fiberglass blowing wool because cellulose is too heavy and absorbs water too readily for use around a mobile home’s lightweight sheeting materials.
If existing insulation is attached to the underside of the roof, blow the insulation below it. If existing insulation lays on the ceiling, blow the insulation above it. If you find insulation at both the ceiling and roof, blow the new insulation in between the two existing layers of insulation.

There are three common and effective methods for blowing mobile home roof cavities.
1. Cutting a square hole in the metal roof and blowing fiberglass through a flexible fill-tube (through-the-roof method).
2. Disconnecting the metal roof at its edge and blowing fiberglass through a rigid fill-tube (side-lift method).
3. Blowing fiberglass through holes drilled in the ceiling (interior-drill method).
Preparing to Blow a Mobile Home Roof
Perform these steps before insulating mobile home roofs.
✓ Reinforce weak areas in the ceiling.
✓ Inspect the ceiling and seal all penetrations.
✓ Replace or remove and seal all broken mushroom vents.
✓ Take steps to maintain safe clearances between insulation and recessed light fixtures and ceiling fans.
✓ Verify that gas, water, and electrical lines are secured at least every 4 feet to a floor joist or framing member.
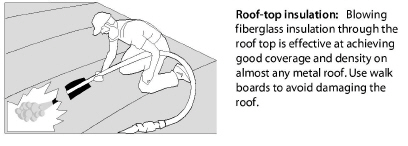
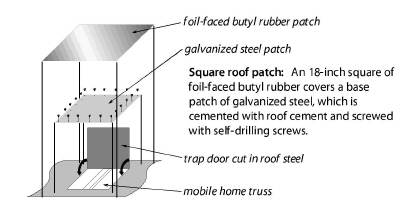
Blowing Through the Top
Blowing through the roof top does a good job of filling the critical edge area with insulation, and the patches are easy to install if you have the right materials. It is important to complete the work during good weather, since the roof is vulnerable to rain or snow during the job.
If the roof contains a strongback running the length of the roof, the holes should be centered over the strongback, which is usually near the center of the roof’s width. A strongback is a 1-by-4 or a 1-by-6, installed at a right angle to the trusses near their center point, that adds strength to the roof structure. Follow these steps when insulating the attic using the through-the-roof method.
1. Cut 10-inch square holes at the roof’s apex on top of every second truss. Each square hole permits access to two truss cavities.
2. Use a 2-inch or 2-1/2-inch diameter fill-tube. Insert the fill-tube and push it forcefully out to within 6 inches of the edge of the cavity.
3. Blow fiberglass insulation into each cavity.
4. Stuff the area under each square hole with a piece of unfaced fiberglass batt so that the finished roof patch will stand a little higher than the surrounding roof.
5. Patch the hole with a 14-inch-square piece of stiff galvanized steel, sealed with copolymer or tripolymer sealant and screwed into the existing metal roof.
6. Cover the first patch with a second patch, consisting of an 18-inch-square piece of rubberized asphalt membrane.
7. Apply a coat of elastomeric roof coating to the patched area.
Blowing Through a Round Hole on the Roof
Consider this alternative to cutting a square hole as suggested above.
1. Drill a 3-inch or larger hole between each truss.
2. Use a 2-inch or 2-1/2-inch diameter fill-tube. Insert the fill-tube, and push it forcefully out to within 6 inches of the edge of the cavity.
3. Blow fiberglass insulation into each cavity to fill the entire cavity.
4. Patch the holes with galvanized steel, plastic caps, and roofing material that is compatible with the existing roof.
Blowing a Mobile Home Roof from the Edge
Erect scaffold to do this procedure safely and efficiently. Mobile home metal roofs are usually fastened only at the edge, where the roof joins the wall.
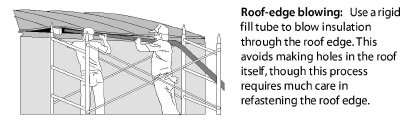
1. Remove the screws from the metal j-rail at the roof edge. Also remove staples or other fasteners, and scrape off putty tape.
2. Pry the metal roof up far enough to insert a 2-inch-diameter, 10- to 14-foot-long rigid fill-tube. ABS pipe is a good choice for a fill tube. Inspect the cavity with a bright light to identify any wires or piping that could be damaged by the fill tube.
3. Insert the fill-tube, and push it forcefully out to within 6 inches of the edge of the cavity.
4. Blow insulation through the fill-tube into the cavity. Turn off the insulation-material feed and blower on the blowing machine when the tube is a couple feet from the roof edge, in order to avoid blowing insulation out through the opening in the roof edge. Stuff the last foot or two with unfaced fiberglass batts.
5. Fasten the roof edge back to the wall using galvanized roofing nails, a new or existing metal j-rail if able to reuse, new putty tape, and larger screws. The ideal way to re-fasten the metal roof edge is with air-driven galvanized staples, which is the way most roof edges were attached originally.
The re-installation of the roof edge is the most important part of this procedure. Putty tape must be replaced and installed as it was originally. This usually involves installing a layer of putty tape or a bead of high quality caulk under the metal roof and another between the metal roof edge and the j-rail.
The advantages of blowing through the edge is that if you have the right tools, including a powered stapler, this method can be very fast and doesn’t require cutting into the roof. The disadvantages of this procedure are that you need scaffolding to work at the edges, and it won’t work on roof systems with a central strongback that stops the fill tube from reaching all the way across the roof.
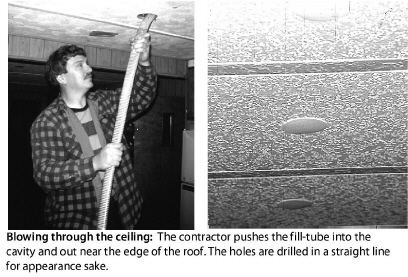
Blowing a Mobile Home Roof from Indoors
The advantage to this method is that you are indoors, out of the weather. The disadvantages include being indoors where you can make a mess — or worse, damage something.
Blowing the roof cavity from indoors requires the drilling of straight rows of 3-inch or 4-inch holes and blowing insulation into the roof cavity through a fill tube.
Follow this procedure.
1. Drill a 3-inch or 4-inch hole in an unseen location to discover whether the roof structure contains a strongback that would prevent blowing the roof cavity from a single row of holes.
2. Devise a way to drill a straight row of holes down the center of the ceiling. If a strongback exists, drill two rows of holes at the quarter points of the width of the ceiling.
3. Insert a flexible plastic fill tube into the cavity, and push it forcefully out to within 6 inches of the edge of the cavity.
4. Fill the cavity with tightly packed fiberglass insulation.
5. Cap the holes with manufactured plastic caps and caulk. Care must be taken not to damage the holes so that the plastic hole covers fit properly. You can also install a piece of painted wood trim over the line of holes.
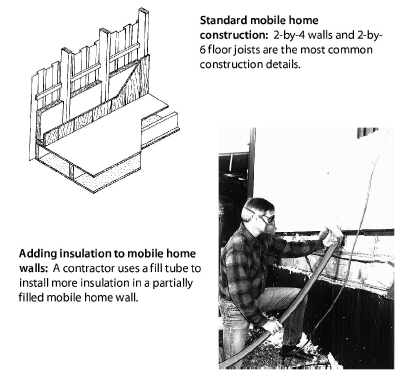
11.4.2 Mobile Home Sidewall Insulation
The sidewalls of many mobile homes are not completely filled with insulation. This reduces the nominal R-value of the existing wall insulation because of convection currents and air leakage. Consider the following steps for adding insulation to partially filled mobile home walls.
1. Check the interior paneling and trim to make sure they are securely fastened to the wall. Repair holes in interior paneling and caulk cracks at seams to prevent indoor air from entering the wall. Note the location of electrical boxes and wire to avoid hitting them when you push the fill tube up the wall.
2. Remove the bottom horizontal row of screws from the exterior siding. If the vertical joints in the siding interlock, fasten the bottom of the joints together with1/2-inch sheet metal screws to prevent the joints from coming apart. Pull the siding and existing insulation away from the studs, and insert the fill tube into the cavity with the point of its tip against the interior paneling.
3. Push the fill tube up into the wall cavity until it hits the top plate of the wall. The tube should go into the wall cavity 7-to-8 feet. It is important to insert the tube so that its natural curvature presses its tip against the interior paneling. When the tip of the fill tube, cut at an angle, is pressed against the smooth paneling, it is least likely to snag the existing insulation on its way up the wall. If the fill tube hits a belt rail or other obstruction, twisting the tube will help its tip get past the obstruction.
4. Stuff a piece of fiberglass batt into the bottom of the wall cavity around the tube to prevent insulation from blowing out of the wall cavity. Leave the batt in-place at the bottom of the wall, when you pull the fill tube out of the cavity. This piece of batt acts as temporary gasket for the hose and insulates the very bottom of the cavity after the hose is removed. This batt also eliminates the need to blow fiberglass insulation all the way to the bottom, preventing possible spillage and overfilling. If you happen to overfill the bottom of the cavity, reach up inside the wall to pack or remove some fiberglass insulation, particularly any that lies between the loose siding and studs.
5. Draw the tube down and out of the cavity about 6 inches at a time. Listen for the blower fan to indicate strain from back-pressure in the wall. Watch for the fiberglass insulation to slow its flow rate through the blower hose at the same time. Also watch for slight bulging of the exterior siding. These signs tell the installer when to pull the tube down.
6. Carefully refasten the siding using the same holes. Use screws that are slightly longer and thicker than the original screws.
11.4.3 Mobile Home Floor Insulation
|
SWS Details: 4.1302.1 Prepare Belly Floor Cavity for Insulation, 4.1303.1 Insulation of Floor Cavity with Blown Material, 2.0107.2 Basements and Crawl Spaces—Pre-Work Qualifications |
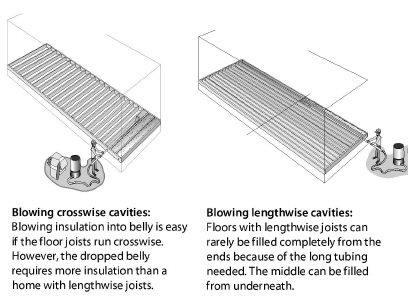
Mobile home floor insulation is a good energy-saving measure in cool climates. The original insulation is usually fastened to the bottom of the floor joists, leaving much of the cavity uninsulated and subject to convection currents. This greatly reduces the insulation’s R-value.
Preparing for Mobile Home Floor Insulation
Prior to installing floor insulation, always perform these repairs.
✓ Repair plumbing leaks.
✓ Secure gas, water, and electrical lines at least every 4' to a floor joist or framing member
✓ Tightly seal all holes in the floor.
✓ Inspect and seal ducts.
✓ Repair the rodent barrier.
✓ Support belly material and cinch up with furring strips or plumbers strap.
✓ Install a ground moisture barrier and fasten it to the ground with durable fasteners.
✓ Overlapped the seams of the ground moisture barrier a minimum of 12" using the “reverse or upslope lapping” technique.
✓ Pipe freeze protection system will have thermostatic heat control and circuit protection.
✓ Insulation will be installed over pipe freeze protection system when necessary.
Patching the Belly
Mobile homes have two common types of belly covering: rigid fiber board and flexible paper or fabric. The fiberboard is normally stapled to the bottom of the floor joists. To patch a rigid belly, simply screw or staple plywood or another rigid material over the hole.
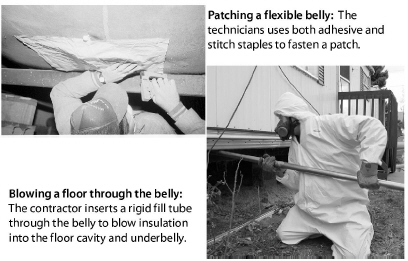
Flexible belly material may have no solid backing behind the hole or tear because the material forms a bag around the main duct, which is installed below the floor joists. In this case, use both adhesive and stitch staples to bind the flexible patch to the flexible belly material.
Insulating the Floor
The two common methods for insulating mobile home floors are the rim joist method and the underbelly method.
1. The rim-joist method drills through the 2-by-6 rim joist and install blown fiberglass through a rigid fill tube into the belly.
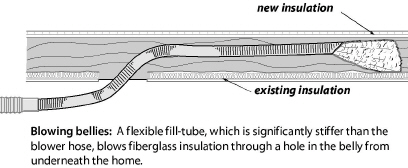
2. The underbelly method blows fiberglass insulation through a flexible fill tube or a rigid fill tube into the underbelly.
Follow these steps before installing belly insulation.
1. Repair all holes in the belly. Use mobile home belly-paper, silicone sealant, and stitch staples. Use these same patches over the holes cut for fill-tubes. Screw wood lath over weak areas if needed.
2. Identify any plumbing lines, and avoid installing insulation between them and the living space if freezing could be an issue. This may require running a piece of belly-paper under the pipes, and insulating the resulting cavity, to include the pipes in the heated envelope of the home.
Unfaced fiberglass batts may also be used to insulate floor sections where the insulation and belly are missing. The insulation should be supported by lath, twine, or insulation supports. This is a good approach when it isn’t cost-effective to insulate the entire belly.
11.5 Mobile Home Windows and Doors
Repairing or replacing mobile home windows and doors is often part of a mobile home weatherization job. Installing storm windows or replacing existing windows is expensive per square foot. However, storm windows and replacement windows are all energy conservation measures for mobile homes that are worth considering.
Determine if the mobile home has a removable fire escape window. If so, note it’s location and ensure that it is not sealed shut.
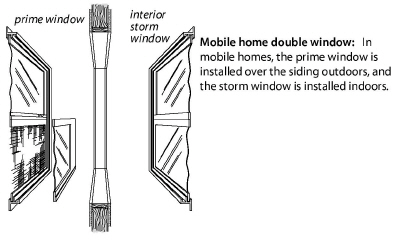
11.5.1 Mobile Home Storm Windows
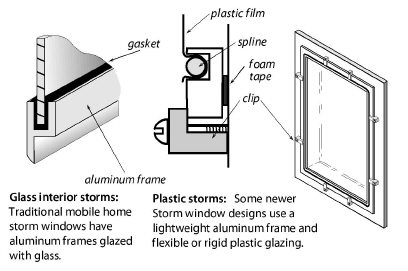
Interior storm windows are common in mobile homes. These stationary interior storms serve awning and jalousie windows. Sliding interior storm windows pair with exterior sliding prime windows.
✓ Interior storm windows double the R-value of a single-pane window. They also reduce infiltration, especially in the case of leaky jalousie prime windows.
✓ Interior storm windows must be operable and egress-rated in egress locations.
✓ Consider repairing existing storm windows rather than replacing them unless the existing storm windows can’t be re-glazed or repaired.
✓ When sliding primary windows are installed, use a sliding storm window that slides from the same side as the primary window. Sliding storm windows stay in place and aren’t removed seasonally, and are therefore less likely to be lost or broken.
✓ All egress windows will be operable as required by local code.
11.5.2 Replacing Mobile Home Windows
|
SWS Details: 3.1202.3 Replacing Damaged Window Glass in Manufactured Housing, 3.1203.3 Replacement of Manufactured Housing Windows and Doors, 3.1201.5 Manufactured Housing Windows and Doors |
Replacement windows should have lower U-factors than the windows they are replacing. Inspect the condition of rough opening members before replacing windows. Replace deteriorated, weak, or waterlogged framing members.
Prepare the replacement window by lining the perimeter of the inner lip with 1/8-inch thick putty tape. Caulk exterior window frame perimeter to wall after installing the window.
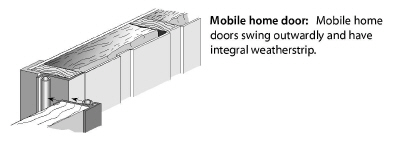
Mobile home doors come in two basic types: the mobile home door and the house-type door. Mobile home doors swing outward, and house-type doors swing inward. House-type doors are available with pre-hung storm doors included.
Existing or replacement mobile home doors should be air-tight, water-tight, and operable. Replace missing or damaged weatherstripping, drip cap, or flashing to ensure that water or air can’t penetrate the opening. Properly adjust the door so that it closes securely, but does not crush or deform the weatherstripping. All egress doors will be operable as required by local codes.
11.6 Cool Roofs for Mobile Homes
|
SWS Details: 5.3202.1 Reflective Coatings on Metal Roofs, 5.3202.2 Reflective Roof Coatings |
Cool roof coatings reduce summer cooling costs and improve comfort by reflecting solar energy away from the home's roof and slowing the flow of heat into the home. They are shown to reduce overall cooling costs by 10-20%, and are a good choice for mobile homes or site-built homes with low slope or flat roofs. Cool roof coatings are usually bright white, and must have a reflectivity of at least 60% to meet the Energy Star or equivalent requirement for cool roof coatings.
Cool roof coatings are usually water-based acrylic elastomers, and are applied with a roller. They can be applied over most low-sloped roofing such as metal, built-up asphalt, bitumen, or single ply membranes. Some underlying materials require a primer to get proper adhesion-check the manufacturer's recommendations for asphalt-shingle roofs.
Surface preparation is critical when applying any coating. The underlying roofing materials must be clean so the coating will stick. Repairs should be performed if the existing roofing is cracked or blistered. Roof coating Won’t stick to dirty or greasy surfaces, and they can’t be used to repair roofs in poor conditions. Observe the following specifications when installing cool roof coatings.
✓ Install the coating when dry weather is predicted. Rain heavy dew, or freezing weather, if it happens within 24 hours of installation, will weaken the coating’s bond to the underlying roofing.
✓ Protect any nearby windows, siding, or automobiles from splatters. For roller application, use a large brush for the edges, and a shaggy 1 to 1 1/2-inch roller on a 5- or 6- foot pole for the field. Run the coating up the roof jacks and other penetrations to help seal these areas. Install at least two coats, with second coat applied in the opposite direction to the first to get more complete coverage. Allow a day for drying between coats.
✓ Clean the roof of loose roofing material and other debris.
✓ Wash the roof with a water/tri-sodium phosphate (tsp) solution, or comparable mildew-cide, and scrub brush. Better yet, use a pressure washer.
✓ For metal roofs, sand any rusted areas down to sound metal. Install metal patches over any areas that are rusted through, followed by polyester patches as described above.
✓ Buy the highest quality coatings, and look for those that are specifically formulated as mobile home roof coatings.
✓ Reinforce any open joints around skylights, pipe flashing, roof drains, wall transitions, or HVAC equipment. For build-up asphalt or bitumen roofs, repair any cracks, blisters, or de-laminations. Use polyester fabric and roof coating for these reinforcements and repairs by dipping fabric patches in the roof coating and spreading them over the existing roofing, or by laying dry fabric into a layer of wet coating. Smooth the patches down with a broad-knife or squeegee to remove bubbles or wrinkles. Allow any repairs to cure for 1 to 2 days before applying the topcoat.
The primary purpose of skirting is to keep animals out of the crawl space.
• Installation and repair of mobile home skirting is seldom cost-effective and is not allowed in weatherization work. Locate the thermal boundary at the floor of mobile homes.
• If skirting exists, install a continuous ground moisture barrier, if one is not present. Don’t install a ground moisture barrier if skirting is not present.
• Determine any moisture problems and correct prior to installing ground moisture barrier. The ground moisture barrier will be a sheet of plastic such as 6-mil polyethylene. The moisture barrier will meet tear and puncture resistance standard ASTM E1745.
• Seams will be overlapped a minimum of 12” using the reverse or upslope lapping technique. Ground moisture barrier will be fastened to ground with durable fasteners (minimum 10 years service life.)
• Install 1 square foot of closeable NFVA for every 1500 square foot of area enclosed by skirting unless the area is well drained and dry.