6.3 Preparing for Foundation or Floor Insulation
|
SWS Detail: 4.1402.2 Basement Wall Insulation—No Groundwater Leakage, 4.1402.3 Basement Wall Insulation—Groundwater Leakage |
Floor and foundation insulation can increase the likelihood of moisture problems. Installers should take all necessary steps to prevent moisture problems from ground moisture before installing insulation.
6.3.1 Rim-Joist Insulation and Air-Sealing
|
SWS Detal: 4.1401.1 Band/Rim Joists—Spray Polyurethane Foam (SPF) Installation |
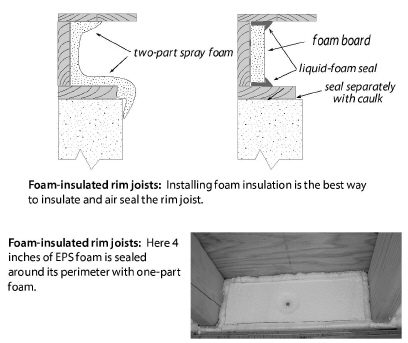
The rim-joist spaces at the perimeter of the floor are a major weak point in the air barrier and insulation. Insulating and air sealing both the rim joist and longitudinal box joist are appropriate either as individual procedures or as part of floor or foundation insulation.
Air seal stud cavities in balloon-framed homes as a part of insulating the rim joist. Air seal other penetrations through the rim before insulating. Two-part spray foam is the most versatile air sealing and insulation system for the rim joist because spray foam air seals and insulates in one step.
Polystyrene or polyurethane rigid board insulation are also good for insulating and air sealing the rim joist area. When the rim joist runs parallel to the foundation wall, the cavity may be air sealed and insulated with methods similar to those as shown here.
If you leave the spray foam exposed, it should have a flame spread of 25 or less and be no more than 3.25 inches thick according to the IRC. In habitable spaces, cover all foam with a thermal barrier such as drywall or use an insulation product that doesn’t require a thermal barrier like mineral wool boards and foil-faced PIC.
Don’t use fiberglass batts to insulate between rim joists because air can move around the fiberglass, causing condensation and encouraging mold on the cold rim joist. If you use foam to insulate between the rim joists, use liquid foam sealant to seal around the edges of the rigid foam.
6.3.2 Installing Floor Insulation
Before installing floor insulation, make the following preparations.
ü Seal air leaks in the floor from the living space or the crawl space or basement, as opportunity allows.
ü Seal and insulate ducts remaining in the crawl space or unconditioned basement.
ü Identify electrical junction boxes, plumbing valves and drains before insulating and provide access to them.
ü Insulate water lines in cold climates if they protrude below the insulation.
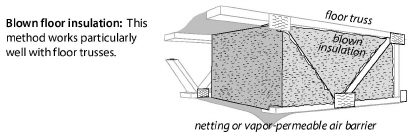
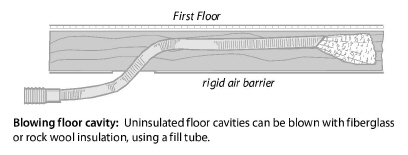
The best way to insulate a floor cavity is to completely fill each joist cavity with fiberglass insulation. Blowing fiberglass insulation is the easiest way to achieve complete coverage because the blown fiberglass is able to surround obstructions and penetrations better than fiberglass batts. Avoid blown cellulose because of its weight, moisture absorption, and tendency to settle.
ü Cover the entire under-floor surface with a vapor permeable supporting material such as: dust-free fabric insulation restraint or equivalent vapor-permeable and drain-able material.
ü Use wood strips to support the flexible or semi-flexible support material unless that material with its fasteners can support the floor insulation without sagging.
ü Install rock wool or fiberglass blowing wool through V-shaped holes in the air barrier.
ü Use a fill tube for installing the blown insulation. Insulation must travel no more than 12 inches from the end of the fill tube.
ü Seal all penetrations in the air barrier with a tape, approved for sealing seams in the air-barrier material.
6.3.3 Installing Fiberglass Batt Floor Insulation
|
SWS Detail: 4.1301.1 Standard Floor System—Batt Installation, 4.1301.5 Cantilevered Floor—Batt Installation, 4.1301.6 Pier Construction Subfloor Insulation—Batt Installation with Rigid Barrier |
Observe these material and preparation specifications for insulating under floors.
ü Choose unfaced batts for insulating floors.
ü Seal all significant air leaks through the floor before insulating the floor, using strong airtight materials.
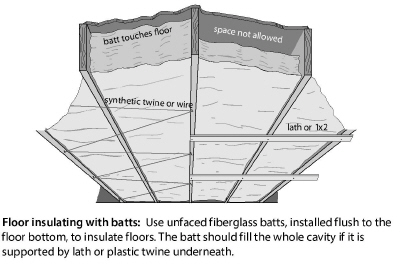
ü Batt thickness must fill the complete depth of each cavity.
ü Batts must be neatly installed, fitting tightly together at joints, fitting closely around obstructions, and filling all the space within the floor cavity.
ü Crawl-space access doors, adjacent to a conditioned space, must be insulated to at least R-21 for horizontal openings and to at least R-15 for vertical openings.
ü Crawl-space access doors, adjacent to a conditioned space, must be effectively weatherstripped.
Installation Specifications for Batts in Floor Cavities
Batt insulation, installed in floors, must be supported by twine, wire, wood lath or other suitable material that keeps the insulation touching the floor. Friction-fit fiberglass batts supported by self-supporting wire insulation supports aren’t good practice. Fasteners for floor insulation must resist gravity, the weight of insulation, and moisture condensation.
ü Install batts in continuous contact with the subfloor.
ü Cut the batts accurately and squarely. An electric carving knife is an excellent tool for this purpose.
Use one of the following 4 restrainer materials to keep the fiberglass batts in the floor cavity.
1. Install standard wood lath (1/4 inch by 1 inch) or nominal one-inch lumber. Install the lath or lumber perpendicular to joists 12 inches apart for joists on 24-inch centers and 18 inches apart for joists on 16-inch centers.
2. Install non-stretching polypropylene or polyester twine.
3. Install copper or stainless steel wire with a minimum diameter of 0.04 inches or size 18 AWG.
4. Install a rigid vapor-permeable air barrier, such as plywood.
Observe these requirements about installation and fasteners for the restrainers.
• Fasten lath or a rigid barrier with screws, nails, or power-driven staples. The fastener should penetrate the joist 3/4 inch or more.
• Install twine or wire in a zig-zag pattern.
• Install power-driven staples over the twine or wire 12 inches apart for joists on 24-inch centers and 18 inches apart for joists on 16-inch centers. The staples must penetrate the wood joists by at least 5/8 inch. Don’t hand staple the restrainer.
6.3.4 Crawl-Space Wall Insulation
Crawl-space foundation insulation is only worthwhile if you can seal the existing foundation vents. See "Power-Ventilated Crawl Spaces" on page 374.
Materials for Crawl-Space Insulation
Retrofit foundation insulation is usually installed on the inside of the foundation walls. Contractors undertake this retrofit for both energy savings and moisture control. Observe these insulation specifications for insulating foundation walls.
• Any foam foundation-wall insulation should be labeled ASTM E84 or UL 723 with a flame spread of less than 25 and smoke developed value of less than 450.
• Foam insulation must be protected by intumescent paint or another ignition barrier if not labeled ASTM E84 or UL 723.
• Local building officials may approve other foam materials based on product labels such as NFPA 286, FM 4880, UL 1040, or UL 1715.
• Unfaced mineral fiber insulation, greater than 5 pounds per cubic foot in density. Although expensive, mineral wool board is probably the best choice because it is vapor permeable and non combustible.
• Metal fasteners should carry a label of ASTM B 695 Class 55.
These insulation products might meet some of the above specifications.
• Foil-faced polyisocyanurate
• Expanded polystyrene foam board.
• Two-part high-density spray polyurethane foam with fire-retardant specifications as listed above. See "Fire Protection for Foam Insulation" on page 99.
• Unfaced rock wool board or fiberglass board.
.
Consider these issues with the use of fibrous insulation in crawl spaces.
• Fiberglass batts or blankets are poor choices for foundation insulation because their facing is a vapor retarder. The facing can trap moisture in the fiberglass between the foundation wall and the facing.
• Sprayed fiberglass and cellulose are easily damaged by moisture, mechanical abrasion, and adhesive failure.
Safety and Durability
Consider the following issues when insulating foundation walls.
ü Secure outdoor access hatches to foundation walls. If the foundation walls are insulated, also insulate any crawl-space access hatch with foam to the same R-value of the foundation wall.
ü Remove obstacles and debris from crawl space before retrofit.
ü If an open-combustion appliance is located in a crawl space, verify that outdoor combustion air is available to the appliance.
ü When insulating crawl-space walls, consult the local building inspector about acceptable ventilation options if in doubt. See "Crawl Space Ventilation" on page 374.
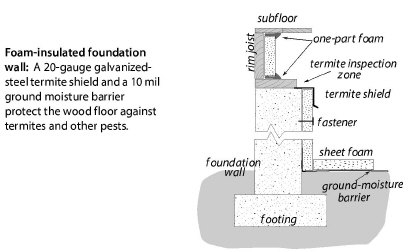
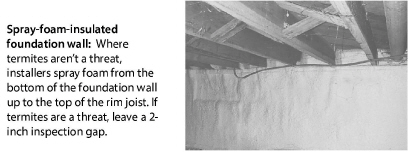
In regions affected by termites, carpenter ants, and similar insects consider these suggestions.
ü Leave a termite-inspection zone between the foundation and the rim-joist insulation.
ü Apply moisture control measures and insulation with the application insecticide or baiting.
ü Consult with experts to ensure that the insulation, air sealing materials, and moisture barrier don’t provide a conduit for insects to infest the wood floor.
|
SWS Detail: 4.1402.2 Basement Wall Insulation—No Groundwater Leakage, 4.1402.3 Basement Wall Insulation—Groundwater Leakage |
Before installing basement wall insulation, inspect for moisture problems and take appropriate action to solve moisture problems.
ü Check for bulk-water problems like puddling around the foundation or malfunctioning gutters and downspouts.
ü Remove obstacles and debris from the basement.
ü Repair structural cracks in foundation walls.
ü Install a drainage system with a sump and outdoor drainage as appropriate to solve major moisture problems.
Basement wall is often installed ineffectively because of the installers’ incomplete understanding about moisture problems.
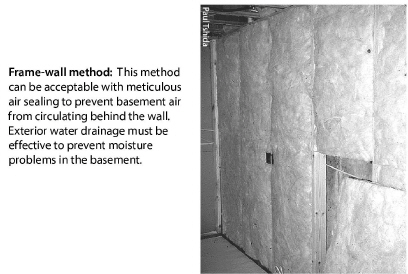
The most common (although not the best) way to insulate basement walls, or any masonry wall, is to build a framed wall against the masonry wall and fill the wall with fiberglass batts. The frame wall is then covered with drywall.
Unfaced batts are the best choice of fiberglass insulation since they contain no vapor barrier to trap moisture. Moisture may escape from the wall in either direction: from outdoors in or indoors out.
With a framed wall, the installer often neglects to seal in areas where the wall is discontinuous, such as a mechanical room. Any area, such as an unfinished wall, open rim-joist area, or un-sheeted ceiling, constitutes a very large air leak around the insulated wall. Avoid this problem by doing these procedures.
ü Insulate the rim joist and air seal it.
ü Build the frame walls.
ü Wall off the entire basement. If a mechanical room or other area won’t be insulated, install an airtight block at the wall’s edge to prevent basement air from circulating behind the insulated wall.
ü Don’t install a vapor barrier on the interior face of the new basement wall. The new wall assembly must be able to dry toward indoors or to the outdoors.
ü Install drywall in an airtight manner on the walls and ceiling by applying sealant to the back or each sheet around its perimeter.
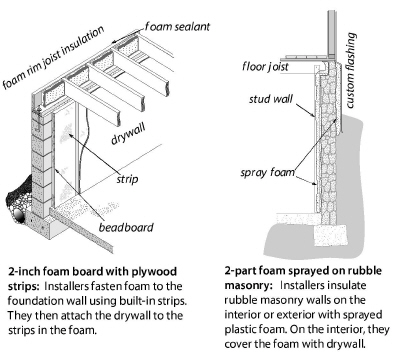
Stripped Foam Basement Insulation
Polystyrene foam is an excellent choice for insulating smooth basement walls.
You can order either expanded polystyrene or extruded polystyrene equipped with grooves for fastening strips, spaced apart on 16-inch or 24-inch centers. Stripped foam sheets may be the easiest and most satisfactory way to insulate below-grade basement walls. Do these procedures to install 2-inch stripped foam on a foundation wall.
ü Apply walnut-sized globs of adhesive to the back of the sheet on one-foot centers. Use a foam-compatible adhesive and follow the instructions on the container.
ü Install at least two concrete screws or two powder-driven nails in each strip, 24 inches from the bottom and top.

ü Wherever an electrical box is needed, install it between two sheets if possible because it’s easier to run the wire between sheets than toward the center of a sheet. Install an electrical box backed by a piece of wood that sets the box out from the foam a half inch. Use construction adhesive and a concrete screw to fasten the box in place.
ü Leave a half-inch gap at the bottom of the polystyrene sheets to run wire. Run the wire along the floor and up into the boxes. If flooding is a possibility, run the wire at the ceiling and down into boxes on the wall.
ü Seal the bottom gap and other gaps in the foam sheeting with one-part foam.
ü Glue the drywall using the same adhesive and pattern. Screw the drywall to each wooden strip with one-inch drywall screws.
Exterior Foam Foundation Insulation
If installed at the exterior, as during new construction, use durable water-resistant insulation such as blue or pink extruded polystyrene or high-density (2 pcf) expanded polystyrene. For portions that are exposed above ground level and six inches below ground, you’ll need to provide mechanical and moisture protection such as sheet metal or fiberglass panels. For areas more than 6 inches below grade, there are asphalt-based sealants for the foam that are applied with a paint roller.