7.3 Window Replacement Specifications
The purpose of these specifications is to guide the selection and installation of replacement windows. Improper window installation can cause water leakage, air leakage, and noise leakage.
Existing window openings may have moisture damage and air leakage. Repair these conditions before or during window replacement.
Included here are specifications for two special window safety considerations.
1. Windows in high risk areas, such as around doors and walkways, must have safety glass.
2. Some bedroom windows function as a fire escape (egress). Recognize and accommodate this egress function.
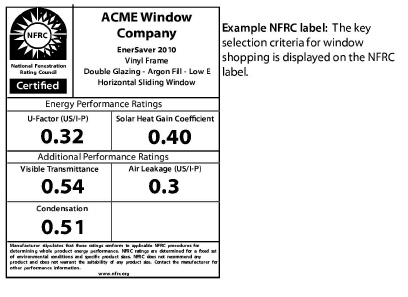
7.3.1 Window Energy Specifications
Installing new windows incurs a large labor expense so they should be as energy-efficient as budget allows.
1. Replacement windows must have a U-factor less than or equal to what is required by State standards. Lower is better, especially in cold climates.
2. Replacement windows facing east or west in air conditioned homes should have a solar heat-gain coefficient (SHGC) that is equal to or less than what is required by State standards. Lower is better in hot climates.
Remove existing windows without damaging the home’s interior finish, siding, exterior trim, or the water-resistive barrier (WRB) if possible.
1. Protect the interior of the home from construction debris. See "EPA RRP Requirements" on page 45.
2. Remove window sashes, jambs, or siding, depending on the window-replacement method chosen.
3. Repair moisture damage to the rough opening before installing the new window.
7.3.3 Installing Replacement Windows
|
SWS Details: 3.1203.2 Single-Unit Window, Mounted on Rough Opening—Newer House, 3.1202.1 Fixed Frame with Wood Sash—Older House, 3.1203.1 Replacement Window in Existing Window Frame |
The most important considerations for installing new windows is that the window installation is watertight and airtight.
Water leakage deteriorates building components around the window. To prevent water leakage in frame buildings, the window must be integrated, if possible, into the home’s water resistive barrier (WRB).

7.3.4 Replacing Nailing-Fin Windows
|
SWS Detail: 3.1203.2 Single-Unit Window, Mounted on Rough Opening—Newer House, 3.1203.1 Replacement Window in Existing Window Frame |
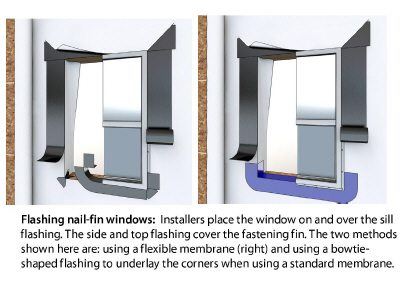
Install replacement windows with nailing fins in the rough opening after removing the existing window frame and exterior trim. Fasten the nailing fins directly to the house’s sheathing or framing, but support the window’s weight on the sill with or without shims before fastening the window to the building.
Water-Resistive Barrier (WRB)
Designers and builders assume that some rain water penetrates through the siding. The WRB is the building’s last defense against water. House wrap and asphalt felt are the most common WRBs. Window replacements that expose the home’s WRB must incorporate the WRB in the window installation. Install a sill pan below the window and flashing on the side fins. Use flashing to connect the window opening to the WRB so water that penetrates the siding, trim, or window exits the building by way of the WRB.
Windows are exposed to wind and rain. Install replacement windows so water that penetrates the siding or trim drains to the outdoors. If water leaks underneath the existing WRB or the new flashing, the water eventually damages the building. With proper flashing, the fins and flashing create a drainage system that drains water to the outdoors rather than relying on caulked siding and trim to prevent rain water from penetrating the building’s surface.
Follow these steps to install a nailing-fin window in the rough opening.
1. At the sill, insert the flashing underneath the existing siding, over top of existing building paper, and under the bottom nailing fin of the window.
2. Use flat shims to provide a level surface and support under the vertical structural members of the new window frame. Don’t allow the fins to support the window’s weight.
3. Use fasteners with heads wide enough in diameter to span the holes or slots in the window fin.
4. Avoid over-driving the fasteners or otherwise deforming the window fin.
5. Flash the window around its perimeter with 15-pound felt, house wrap, or a peel-and-stick membrane.
a. Flashing procedures may vary. However, always install flashing materials to overlap like shingles.
b. Insert the new building paper or flashing underneath the existing siding and underneath existing building paper on the sides and top of the window opening.
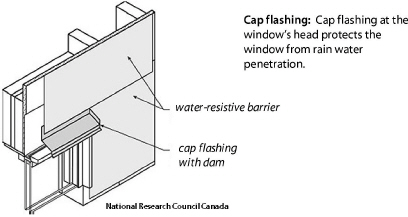
6. Windows that are exposed to wind-driven rain or without overhangs above them or without WRB integration should have a rigid cap flashing (also called head flashing) to prevent rainwater from draining onto the window. The cap flashing should divert water away from vertical joints bordering the window with an overhang or dam.
7. Tuck the cap flashing up behind the WRB or exterior siding. Metal cap flashing must have downward bending lip of at least 1/4 inch on the front and ends.
8. Fill gaps between the new window and existing frame with low-expanding foam.
9. Thoroughly caulk all filler and trim pieces surrounding the replacement window.
7.3.5 Block-Frame or Finless Windows
|
SWS Detail: 3.1202.1 Fixed Frame with Wood Sash—Older House, 3.1203.1 Replacement Window in Existing Window Frame, 3.1203.4 Window Replacement |
Contractors install windows using a block-frame or finless installation when they can’t remove the existing window frame or in a masonry window opening. Block-frame windows rely on caulk or rigid flashing to create a weatherproof seal around the window perimeter. Take care when installing caulk so that it is durable and effective for as long as possible.
Comply with the following requirements when installing block-frame or finless windows.
1. Block-frame or finless windows may require a sufficiently wide gap between the new window and the existing window frame or masonry opening to allow for the following.
a. Allowing for a slightly out-of-square opening.
b. Leveling the window.
c. Insulating the gap with foam.
2. Access the window-weight cavities, remove the weights, and fill the cavities with insulation, and seal the cavities.
3. Protect the existing sill with a metal or plastic sill pan or rigid sill flashing if necessary for drainage and to protect the existing sill that protrudes from the exterior wall. Or, install a new sill as part of the window replacement.
4. Support block-frame or finless windows under their main vertical supports with shims that level the window.
a. Use flat shims for support if the sill surface is flat.
b. Use tapered shims or a sill angle for support if the sill surface is sloping.
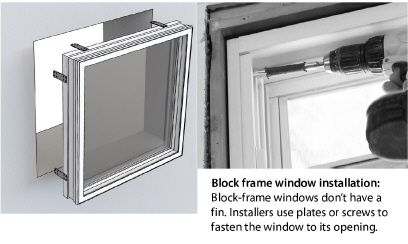
5. Windows without fins must be secured to the rough opening within 4 inches of each side corner and a minimum 12 inches on center along the remainder of the frame with one of these fastening methods.
a. Screws fastened through the window frame. Use screws that are designed for fastening block-frame windows if available.
b. Jamb clips or plates that are fastened first to the window and then to the opening in separate steps.
6. Fill gaps between the new window and existing frame with low-expanding foam.
7. If possible, flash block-frame windows between the opening and the replacement-window frame and extend the flashing out far enough to slip under or into the siding.
a. Tuck the flashing up behind the exterior siding at least 1 inch.
b. Sill and cap flashing should have a downward bending lip of at least 1/4 inch on the front that sheds water away from the building.
7.3.6 Flush-Fin Window Replacement
Flush-frame windows are replacement windows that fasten to the window opening and mount directly over the flat siding surrounding the window opening. Replace windows in stucco walls using windows with flush fins, also called stucco fins, that have no nail holes. Flush-fin windows work well for any window opening with a flat water-resistant finished surface surrounding the window opening.
This flush-fin window-replacement technique is similar to block-frame window installation.
1. Support the replacement window on the existing sill with one of the following materials.
a. A flat or tapered continuous wood support.
b. Flat shims under the window’s main vertical supports.
c. Tapered shims under the window’s main vertical supports if the sill is sloping.
2. Apply a sealant that remains flexible to the back of the flush fin of the replacement window in order to seal it to the surface of the exterior wall. Interrupt the caulking at the bottom fin for one inch on each side of the window’s weep holes.
3. Fasten the flush-fin window to the window opening by driving screws through the replacement window’s frame.
