8.14 Evaluating Duct Air Leakage
Duct leakage is a major energy-waster in buildings where the ducts reside outside the home’s thermal boundary in a crawl space, attic, attached garage, or unconditioned basement. When these intermediate zones remain outside the thermal boundary after weatherization, duct sealing is usually cost-effective.
Duct leakage inside the thermal boundary isn't usually a severe energy or comfort problem unless the leaks are causing pressure imbalances in the dwelling or duct zone.
8.14.1 Troubleshooting Duct Leakage
Locate the duct leaks and evaluate their severity using one or more of the following procedures.
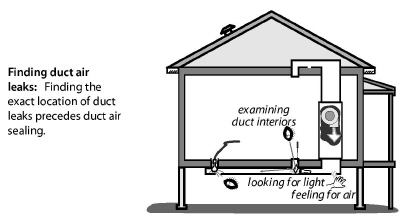
Finding Duct Leaks Using Touch and Sight
One of the simplest ways of finding duct leaks is feeling with your hand for air leaking out of supply ducts, while the ducts are pressurized by the air handler’s blower. Duct leaks can also be located using light.
Use one of these 4 tests to locate air leaks.
1. Use the air handler blower to pressurize supply ducts. Closing the dampers on supply registers temporarily or partially blocking the register with pieces of carpet, magazines, or any object that won’t be blown off by the register’s airflow increases the duct pressure and make duct leaks easier to find. Dampening your hand makes your hand more sensitive to airflow, helping you to find duct air leaks.
2. Place a trouble light, with a 100-watt bulb, inside the duct through a register. Look for light emanating from the exterior of duct joints and seams.
3. Determine which duct joints were difficult to fasten and seal during installation. These joints are likely duct-leakage locations.
4. Use a trouble light, flashlight, and mirror or a digital camera to help you to visually examine duct interiors.
Feeling air leaks establishes their exact location. Ducts must be pressurized in order to feel leaks. You can feel air leaking out of pressurized ducts, but you can’t feel air leaking into depressurized return ducts. Pressurizing the home with a blower door forces air through duct leaks, located in intermediate zones, where you can feel the leakage coming out of both supply and return ducts.
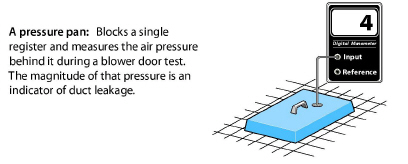
Pressure pan tests can identify leaky or disconnected ducts located in intermediate zones. With the house depressurized by the blower door to either –25 pascals or –50 pascals, make pressure pan readings at each supply and return register.
If the ducts are located within the thermal boundary, typically, pressure pan testing isn't really necessary if the following steps are taken.
• Returns are sealed in the CAZ, basements or crawlspaces for H&S reasons.
• Verify that the duct zone pressure does not change when the air handler is operated.
Pressure pan testing is required when ducts are located outside the thermal boundary or when returns are part of the building structure such as panned floor joists or wall cavities. For comprehensive pressure pan testing, use the following guidance.
1. Install blower door and set-up house for winter conditions. Open all interior doors.
2. If the basement is conditioned living space, open the door between the basement and upstairs living spaces.
3. If the basement isn’t conditioned living space, close the door between basement and upstairs. Then measure and record the zone pressure of the basement with reference to the conditioned space to confirm that the conditioned space and basement are separate spaces with a substantial pressure difference between them.
4. Turn furnace off at the thermostat or main switch. Remove furnace filter, and temporarily tape filter slot if one exists. Be sure that all grilles, registers, and dampers are fully open.
5. Temporarily seal any outside fresh-air intakes to the duct system.
6. Seal supply registers in unoccupied zones that aren’t intended to be heated — an unconditioned basement or crawl space, for example.
7. Open attics, crawl spaces, and garages as much as possible to the outdoors so they don’t create a secondary air barrier.
8. Connect hose between pressure pan and the input tap on the digital manometer. Leave the reference tap open.
9. With the blower door’s manometer reading –25 or –50 pascals, place the pressure pan completely over each grille or register one by one to form a tight seal. Leave all other grilles and registers open when making a test. Record each reading, which should give a positive pressure.
10. If a grille is too large or a supply register is difficult to cover with the pressure pan (under a kitchen cabinet, for example), seal the grille or register with masking tape. Insert a pressure probe through the masking tape and record the reading. Remove the tape after the test.
11. Use either the pressure pan or tape to test each register and grille in a systematic way.
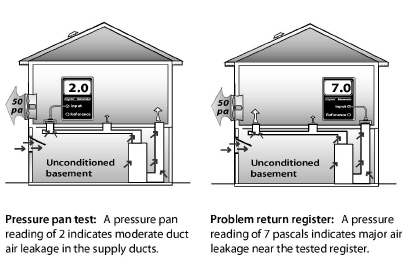
If the ducts are perfectly sealed with no leakage to the outdoors, you won’t measure any pressure difference (0.0 pascals) during a pressure-pan test. The higher the measured pressure reading, the more connected the duct is to the outdoors.
• If the median pressure pan reading is 4 pascals or more and/or if one reading is more than 8 pascals, duct-sealing is usually cost-effective.
• Following duct-sealing work, no more than three registers should have pressure-pan readings greater than 2 pascals. No single reading should be greater than 4 pascals. (Or follow your own more ambitious standard.)
• The reduction you achieve depends on your ability to find the leaks and whether you can access the leaky ducts. The best weatherization agencies use 1 pascal or less as a general goal for all registers.
Examine the registers connected to ducts that are located in areas outside the conditioned living space. Unconditioned spaces containing ducts include attics, crawl spaces, garages, and unoccupied basements. Also evaluate registers attached to stud cavities or panned joists used as return ducts. Leaky ducts, located outside the conditioned living space, may lead to pressure-pan measurements more than 30 pascals if these ducts have large holes.
8.14.2 Measuring Duct Air Leakage with a Duct Blower
The duct blower is the most accurate common measuring device for duct air leakage. It consists of a fan, a digital manometer or set of analog manometers, and a set of reducer plates for measuring different leakage levels.
Pressurizing the ducts with a duct blower measures total duct leakage. Using a blower door with a duct blower measures leakage to outdoors.
Measuring Total Duct Leakage
The total duct leakage test measures leakage to both indoors and outdoors. The house and intermediate zones should be open to the outdoors by way of windows, doors, or vents. Opening the intermediate zones to outdoors insures that the duct blower is measuring only the ducts’ airtightness — not the airtightness of ducts combined with other air barriers like roofs, foundation walls, or garages.
Supply and return ducts can be tested separately, either before the air handler is installed in a new home or when an air handler is removed during replacement.
Follow these steps when performing a duct airtightness test.
1. Install the duct blower in the air handler or to a large return register, either using its connector duct or simply attaching the duct blower itself to the air handler or return register with cardboard and tape.
2. Remove the air filter(s) from the duct system.
3. Seal all supply and return registers with masking tape or other non-destructive sealant.
4. Open the house, basement or crawl space, containing ducts, to outdoors.
5. Drill a 1/4 or 5/16-inch hole into a supply duct a short distance away from the air handler and insert a manometer hose. Connect a manometer to this hose to measure duct with reference to (WRT) outdoors. (Indoors, outdoors, and intermediate zones should ideally be opened to each other in this test).
6. Connect an airflow manometer to measure fan WRT the area near the fan.
Check manometer(s) for proper settings. Digital manometers require your choosing the correct mode, range, and fan-type settings.
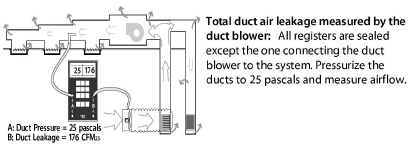
1. Turn on the duct blower and pressurize the ducts to 25 pascals.
2. Record duct-blower airflow.
3. While the ducts are pressurized, start at the air handler and move outward feeling for leaks in the air handler, main ducts, and branches.
4. After testing and associated air-sealing are complete, restore filter(s), remove seals from registers, and check air handler.
Measuring Duct Leakage to Outdoors
Measuring duct leakage to outdoors gives you a duct-air-leakage value that is directly related to energy waste and the potential for energy savings.
1. Set up the home in its typical heating and cooling mode with windows and outside doors closed. Open all indoor conditioned areas to one another.
2. Install a blower door, configured to pressurize the home.
3. Connect the duct blower to the air handler or to a main return duct.
4. Pressurize the ducts to +25 pascals by increasing the duct blower’s speed until this value is reached.
5. Pressurize the house until the pressure difference between the house and ducts is 0 pascals (house WRT ducts). See "Blower-Door Test Procedures" on page 520.
6. Read the airflow through the duct blower. This value is duct leakage to outdoors.

8.14.3 Measuring House Pressure Caused by Duct Leakage
The following test measures pressure differences between the house and outdoors, caused by duct leakage. Try to correct pressure differences greater than +2.0 pascals or more negative than –2.0 pascals because of the air leakage through the building enclosure that the pressure differences create.
1. Close all windows and exterior doors. Turn-off all exhaust fans.
2. Open all interior doors, including door to basement.
3. Measure the baseline house-to-outdoors pressure difference and zero it out using the baseline procedures described in “Blower-Door Test Procedures” on page 520.
4. Turn on air handler.
5. Measure the house-to-outdoors pressure difference. This test indicates dominant duct leakage as shown here.
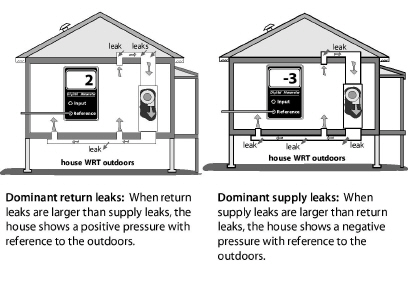
A positive pressure indicates that the return ducts (which pull air from leaky intermediate zones) are leakier than the supply ducts. A negative pressure indicates that the supply ducts (which push air into intermediate zones through their leaks) are leakier than return ducts. A pressure at or near zero indicates equal supply and return leakage or else very little duct leakage.