This chapter discusses some of the most important hazards that you find both on weatherization jobs in residential buildings. The SWS contains many health-and-safety requirements that relate to various cost-effective energy-conservation measures (ECMs). We reference these SWS requirements throughout this chapter.
The chapter begins with health, safety, and durability of buildings. If health-and-safety problems affect the cost-effective ECMs you select, solve these problems before or during the weatherization work.
Workers are the most important asset of WAP. We discuss their health and safety at the end of this chapter.
Client Health and Safety
Building fires, moisture problems, carbon-monoxide poisoning, and lead-paint poisoning are the most common and serious health and safety problems found in residential buildings.
Alert residents to any health and safety hazards that you find. Discuss known or suspected health concerns with occupants; take extra precautions based on occupant sensitivity to environmental hazards, such as chemicals and allergens.
ü Inspect the building for fire hazards such as improperly installed electrical equipment, flammable materials stored near combustion appliances, or malfunctioning heating appliances. Discuss these hazards with occupants, and remove these hazards if possible, as allowed under WPN 17-7
ü Understand and comply with the fire-containment code requirements of the IRC.
ü Test combustion appliances for carbon monoxide and related hazards. Also measure carbon monoxide (CO) in the ambient air. Investigate and eliminate CO.
ü Find moisture problems, and discuss them with the occupant. Solve moisture problems before or during weatherization work. See page 34.
ü Obey the EPA Repair, Renovation, and Painting rules when working on buildings constructed before 1978. Prevent dust during all weatherization projects. Explain the lead paint hazard and tell residents what you’re doing to protect them. See page 43.
Worker Health and Safety
In the worker-safety section at the end of this chapter, we discuss the most dangerous hazards present during weatherization and how to avoid these hazards. Hazards include: driving, falls, back injuries, cuts, chemical exposure, repetitive stress, and electrical shocks. See page 50.
1.1 Educate Occupants and Building Operators
|
SWS Details: 2.0203.4 Occupant Education, 2.0702.3 Building Operations Staff Education |
Homes and multifamily buildings are complex systems of building envelopes and mechanical systems that harbor a variety of hazards. Educate occupants, landlords, and building operators about the health and safety hazards and the improvements that you make to mitigate these hazards.
ü Explain any health or safety hazard you see with fellow workers, occupants, and building operators, and discuss how to mitigate the hazard.
ü Suggest contacting specialists to mitigate particular hazards if appropriate.
ü Explain equipment operation and maintenance (O&M).
ü As appropriate, provide a O&M procedures manuals and manufacturers’ equipment specifications as appropriate. Encourage occupants or staff to store important documents in a safe and obvious location.
ü Instruct occupants or staff to remove combustible materials from near ignition sources.
ü Inform occupants and staff about smoke alarms, carbon monoxide (CO) alarms, and combination alarms, and explain their functioning.
ü Suggest that occupants or staff remove or isolate indoor air quality hazards such as pesticides, petroleum products, and solvents.
The building codes focus on preventing the spread of fire within and between buildings. A fire barrier is a tested and certified wall assembly that can withstand and contain a fire for a particular time duration.
A fire partition is a fire barrier that prevents the spread of fire between the sections of a building. A firewall is a structural fire barrier between buildings that is designed to remain standing during and after a fire.
Flame spread is a tested value of how fast a material burns compared to red oak planks.
A thermal barrier is a sheeting material that protects the materials behind it from reaching a temperature of 250°F or breaching during a fire. Drywall is the most common thermal barrier and is rated for 15 minutes of protection. Fire partitions in multifamily buildings usually require a wall assembly with a 2-hour rating.
An ignition barrier is a material used with foam insulation to prevent the foam from igniting. The code specifies a number of materials that can serve as ignition barriers including drywall, plywood, fibrous insulation, galvanized steel, and intumescent paint.
See also "Fire Testing and Rating" on page 531.
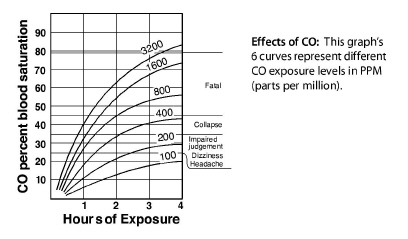
Carbon monoxide is a colorless, odorless, poisonous gas. The two common terms for expressing measured CO concentration are these.
1. “as measured” which compares CO molecules to air molecules in parts per million (ppm).
2. “air free”, which is a value, calculated from the as measured CO and the measured oxygen in combustion gases. Air free denotes what the CO concentration would be in an air-free sample of combustion gases.
Measure ambient CO levels outside and inside. Investigate any CO levels inside that are higher than what was measured outside.
1.3.1 Causes of Carbon Monoxide (CO)
CO is released by unvented gas space heaters, kerosene space heaters, backdrafting vented space heaters, gas ranges, leaky wood stoves, and motor vehicles idling near the building. Central furnaces and boilers that backdraft may also lead to high levels of CO.
The following conditions cause CO.
• A combustion appliance is overfired compared to its rated fuel input.
• Backdrafting combustion gases smother the flame.
• An object interferes with the flame (a pan over a gas burner on a range top, for example).
• Too-little combustion air.
• Rapidly moving air interferes with the flame.
• Burner misalignment causes a distorted flame.
• Flue or heat exchanger blockage interferes with the flow of flue gases.
Measure CO at the exhaust port of the heat exchanger. Identify and correct CO problems.
Testing for Carbon Monoxide (CO)
The most common CO-test instruments use electronic sensors with a digital display showing parts per million (ppm). Read the manufacturer’s instructions on zeroing the meter — usually by calibrating the meter in outdoor air. CO test equipment must be maintained and calibrated regularly per manufacturers recommendations.
Air-free CO measurement includes both CO and O2 sensing with a calculation to find the CO concentration in undiluted flue gases that contain no oxygen. Air-free CO measurement avoids the perception that moving the testing probe or diluting CO are solutions to elevated levels of CO. See "Carbon Monoxide (CO) Testing" on page 254.
Technicians must test for CO before, during and after weatherization is completed.
1.4 Smoke and Carbon Monoxide (CO) Alarms
Every dwelling must have at least one smoke alarm and one CO alarm. Install these alarms on each level, near the bedrooms.
Install CO alarms, smoke alarms, or else combination CO/smoke alarms in all dwellings that don't have functional alarms. Check all existing alarms in the home for proper operation.
Smoke and CO alarms are to be installed per manufacturers installation recommendations.
Single-function alarms or combination alarms can interconnect electrically for whole-building protection. If one alarm sounds the other alarms sound too.
1.4.1 Occupant Education about Alarms
ü Educate occupants about what to do if the alarm sounds: evacuate or at least investigate.
ü Alert residents to the possibility of false alarms from smoking, cooking and forest fires.
ü Discuss the low-battery chirping sound and how to replace the battery.
ü Tell residents that alarms last less than 10 years and that a different sound will alert them when the alarm fails.
Install smoke alarms labeled UL 217 in buildings where they don’t exist or don’t work.
ü Install at least one smoke alarm in each dwelling on each floor.
ü Install smoke alarms per manufacturer’s recommendations.
ü If battery powered, prefer long-life lithium batteries.
ü If hard wired, connect the alarm to a circuit that is energized at all times.
ü Be aware of local ordinances - for example, Marion County (Indianapolis) requires 10 year non-removable, non-replaceable batteries in residential buildings where battery type smoke alarms are used.
ü Due to the increased use of synthetic materials in building construction, the Indiana State fire marshal recommends the use of dual sensor smoke alarms that incorporate the use of both ionization and photoelectric sensors.
Don’t install smoke alarms in these situations.
• Within 12 inches of exterior doors and windows
• With an electrical connection to a switched circuit
|
SWS Detail: 2.0301.2 Carbon Monoxide Alarm or Monitor, 2.0201.2 Combustion Safety - Make-up Air |
Install at least one CO alarm in all weatherized dwellings or weatherized apartments. CO alarms must comply with these specifications.
ü Have a label with a UL 2034 listing.
ü If hard wired, connect to a circuit that is energized at all times by plugging in to an electrical receptacle.
ü If battery powered, prefer long-life lithium batteries.
ü Have a sensor-life alarm.
Don’t install CO alarms in these situations.
• In a room that may get too hot or cold for alarm to function properly
• Within 5 feet of a combustion appliance, vent, or chimney
• Within 5 feet of a storage area for vapor-producing chemicals
• Within 12 inches of exterior doors and windows
• Within a furnace closet or room
• With an electrical connection to a switched circuit
|
SWS Details: 2.0100.1 Global Worker Safety, 2.0201.2 Combustion Safety - Make-up Air, 6.6005.2 Kitchen Range, 6.6005.4 Kitchen Range Hood within Dwelling Unit (All Building Types) |
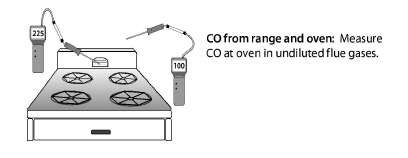
Gas ovens can release CO, natural gas, or propane into a kitchen. Test the burners for safe combustion with these steps and do the recommended improvements.
1. Test for gas leaks in the gas piping in and around the range and oven and seal leaks.
2. Turn the oven burner and then range burners to high one-by-one. Inspect the flames and test them for CO. For the oven burner test at its outlet. For range burners, hold the test probe approximately 8 inches above the flame.
3. If the CO reading for the oven exceeds 225 ppm or any of the range top burners exceed 100 ppm, clean and tune the burner.
4. For range tops, if after servicing, the CO level still exceeds 100 ppm, install a CO alarm in the same room as the appliance and perform client education on use of the range. Consider a kitchen rated CO alarm.
5. For ovens, if after servicing, the CO level still exceeds 225 ppm, install a CO alarm in the same room as the appliance. Additionally, install a kitchen exhaust fan (minimum 100 cfm) to vent the CO to the exterior OR replace the range if a fan is not an option. Consider a kitchen rated CO alarm.
6. DOE funds cannot be used to replace ranges.
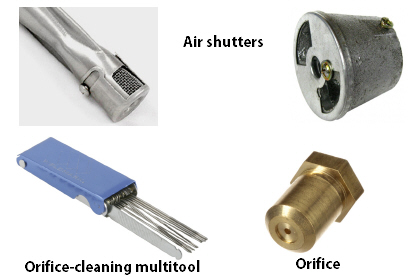
7. Burner orifices can clog. Clean dirty orifices with a multi-tool designed for cleaning various sizes of orifices.
8. Adjust the burner’s air shutters to stabilize and harden the flame and reduce yellow-tipping, which should also reduce the CO concentration.
Caution: To protect yourself and the occupants, measure CO in the ambient air in the kitchen during these tests. If the ambient CO reading is 70 ppm or more, discontinue the testing.
Client Education about Ranges
Educate clients about the following safety practices in using their gas range.
ü Never use a range burner or gas oven as a space heater.
ü Open a window, and turn on the kitchen exhaust fan when using the range or oven.
ü Never install aluminum foil around a range burner or oven burner because the foil could interfere with the flame.
ü Keep range burners and ovens clean to prevent dirt from interfering with combustion.
ü Burners should display hard blue flames. Call a service company if you notice yellow flames, white flames, wavering flames, or noisy flames.
1.6 Reducing Moisture Problems
Moisture causes billions of dollars worth of respiratory distress, property damage, and high energy bills each year in American buildings. Moisture-nurtured irritants, such as dust mites and mold, cause respiratory illness.Water damages building materials by nurturing destructive irritants like mold and insects, dissolving glues and mortar, and corroding metal.
1.6.1 Moisture Sources and Effects
Water or material wetting due to high relative humidity reduces the thermal resistance of insulation and other building materials. High humidity also increases air-conditioning costs because the air conditioner must remove airborne moisture to provide comfort.
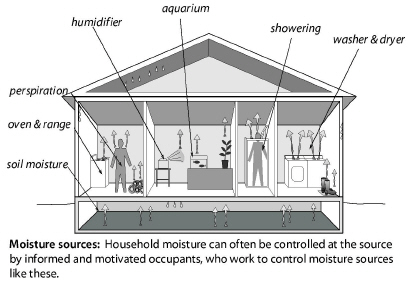
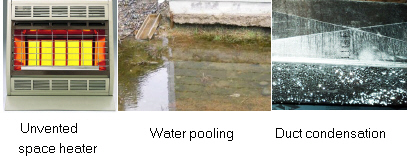
The most common sources of moisture are leaky roofs and damp foundations. Other critical moisture sources include clothes dryers venting indoors, long showers, cooking, and unvented gas appliances like ranges or decorative fireplaces. Clients control many of these moisture sources, so educate them about how to reduce moisture sources.
Climate is also a major contributor to moisture problems. The more rain, extreme temperatures, and humid weather a region experiences, the more its buildings are vulnerable to moisture problems.
1.6.2 Moisture Reduction Priorities
Follow these priorities by number to reduce moisture problems.
1. Reduce moisture sources such a roof leaks, plumbing leaks, and standing water around the building’s perimeter outdoors.
2. Install air and vapor barriers to prevent water vapor from migrating out of the soil and into building materials and building cavities.
3. Provide mechanical ventilation to remove accumulated water vapor. See "Ventilation" on page 393.
|
Moisture Source |
Potential Amount Pints |
|---|---|
|
Ground moisture |
0–105 per day |
|
Unvented combustion space heater |
0.5–20 per hour |
|
Seasonal evaporation from materials |
6–19 per day |
|
Dryers venting indoors |
4–6 per load |
|
Dish washing |
1–2 per day |
|
Cooking (meals for four persons) |
2–4 per day |
|
Showering |
0.5 per shower |
1.6.3 Symptoms of Moisture Problems
Condensation on windows, walls, and other cool surfaces signals high relative humidity and the need to reduce moisture sources.
During very cold weather or summer air conditioning, condensation may occur on cold surfaces. Occasional condensation isn’t a major problem. However, if condensation happens frequently, take action to reduce moisture sources. Adding insulation helps eliminate cold walls, ceilings, and air-conditioning ducts where water vapor condenses.
Moisture problems arise when parts of the building become wet often and remain wet. Moisture in organic or porous building materials reaches a threshold that allows irritants like mold, dust mites, and insects to thrive. These irritants can cause or trigger asthma, bronchitis, and other respiratory ailments because they produce potent biological allergens.
Rot and wood decay indicate advanced moisture damage. Unlike surface mold and mildew, wood decay fungi and insects penetrate, soften, and destroy wood.
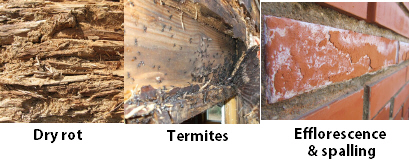
Peeling, blistering, or cracking paint may indicate that moisture is moving through a building material or assembly, damaging the paint and the materials underneath.
Corrosion, oxidation, and rust on metal are unmistakable signs of moisture problems. Deformed wooden surfaces may appear as the damp wood swells, and later warps and cracks as it dries.
Efflorescence is a white, powdery deposit left by water that moves through masonry and leaves minerals behind as it evaporates from the masonry surface. Masonry materials experience spalling with efflorescence that deteriorates their surfaces.
1.6.4 Solutions for Moisture Problems
Preventing moisture problems is the best way to guarantee a building’s durability and its occupant’s respiratory health. However, the solutions get progressively more expensive if simple solutions don’t solve the problems.
Inexpensive Moisture Solutions
If moisture source reduction isn’t adequate to prevent moisture problems, try these solutions after preventive measures are in place.
ü Install a ground moisture barrier. See “Crawl Space Moisture and Safety Issues” on page 38.
ü Verify that clothes dryers and exhaust fans vent to the outdoors and not into crawl spaces or attics.
ü Seal water leaks in the foundation.
ü Seal water leaks in the roof.
ü Remove unvented space heaters, a major source of moisture, from the dwelling.
ü Educate clients about ways to reduce moisture that they control.
ü Educate clients to avoid excessive watering around the building’s perimeter. Watering lawns and plants close to the building can dampen its foundation. In moist climates, cut shrubbery back away from the foundation, allowing air to circulate near the foundation.
ü Insulate air-conditioning ducts to prevent summer condensation.
More Costly Moisture Solutions
Follow these preventive measures before trying any of the solutions in the next section.
ü Install or improve air barriers and vapor barriers to prevent air leakage and vapor diffusion from transporting moisture into building cavities. See page 499.
ü Add insulation to the walls, floor, and ceiling of a building to keep the indoor surfaces warmer and less prone to winter condensation. During cold weather, well-insulated homes can tolerate higher humidity without condensation than can poorly insulated homes.
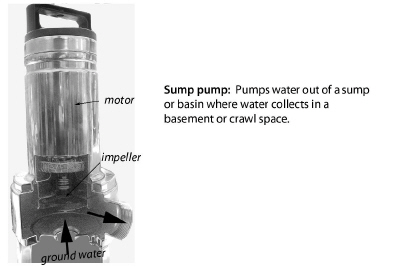
ü A sump pump is the most effective remedy when ground water continually seeps into a basement or crawl space and collects there as standing water. Persistent ground-water seepage may only be solved by connecting an interior perimeter drain to the sump. The sump must not interfere with drainage and must be accessible and rigid. See "Sump pump" on page 40.
ü Ventilate the dwelling with drier outdoor air to dilute the more humid indoor air. Ventilation is only effective when the outdoor air is drier than the inside air, such as in winter. In summer, outdoor air may be more or less humid than indoor air depending on climate, time of day, and whether the dwelling is air conditioned. See "Ventilation" on page 393.
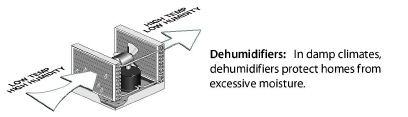
Dehumidifiers and Air-Conditioners for Drying
As a last resort, remove moisture from indoor air by cooling the air to below its dew point with dehumidifiers in winter and air-conditioners in summer. Using air conditioners and dehumidifiers for drying a building is the most expensive solution. It is required to try all the moisture solutions discussed previously before resorting to a dehumidifier.
The dehumidifier should meet these specifications.
ü Must be Energy Star or more efficient.
ü Must have a fan-off option.
ü Must retain automatic settings after power interruption.
ü Must be rated for low temperature operation if located in a basement or crawl space.
When you install a dehumidifier, observe these requirements.
ü Install the dehumidifier in a location that allows free airflow around it.
ü The dehumidifier should have automatic controls to limit energy and power.
ü Make sure that the dehumidifier works and measure the relative humidity in the space before completing the installation.
ü Drain the dehumidifiers collected water to a plumbing drain in a code-approved way.
ü Give the homeowner the user guide and warranty information, and explain how to use the dehumidifier. Show the occupant how to clean or change the filter and how to clean the condensate drain.
1.6.5 Crawl Space Moisture and Safety Issues
Air, water vapor, liquid water, and pollutants move through soil and into crawl spaces and dirt-floor basements. Even if soil’s surface seems dry and airtight, the soil may allow a lot of water vapor and soil gases to enter a dwelling.
Cover the ground with an airtight moisture barrier to prevent the movement of moisture and soil gases from the ground into the crawl space using these procedures.
ü The crawl space should have an access hatch or door that is sized adequately for a worker or a resident to enter and exit.
ü Remove debris that can cause injury or puncture vapor barrier.
ü Remove biodegradable matter, such as wood and cardboard, from the crawl space.
ü Cover the ground completely with a ground moisture barrier such as 6-mil polyethylene where little or no foot traffic exists. Install reinforced or cross-linked polyethylene where the barrier will see foot traffic, such as when the crawl space is used for storage.
ü Seams must overlap at least 12 inches. Seal the edges and seams with acoustical sealant, butyl caulking, or vapor tape to create an airtight seal between the crawl space and the ground underneath. Seams must overlap 12 inches.
ü The edges of the barrier should run at least 6” up the foundation walls and internal supporting structures. Fasten the barrier with termination strips, masonry fasteners, and sealant. Installers may also adhere the barrier with mechanical fasteners and polyurethane adhesive or acoustical sealant to a clean and flat masonry surface.
ü To avoid trapping of moisture against wood surfaces, ground moisture barriers must not touch wood structural members, such as posts, mud sills, or floor joists.
ü Caution occupants not to store hazardous materials in the crawl space.
ü Provide negative pressure in the crawl space with reference to the building when dust or vapors might migrate into the living area from the crawl space during weatherization.
1.6.6 Ground Moisture Source-Reduction
Observe the following specifications to avoid building deterioration from ground moisture. Finish the following tasks before air sealing the floor or installing underfloor insulation, as allowed under DOE guidelines or with non-DOE funds.
ü Repair plumbing or sewer leaks.
ü Consider solutions for drainage problems, ground-water problems, wood-deterioration, and structural problems.
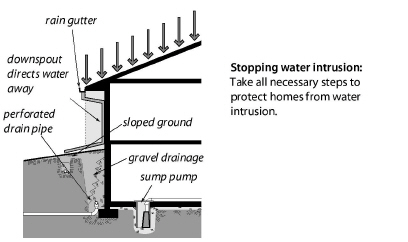
ü Verify that the ground outside the building slopes away from the foundation or that water doesn’t puddle near the foundation.
ü Install or repair rain gutters as necessary, and verify that downspouts discharge rainwater at least 3 feet away from the building.
ü Verify that all combustion vents (chimneys), clothes-dryer vents, and exhaust fan vents are vented to outdoors and not into crawl spaces.
ü Suggest a sump pump for crawl spaces or basements with a history of flooding. Locate the sump pump in an area where it collects water from the entire below-grade area and pumps it away from the foundation to daylight.
ü Provide crawl-space ventilation which follows the requirements of the IRC and SWS. See “Crawl Space Ventilation” on page 422.
ü When installing a new sump pump ensure there is a check valve installed in the discharge line near the pump. The pump basin should also have a cover to prevent evaporation.
Radon and asbestos are also important hazards to both occupants and workers.
|
SWS Details: 2.0501.1 Radon—Air Sealing Considerations, Basements, and Crawl spaces, 2.0501.2 Pier and Skirting Foundation—Venting, 2.0502.1 Radon Testing and Evaluation |
Radon is a dangerous indoor air pollutant that comes from the ground through the soil. The EPA predicts about 20,000 lung cancer deaths per year, caused by radon exposure. Weatherization workers should be aware of: the radon hazard, radon testing procedures, and radon mitigation strategies.
The EPA believes that any building with a radon concentration above 4 pico-Curies per liter (pC/l) of air should be modified to reduce the radon concentration. Health departments and private consultants throughout the U.S. do several common and reliable tests for radon.
Every Indiana county has been determined to be a Zone 1 or Zone 2 county. Zone 1 counties have the highest potential for radon, at >4 pCi. Zone 2 counties have a moderate potential for radon at 2-4 pCi.
Weatherization work usually has little effect on radon concentrations. However, ground-moisture barriers and foundation air sealing may reduce radon concentrations in addition to reducing moisture migration and air leakage.
Radon Mitigation
DOE funds can’t pay for fans or other measures specifically designed for radon mitigation. Radon mitigation must use non-DOE funds. Since radon comes through the soil, mitigation strategies include the following.
1. Installing a plastic ground barrier and carefully sealing the seams and edges
2. Sealing the walls and floor of the basement or crawl space
3. Ventilating the crawl space or basement with an exhaust fan to dilute radon
4. Depressurizing the ground underneath the basement concrete slab
Weatherization workers may install the first two mitigation strategies as prescribed by the weatherization work order for air-sealing.
See WPN 17-7 Table of Issues for complete guidance regarding radon in all Indiana homes.
1.7.2 Asbestos Containing Materials (ACM)
|
SWS Detail: 2.0106.2 Potential Asbestos-Containing Materials |
The EPA classifies asbestos as a “known carcinogen.” The following materials may contain asbestos: boiler and steam-pipe insulation, duct insulation, floor tile, siding, roofing, some types of vermiculite, and some adhesives. Weatherization workers must recognize materials that may contain asbestos and avoid disturbing them. Penalties for mishandling asbestos-containing materials can amount to $25,000 per day.
Follow guidelines in WPN 17-7 Table of Issues in Appendices when potentially asbestos containing materials are present.
• When suspected asbestos containing materials are present, assume that asbestos is present unless testing has determined otherwise.
• Sample collection and testing must be done by a certified tester.
• Some (but not all) testing, removal and encapsulation are allowed to be charged to the H&S budget category.
• Follow Client Education guidance outlined in WPN 17-7.
• Don’t do a blower-door depressurization test in a building where friable asbestos or vermiculite are present. Unless the suspect material has tested negative for asbestos, do a blower-door pressurization test instead to avoid sucking asbestos fibers into the building.
In 2010, The EPA’s Lead-Safe Renovation, Repair, and Painting (RRP) rule became a legal mandate for weatherization work.
Lead dust is dangerous because it damages the neurological systems of people who ingest it. Lead often poisons children in pre-1978 homes because of paint disturbance during building improvement and because children’s hand-to-mouth behavior is common. Lead poisons workers when they inhale lead dust.
Lead paint was commonly used in homes built before 1978. Contractors working on these older homes should either assume the presence of lead paint or perform tests to rule out its presence.
The RRP rule requires lead-safe containment procedures whenever workers disturb painted surfaces of more than 6 square feet of interior surface per room or more than 20 square feet of exterior surface per side. Cutting, scraping, drilling, or other dust-creating activities disturb lead in pre-1978 homes. Disturbing paint on windows and doors always requires containment.
The RRP requires certifications, warnings, dust-prevention, dust collection, and housecleaning as summarized here.
ü With pre-1978 homes, either test for lead-based paint or assume that lead-based paint is present.
ü Every pre-1978 weatherization or renovation job must be supervised by a certified renovator with 8 hours of EPA-approved training when workers disturb more than the minimum paint area or when they disturb paint on windows or doors.
ü Renovation firms must be registered with the EPA and employ one or more certified renovators.
ü Every sub-grantee and contractor working for the sub-grantee must be a certified firm registered with the EPA.
ü Signs and barriers must warn occupants and passersby not to enter the work area.
ü Floor-to-ceiling dust-tight barriers must prevent the spread of dust from the work area.
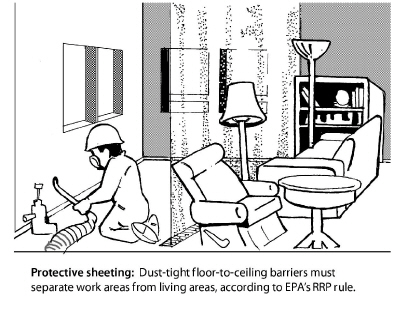
ü 6-mil plastic sheeting must protect surfaces and fixtures within the work area.
ü Workers must clean work surfaces sufficiently to pass an EPA-approved dust-wipe test, conducted by the certified renovator.
ü Workers must not track dust from the work area into the dwelling.
Lead-Safe Weatherization (LSW) is a set of procedures developed by the DOE prior to the enactment of the RRP rule. LSW requires the same basic procedures as RRP in pre-1978 homes. When engaging in the paint-disturbing weatherization activities, follow these lead-safe work practices that were established by weatherization experts.
ü Wear an approved tight-fitting respirator to protect yourself from breathing dust or other pollutants.
ü Confine your work within the dwelling to the smallest possible floor area. Seal this area off carefully with floor-to-ceiling barriers made of disposable plastic sheeting, sealed at floor and ceiling with tape.
ü Don’t use heat guns or power sanders in LSW work.
ü Spray water on the painted surfaces to keep dust out of the air during drilling, cutting, or scraping painted surfaces.

ü Erect an effective dust-containment system outdoors to prevent dust contamination to the soil around the dwelling.
ü Use a dust-containment system with a HEPA vacuum when drilling holes both indoors and outdoors.
ü Avoid taking lead dust home on clothing, shoes, or tools. Wear boot covers while in the work area, and remove them to avoid tracking dirt from the work area to other parts of the building. Wear disposable coveralls, or vacuum cloth coveralls with a HEPA vacuum before leaving the work area.
ü Use a tack mat when exiting the lead containment area.
ü Wash thoroughly before eating, drinking, or quitting for the day.
|
SWS Detail: 2.0100.1 Global Worker Safety, 2.0602 Electric Hazards |
Electrical fires and shocks are common and serious safety problems. Electrical safety is a basic housing need, requiring attention during weatherization and repair.
Observe local codes and the following specifications for electrical safety in weatherizing existing buildings.
ü When any weatherization, health, or safety procedure requires working with line-voltage power, a licensed electrician, or a qualified technician must do the procedure.
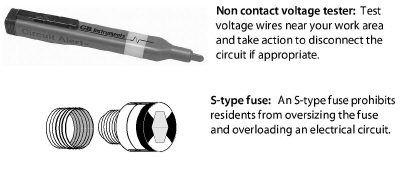
ü Whenever working around wiring, use a non-contact voltage tester to determine whether circuits are live. Turn circuits off at circuit breakers as appropriate.
ü Confirm that all wire splices are enclosed in electrical junction boxes. If you plan to cover a junction box with insulation, attach a flag to mark its location.
ü Don’t allow metal insulation shields to contact wiring.
ü Verify that the electrical system is grounded to either a ground rod or to a metallic water pipe with an uninterrupted electrical connection to the ground.
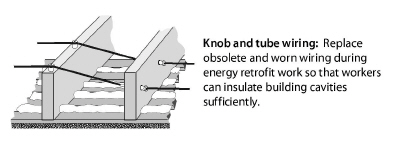
ü If installing insulation, a voltage drop test to evaluate the integrity of knob and tube wiring is recommended.
ü When you doubt the safety of a building’s electrical system, use a generator to power insulation blowers and other large power tools.
1.8.1 Decommissioning Knob-and-Tube Wiring
Decommission knob-and-tube wiring before or during weatherization if possible. Try to convince your clients or their landlords to replace knob-and-tube wiring with their own funds.
Use a non-contact voltage tester to determine whether the knob-and-tube wiring is live. If you’re unsure about whether the wiring is still live, schedule an inspection by an electrician.
If the knob-and-tube wiring in an attic is live, ask an electrician and/or an electrical inspector to determine whether the attic wiring can be decommissioned and replaced with non-metallic (NM) sheathed electrical cable. Depending on the situation, the electrician may choose one of these two options.
1. Terminate the existing attic knob-and-tube wiring, and connect the new NM circuit directly to the main service box.
2. Install a flagged junction box in the attic to connect the knob-and-tube riser to new NM cable in the attic.
1.8.2 Constructing Shielding for Knob-and-Tube Wiring
When knob and tube wiring is NOT going to be decommissioned or replaced, the integrity of the wiring circuit should be evaluated before work can be completed on the home. This can be done with an inspection by a licensed electrician or by performing a voltage drop test for each knob and tube wiring circuit. The maximum allowable voltage drop per circuit is 8%. Once the circuit integrity has been verified, work may be performed around the knob and tube wiring without disturbing it.
It should be noted that the NEC recommends no more than a 5% voltage drop for adequate equipment operation. The 8% maximum is an arbitrary number intended to assist in evaluating the circuit from a safety perspective. If your voltage drop is 8% or less and your inspection reveals excessive or bad splices, missing insulation or anything that might suggest a safety problem, an inspection by a licensed electrician is recommended.
You may install attic insulation up to the bottom of knob-and-tube wiring, but never cover knob-and-tube wiring with insulation that covers the wires.
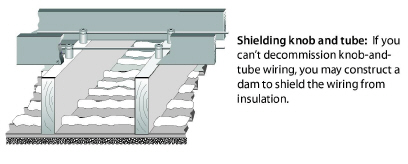
ü Construct structural dam to maintain a 3-inch clearance between attic insulation and knob-and-tube wiring. Don’t cover the knob-and-tube wiring.
ü Flag the shielding structure before insulating over it to mark it for future access or removal.
ü Do not insulate wall cavities that contain knob and tube wiring. Decommissioning of the wiring would be required before insulating.
|
SWS Detail: 2.0100.1 Global Worker Safety, 2.0104.1 Ventilation Worker Safety, 2.0100.2 Work Area Inspection and Stabilization, 2.0106.1 Material Selection, Labeling, and Safety Data Sheets (SDSs) |
The personal health and safety of each worker is vitally important to every weatherization agency. Injuries are the fourth leading cause of death in the United States. Long-term exposure to toxic materials contributes to workers’ sickness, absenteeism, and death. Both injury hazards and toxic substances exist during weatherization work.
The Occupational Safety and Health Administration (OSHA) establishes workplace safety standards. Weatherization staff and contractors must attend training on OSHA standards and observe these standards on the job. Safety always has priority over other factors affecting weatherization operations.
Some hazards deserve attention because of their statistical danger. Become aware of these most common workplace hazards.
• Vehicle accidents
• Falls
• Back injuries
• Exposure to hazardous materials
• Electrical hazards
• Repetitive stress injuries
Safety requires commitment, awareness, communication, and action. Workers may not remember safe work practices unless employers periodically review safe practices.
ü Commit yourself to health and safety
ü Develop awareness of health and safety hazards
ü Communicate with coworkers about health and safety
ü Take action to remove health and safety hazards from your workplace
Safety Basics
ü Observe all state and federal standards relating to worker health and safety.
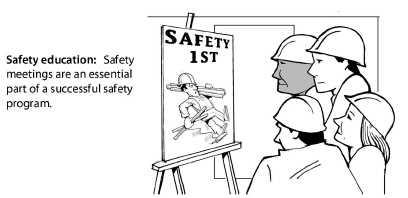
ü Arrange regular health and safety training.
ü Conduct monthly safety meetings at headquarters and weekly safety meetings on the current jobsite.
ü Provide well-equipped first-aid kits in the work vehicles and in the warehouse.
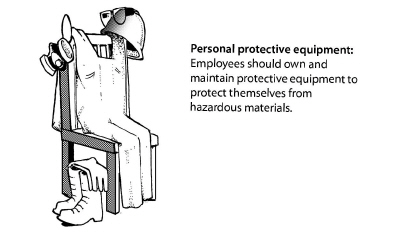
ü Provide and require personal protective equipment for workers appropriate for their job duties.
ü Provide a fire extinguisher in the warehouse and each work vehicle.
ü Keep equipment in good condition.
ü Keep lists of emergency-contact phone numbers for both employees and emergency services in the warehouse and in the work vehicles.
ü Keep Safety Data Sheets (SDSs) in a convenient location and tell workers where they are.
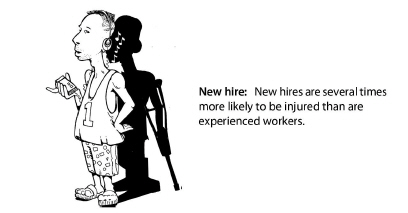
New workers are several times more likely to injure themselves on the job compared to experienced workers. Before their first day on the job, new workers should learn about safety basics such as proper lifting, safe ladder usage, and safe operation of the power tools.
Be sure to inform new employees about hazardous materials they may encounter on the job. Show new hires the Safety Data Sheets (SDS) required by OSHA for each hazardous material they may use.
New employees should be required to use this common safety equipment.
ü Proper clothing.
ü Task-appropriate hand protection
ü Safety glasses.
ü Hearing protectors.
Ban alcohol and drugs from agency headquarters and the job. Encourage staff members to refrain from smoking and to stay physically fit.
According to the Bureau of Labor Statistics, one-third of all occupational fatalities in the United States occur in motor-vehicle accidents. Staff members should organize errands and commuting to the job site so as to minimize vehicle travel.
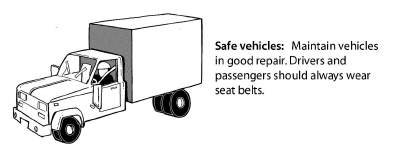
Inspect vehicles regularly and repaired them if necessary. Verify that these safety features are present and functioning.
ü Brake system
ü Steering system
ü Horn
ü Headlights
ü Rear-view and side-view mirrors
ü Directional signals
ü Backup lights
ü A fire extinguisher
Always wear seat belts. Before traveling to the job, secure tools and materials in the vehicle’s cargo area to prevent shifting. Workers shall not be permitted to exceed the occupancy capacity with a bucket or other means of seating that does not employ DOT approved safety restraints.
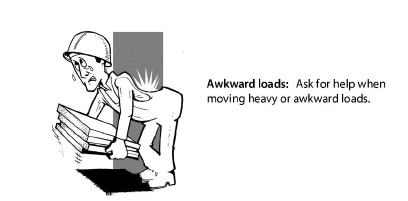
1.9.4 Lifting and Back Injuries
Back injuries account for one out of every five workplace injuries. Most of these injuries are to the lower back and result from improper lifting, crawling in tight spaces, and using heavy tools.
Workers often injure their backs by lifting heavy or awkward loads improperly or without help. Use proper lifting techniques such as lifting with your legs and keeping a straight back whenever possible.
To protect yourself from back injury do these things.
ü Get help before trying to lift heavy or awkward loads,
ü Stay in good physical condition,
ü Control your weight through diet and exercise.
Workers with limited lifting abilities, because of weakness or prior injury, should avoid heavy lifting.
Preventing Back Injury
These policies help prevent back injuries on the job.
ü Redesign work activities — adapt equipment to minimize awkward movements.
ü Perform strength-testing of workers, set lifting limits, and provide training for all workers on the causes and prevention of back injuries.
ü Encourage breaks to prevent workers from being in straining positions for long time periods.
ü Share the most difficult work among all capable crew members.
Wear your respirator when working in a polluted environment. Common construction dust can contain toxins including lead, asbestos, and chemicals released by drilling, cutting, scraping. Polyurethane foam, caulking, and solvents release toxic organic vapors that require either organic vapor cartridges or a fresh-air supply.
Per OSHA regulation 1910.134: A respirator shall be provided to each employee when such equipment is necessary to protect the health of such employee. The employer shall provide the respirators which are applicable and suitable for the purpose intended. Agencies and contractors requiring installers to wear respiratory protection will have a written respiratory protection plan.
Fit-Test your Respirator
Test your respirators to be sure they have a good fit.
ü Check the straps and face piece to be sure they are soft and free of cracks.
ü Strap on the respirator and adjust the straps to be snug but comfortable.
ü Close the exhalation valve with a hand.
ü Exhale gently and check for leaks around the edges.
ü If there are leaks, adjust or repair the respirator.
Workers with beards, facial scars, and thick temple bars on eyeglasses must use a supplied air hood type respirator to achieve respiratory protection. OSHA requires a completed form documenting employees’ fit tests each year. Workers wearing tight-fitting respirators as part of an approved respiratory protection plan must be fit tested annually and be cleared by a physician or by a person licensed to do so. (OSHA 1910.134)
Implement engineering controls for work environment to maintain chemical exposure levels below the permissible exposure limit via ventilation.
Special Respiratory Hazards
Consider and take action to protect yourself from these special respiratory hazards.
1. When spraying low-pressure polyurethane foam, use an organic vapor respirator cartridge with a P-100 particle filter. Also ventilate the area where you’re spraying the foam.
2. When spraying high-pressure polyurethane foam, use a supplied-air, positive-pressure respirator, and ventilate the work area.
3. Learn how to recognize asbestos insulation that may be installed around older furnaces and boilers. Avoid disturbing asbestos in any way.
4. Control dust in your client’s homes by erecting temporary barriers when you’re doing work that may release dust.
5. Wear coveralls when entering attics or crawl spaces. Coveralls should be disposable or professionally laundered.
Hazardous materials threaten your health and safety on the job. Workers often fail to protect themselves from hazardous materials because they don’t recognize the hazards. Breathing hazardous materials, absorbing them through the skin, and coming into eye contact with hazardous materials are common ways dust and chemicals injure workers.
OSHA regulations require employers to notify and train employees about hazardous materials used on the job. Obtain copies of Safety Data Sheets (SDSs) from manufacturers or their distributors. Employers must make SDS for every workplace hazardous material readily available to workers.
Inspect the work site to identify hazardous materials and to plan how to avoid the hazard.
Learn how to handle hazardous materials used on the job. Use the personal protective equipment (PPE) that is recommended by the SDS.
1.9.7 Equipment for Personal and Crew Safety
|
SWS Detail: 2.0100.1 Global Worker Safety, 2.0100.2 Work Area Inspection and Stabilization |
Workers will have personal protective equipment assigned for their own use.
• Respirators with dust and organic-vapor cannisters
• Clean cloth coveralls or disposable coveralls
• Gloves
• Safety glasses
• Hearing protection
• Hard hat for head-injury hazards
Crews should equip themselves with the safety equipment listed here.
• Ladder levelers and stabilizers
• Portable lights for work in dark areas
• A water jug
• Insect spray
• Safe, heavy electrical cords with GFCI or AFCI receptacles as required locally
|
SWS Detail: 2.0100.1 Global Worker Safety, 2.0100.2 Work Area Inspection and Stabilization |
Falls off ladders and stairs cause 13% of workplace injuries according to the National Safety Council. Other falls from heights account for approximately 7% of workplace injuries.
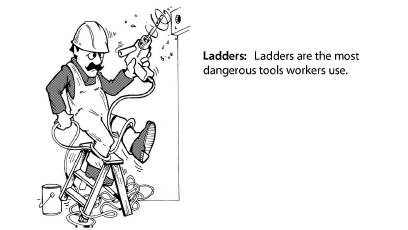
Broken ladders and unstable ladders are both major causes of on-the-job falls. Step ladders, for instance, are often used for work that is too far off the ground, forcing workers to stand on the top step or to reach too far.
Guidelines for Ladders
OSHA regulations include these important guidelines for ladder use.
ü Avoid metal ladders.
ü Maintain all ladders in good repair, and replace ladders if they have missing or damaged steps, cracked side-rails, or damaged feet.
ü Extend extension ladders at least three feet above the area they access.
ü Ladders shouldn’t have a pitch steeper than four feet of rise for each foot that the ladder’s feet are away from the building.
ü Block or tie ladders firmly in place at the top and bottom if you install the ladder at a steeper angle than suggested above or on windy days.
ü Maintain three points of contact when descending a ladder.
ü Don’t use metal ladders where they may accidentally touch electrical conductors.
ü Maintain ladders free of oil, grease, and other slipping hazards. Inspect your shoes for slipping hazard before climbing a ladder.
ü Don’t over-reach — instead move the ladder.
ü Avoid carrying heavy loads up ladders and operating power tools from ladders.
Build scaffolds when working above-ground for sustained time periods. Stabilize each scaffold leg so that it supports an equal weight as other legs. Secure planks to the structure and provide handrails on the sides and ends of walkways.
Housekeeping
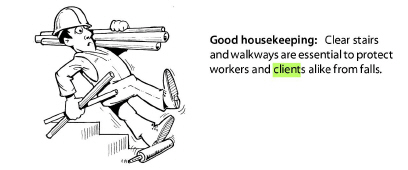
Workers should inspect their workplaces regularly to notice and remove slipping and tripping hazards. Workers carrying loads should create and maintain debris-free walkways.
|
SWS Detail: 2.0100.1 Global Worker Safety, 2.0602.1 Static Electric Shock |
The tools used in construction work are dangerous if used improperly. About 90,000 people hurt themselves with hand tools each year. The crew chief should conduct tool-safety training as frequently as necessary to insure safe tool use.
These basic safety rules can reduce the hazards of using hand and power tools.
ü Use the right tool for the job.
ü Keep all tools in good condition with regular maintenance.
ü Inspect tools for damage before using them.
ü Operate tools according to the manufacturer’s instructions.
ü Wear appropriate personal protective equipment.
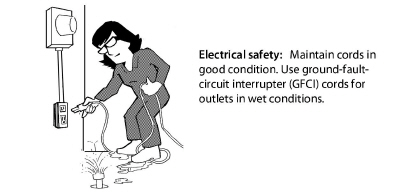
ü Use double insulated power tools or ground-fault-circuit-interrupter (GFCI) outlets or GFCI extension cords to prevent electric shock.
ü Use generators for electrical service on the jobsite and ground them. Exhaust gases must not enter indoor spaces or pollute the outdoor air near workers.
ü Use three-wire electrical cords without worn or frayed insulation jackets.
ü Verify that generator exhaust is directed away from the building, the vehicle, and the crew.
1.9.10 Repetitive Stress Injuries
Repetitive stress injuries are caused by over-working certain parts of your body. Poor body posture, such as reaching above your head when operating a power drill, can encourage these injuries. Good work habits prevent this type of injury.
ü Use a comfortable arm and hand posture when operating tools for a long period of time.
ü Change the angle and location of your work surface frequently.
ü Mix your difficult tasks with easier ones.
ü Carry smaller loads.
ü Take short rest breaks periodically, and stretch any tight muscles during this time.
When you purchase hand and power tools, look for models with ergonomic designs that place less stress on your body.
1.9.11 Safety for Crawl Spaces and Other Confined Areas
|
SWS Detail: 2.0701.1 Crawl Spaces—Providing New Access, 2.0701.2 Crawl Space Information Sign, 2.0107.4 Negative Pressure Contamination Control |
The Occupational Safety and Health Administration (OSHA) defines a confined space as a space that contains a hazard like confinement, limited access, or restricted airflow because of its small size.
Access to Confined Spaces
Employers must be aware of the hazards of confined spaces and have policies for protecting workers. Consider these requirements when appropriate.
ü Have the client remove contaminants such as sewage, dead animals, rotting leaves, etc. before inspecting or working in the crawl space.
ü The crawl space should have an access hatch or door that is sized adequately for a worker or a resident to enter and exit.
ü Workers should identify access and egress points before entering a confined space.
ü If a heating and cooling system is located in the crawl space, the crawl space must have an access hatch or door measuring 22 inches by 30 inches or big enough to remove the heating and cooling system, whichever is greater.
Chemicals in Confined Space
Observe these requirements when using chemicals in confined spaces.
ü At minimum, workers using any type of chemical in a confined space must employ continuous powered ventilation using adequately sized openings to facilitate airflow into and out of the confined space.
ü If workers use chemicals in significant quantities, such as spraying of two-part polyurethane foam, the workers should wear respirators that supply fresh air.
ü If a confined space contains a hazard like chemical vapors or the potential to collapse or trap a worker, the space is called a permit-required confined space (PRCS). A worker must have a permit to enter the space and workers without permits must not enter. The permitted workers must have special training and equipment to enter the confined space.
1.9.12 Safety for Extreme Weather
Extreme weather is a common cause of job-related sickness and injury. You can avoid sickness and injury by awareness and preventive measures.
Hot Weather Safety
Know the signs of heat ailments and take action if you or a co-worker experiences the beginning of symptoms. Observe these hot-weather suggestions for staying cool and preventing heat ailments.
ü Review NIOSH heat related illness and treatments.
ü Drink plenty of water.
ü Ventilate attics with fans.
ü Rotate workers in attics to prevent heat exhaustion.
ü Use water or ice to cool your skin if you experience heat stress.
ü Rest when you feel fatigued.
ü When in doubt contact emergency responders using 911.
Cold Weather Safety
Workers and supervisors should know the temperature, wind speed, and precipitation forecast. Dress for extreme cold and plan work around storms and other extreme weather events.
ü Dress in layers for comfort and changing temperatures.
ü Wear insulated boots or heavy socks.
ü Wear insulated gloves.
ü Seek warm shelter if you experience numbness or uncomfortable chilling.
Windy Weather Safety
Be aware of the forecast for windy weather and take precautions before beginning work and before the wind blows.
ü Tie ladders off high and anchor them low.
ü Avoid carrying sheet goods that could act as a sail allowing the wind to blow you over.
ü Store materials and tools where the wind can’t move them.