This chapter discusses air sealing and insulation for walls in existing buildings. Air sealing begins by inspecting the discontinuities in walls, such as the following.
• Inside and outside corners of walls.
• Openings for windows and doors.
• Protrusions and indentations in walls.
Insulation begins by evaluating the existing wall insulation and deciding on the feasibility and cost-effectiveness of installing additional wall insulation. Other wall-insulation issues may include the following.
• Whether you can install wall insulation at all, such as in walls already partially insulated.
• Whether to insulate from interior or exterior of the home.
• How to open a wall cavity and restore it after insulating the wall cavity.
• How to install insulation to the wall’s surface.
Most wall air leakage involves the wall’s discontinuities, joints, and irregularities.
Firewalls are structural walls between buildings or dwelling units that prevent the spread of fire from one unit to another. Air-sealing between building materials on the two sides of the fire wall and the fire wall itself is an important safety and energy-conservation task.
ü When air-sealing, preserve existing fire ratings of materials and assemblies along with existing-material compatibility and comparable durability.
ü Verify that non-monolithic fire walls, such as balloon-framed walls, are airtight assemblies both to air flowing horizontally and vertically. Improve airtightness as necessary through air sealing and dense-packing with fibrous insulation.
ü Seal air channels, created by furring strips or wall framing, against a monolithic firewall. At a minimum seal the top and bottom of each channel, and/or densepack the channels with fibrous insulation.
ü Seal gaps and cracks with air-sealing materials and backing materials that are compatible with and similar to existing materials with fire-containment functionality.
See “Air Sealing and Fire Containment” on page 93. See “Balloon Framed Walls” on page 175. See “Fire Testing and Rating” on page 531. See “Fire Safety” on page 23.
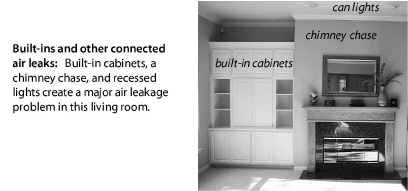
5.1.2 Built-In Cabinets/Shelves
Built-in cabinets and shelves are a feature of older homes and present challenges for air sealing. Sealing these areas from inside the cabinet requires care and attention to appearances.
ü If possible, establish both an air barrier and insulation behind the cabinet, out of sight of the occupants.
ü Install drywall or wood wherever the cabinet is open to a wall cavity after insulating the cavity.
ü Use caulking that is compatible with the colors of the surrounding wood if you seal its interior-facing side.
5.1.3 Wall Framing Around Fireplaces and Chimneys
|
1.SWS Detail: P3.1001.1 Penetrations and Chases, 3.1001.3 Walls Open to Attic—Balloon Framing and Double Walls |
Leaks around fireplace chimneys are often severe air leaks. Use this procedure to seal air leaks through the chimney chase.
ü Cut sheet metal to fit the gap that borders the chimney with overlaps connecting to nearby framing lumber.
ü Bed the sheet metal air seal in sealant (ASTM E136), and then fasten the sheet metal to the framing with staples, nails, or screws.
ü Seal the metal patch to chimney or flue with an ASTM 136 compliant, non-combustible sealant.
ü For large chimney chases, cover the chase opening with structural material such as plywood. Maintain clearances between the structural seal and the metal or masonry chimney as listed in “Clearances to Combustibles for Common Chimneys” on page 315.
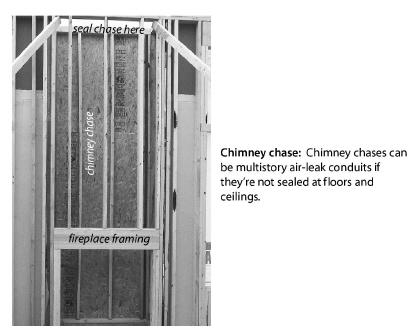
When located on the second floor, cap the top of the entire wall cavity in the attic with rigid board, caulked and mechanically fastened.
Pocket doors connected to the exterior walls present difficult air sealing and insulating challenges. You many need to address these framing situations from the exterior in order to install a durable and efficient repair that provides a good air seal and allows you to install insulation into the exterior wall cavity
5.1.5 Cooling Appliances Installed through Walls or Windows
Room air conditioners, room heat pumps, and evaporative coolers are sometimes installed through walls or in windows. The units installed in windows are often very leaky because of the temporary nature of the air seals.
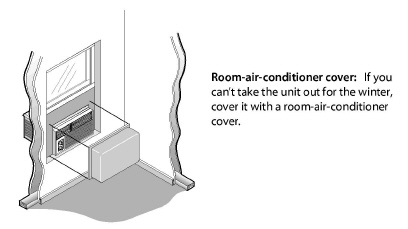
• Remove window units in the fall and re-install in the spring.
• If the client doesn’t want to remove the unit seasonally, cover the unit with a room-air-conditioner cover as shown here.
• Units installed through walls should have a sheet-metal sleeve that seals well to the surrounding framing and finish. This metal sleeve provides a smooth surface to seal to the room air conditioner or heat pump.
• Seal the unit’s perimeter with one-part foam or caulking, depending on the width of the joint.
|
SWS Detail: 3.1001.3 Walls Open to Attic—Balloon Framing and Double Walls, 4.1103.4 Dense Packing Blown Insulation |
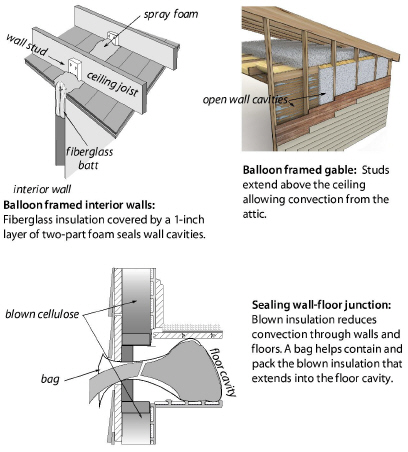
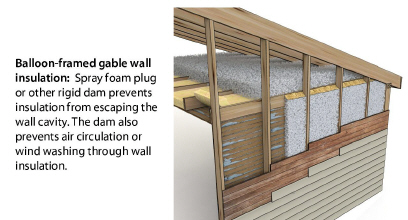
Balloon framed two-story walls are common in older homes. Some modern homes have balloon framed gable walls, where the studs rise above the level of the ceiling joists and are cut at an angle to frame the gable. Even when these balloon framed gable walls are full of insulation, air can convect through the insulation. On occasion, windstorms have blown the insulation out of the wall cavity into the attic.

ü Dense-pack insulation into the wall cavities to reduce air leakage and convection.
ü Dense-pack insulation into an air-permeable bag inserted with the fill tube into the balloon-wall floor cavity.
ü Seal stud cavities from the attic, basement, or crawl space with an insulation plug, covered with a 2-part-foam air seal.
ü Or seal the tops and bottoms of cavities with a rigid barrier, such as drywall or plywood, sealed and bonded to surrounding materials with 2-part foam.
See also "Wall Insulation" on page 179.
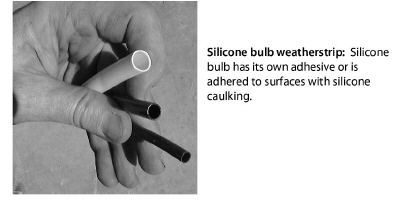
Minor air sealing includes sealing small openings with such materials as caulk or weather stripping.
Sealing from the exterior serves to keep bulk water out and protect the building. If the crack is deeper than 5/16-inch, it should be backed with a material such as backer rod and then sealed with caulk. Any existing loose or brittle material should be removed before the crack is re-caulked. See also "Windows and Doors" on page 223.
The rim joist area is composed of several joints. They can be sealed from the basement or crawl space with caulk or foam. Remove dust before applying sealant. See also "Rim-Joist Insulation and Air-Sealing" on page 206.
Masonry surfaces are best sealed with a cement-patching compound, mortar mix, or high quality caulking, such as polyurethane. For cement-based patches, buy a mix designed for patching and prime the damaged areas with a concrete adhesive.
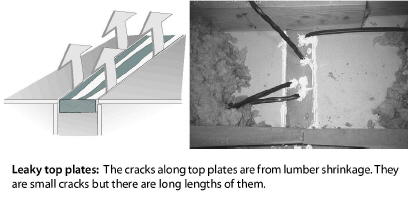
5.2.4 Interior Wall Top Plates
Drywall is installed after interior walls are constructed. The top plates of interior walls are open to the attic. Top plate shrinkage opens up cracks that run the entire length of the interior wall. Move insulation and seal the cracks with caulking or two-part foam.
Install wall-cavity insulation with a uniform coverage and density. Wall cavities encourage airflow like chimneys. Convection currents or air leakage can significantly reduce wall insulation’s thermal performance if channels remain for air to migrate or convect.
Important: Provide the client with an insulation receipt or certificate, with insulation type and number of bags installed, installed thickness, coverage area, and insulation R-value. See “Insulation Receipt or Certificate” on page 102.
Blown Wall-Insulation Types
Cellulose, fiberglass, and open-cell polyurethane foam are the leading insulation products for retrofit-installation into walls.
|
Insulation Material |
Density |
R-Value/in. |
|---|---|---|
|
2.2 pcf |
4.1 |
|
|
Cellulose |
3.5 pcf |
3.4 |
|
Open-cell urethane foam |
0.5 pcf |
3.8 |
|
pcf = pounds per cubic foot |
||
5.3.1 Wall Insulation: Preparation and Follow-up
Inspect and repair walls thoroughly to avoid damaging the walls, blowing insulation into unwanted areas, or causing a dust hazard.
Preparing for Wall Insulation
Before starting to blow insulation into walls, take the following preparatory steps.
ü Calculate how many bags of insulation are needed to achieve the R-value specified on the bag’s label.
ü Inspect walls for evidence of moisture damage. If an inspection of the siding, sheathing, or interior wall finish shows a moisture problem, don’t install sidewall insulation until the moisture problem is identified and solved.
ü Inspect indoor surfaces of exterior walls to assure that they are strong enough to withstand the force of insulation blowing. Reinforce interior sheeting as necessary.
ü Inspect for interior openings or cavities through which insulation may escape. Examples include balloon-framing openings in the attic or crawl space, pocket doors, unbacked cabinets, interior soffits, and openings around pipes under sinks and closets. Seal these openings to prevent insulation from escaping the wall cavity.
ü If exterior wall cavities are being used as return or supply ducts, run new ducts somewhere else before insulating the cavity. If metal ducts are run in exterior walls, either avoid insulating these cavities or run a new duct somewhere else before installing insulation. Address existing building durability issues due to moisture in these cavities as they relate to the ducts before insulating.
ü Don’t insulate cavities containing knob-and-tube wiring. See “Electrical Safety” on page 46.
Patching and Finish after Insulating
The insulators, the home owner, and others should agree about the patching method and the final appearance of the wall finish. The insulators are usually responsible for patching holes and returning the interior or exterior finish to its previous condition or some pre-agreed level of finish.
ü Patch the exterior wall sheathing with wood plugs, plastic plugs, or spray foam insulation.
ü Use caulk or putty and primer to dress exposed exterior plugs.
ü Seal gaps in external window trim and other areas that may admit rain water into the wall.
ü Patch interior finish with standard plastering, a chair rail trim board, or similar “paint ready” methods.
ü Install drywall with joint compound to open cavities to comply with IRC fire codes.
Wall Insulation Quality Control
Retrofit wall insulation has more risk of incomplete application than insulation that you can visually inspect. Consider these quality control options to verify the proper coverage and density of retrofit wall insulation.
• Viewing the wall through an infrared camera.
• Looking through an electrical outlet or other access hole for insulation.
• Calculation of installed weight of installed insulation compared to wall-cavity volume and required density.
Drilling Exterior Sheathing: Insulation Retrofit
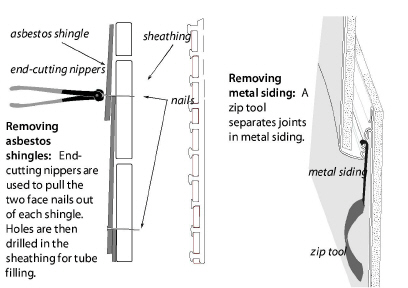
Avoid drilling through siding. Where possible, carefully remove siding and drill through sheathing. This procedure avoids the potential lead-paint hazard of drilling the siding. Drilling through only the sheathing also makes it easier to insert flexible fill tubes since the holes pass through only one layer of material.
If you can’t remove the siding, consider drilling the walls from inside the home. Obtain the owner’s permission before drilling indoors, and practice lead-safe weatherization procedures. See “Lead-Safe Procedures” on page 43.
Consider these possible methods of removing siding.
• Cut completely through the paint on wood-siding joints with a sharp utility knife before carefully prying the siding off.
• Remove asbestos shingles by pulling the nails holding the shingles to the sheathing, or else cut off the nail heads. Dampen the asbestos tiles to reduce dust. Wear a respirator and coveralls when working with asbestos siding.
• Use a zip tool to remove metal or vinyl siding.
• Insulate homes with brick veneer or blind-nailed asbestos siding from the indoors.
• Use a decorative chair rail to cover holes drilled indoors.
Restore holes drilled for insulation to an appearance as close to original as possible, or in a manner that is satisfactory to the client.
5.3.2 Retrofit Closed-Cavity Wall Insulation
|
SWS Detail: 4.1103.1 Dense Pack Exterior Walls, 4.1103.2 Additional Exterior Wall Cavities, 4.1103.4 Dense Packing Blown Insulation |
This section describes six ways of installing wall insulation.
1. Blowing walls with fibrous insulation using a fill tube from indoors or outdoors.
2. Installing batts in an open wall cavity.
3. Spraying wet-spray fiberglass or cellulose into an open wall cavity.
4. Spray open-cell or closed-cell foam into an open wall cavity.
5. Blowing fibrous insulation behind netting.
Blowing Walls with a Fill-Tube
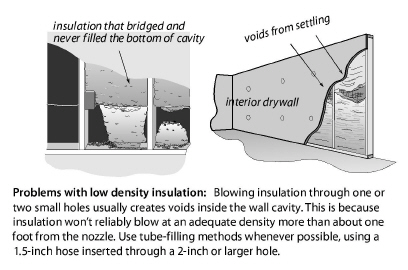
Install dense-pack wall insulation using a blower equipped with separate controls for air and material feed. Mark the fill tube in one-foot intervals to help you verify when the tube reaches the top of the wall cavity.
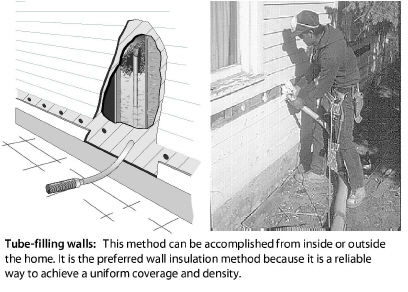
To prevent settling, cellulose insulation must be blown to at least 3.5 pounds per cubic foot (pcf) density. Fiberglass dense-pack must be 2.2 pcf or to manufacturer’s specifications and the fiberglass material must be designed for dense-pack installation.
Insulate walls using this procedure.
1. Drill 2-to-3-inch diameter holes to access the stud cavity.
2. Probe all wall cavities through holes, before you fill them with the fill tube, to identify fire blocking, diagonal bracing, and other obstacles.
3. Start with several full-height, unobstructed wall cavities so you can measure the insulation density and calibrate the blower. An 8-foot cavity (2-by-4 on 16-inch centers) should consume a minimum of 10 pounds of cellulose or 6 pounds of fiberglass.
4. Insert the hose all the way to the top of the cavity. Start the machine, and back the hose out slowly as the cavity fills.
5. Then fill the bottom of the cavity in the same way.
6. After probing and filling, drill whatever additional holes are necessary for complete coverage. For example: above windows, missed areas with fire blocking.
7. Use the blower’s remote control to achieve a dense pack near the hole while limiting spillage.
8. Seal and plug the holes, repair the weather barrier, and replace the siding.
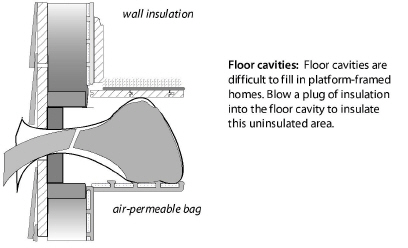
Insulating the Wall-Floor Junction of Two-Story Walls
When insulating the perimeter of walls between the first and second floors, blow an insulation plug into the perimeter floor cavities for both thermal resistance and airflow resistance. This method is particularly effective for platform-framed walls because the wall insulation is discontinuous at the floor cavity unless you drill and blow through the rim joist there.
This insulation plug prevents the floor cavity from being a thermal bridge and an air-leakage conduit. Using a fill tube, blow the insulation into a air-permeable bag that expands inside the cavity. The bag limits the amount of insulation necessary to insulate the floor perimeter.
5.3.3 Open-Cavity Wall Insulation
|
SWS Details: 4.1102.1 Open Cavity Wall Insulation—General, 4.1102.2 Open Wall—Spray Polyurethane Foam (SPF) Installation |
Fiberglass batts are the most common open-cavity wall insulation. Batts achieve their rated R-value only when installed carefully. If there are gaps between the cavity and batt at the top and bottom, the R-value can be reduced by as much as 30 percent. The batt should fill the entire cavity without spaces in corners or edges.
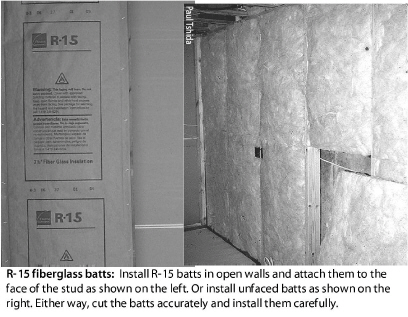
ü Use unfaced friction-fit batt insulation where possible. Fluff the batts during installation to fill the depth of the wall cavity.
ü Choose medium- or high-density batts: R-13 or R-15 rather than R-11, and R-21 rather than R-19.
ü Seal all significant cracks and gaps in the wall structure before you install the insulation.
ü Insulate behind and around obstacles with scrap pieces of batt before installing batts.
ü Staple faced insulation to outside face of studs on the warm side of the cavity. Don’t staple the facing to the side of the studs, even though drywallers may prefer that method, because this method leaves an air space that encourages convection currents. Another option is to use staple-free friction-fit batts.
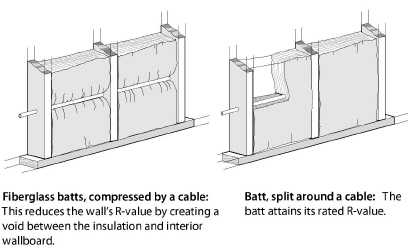
ü Cut batt insulation to the exact length of the cavity. A too-short batt creates air spaces above and beneath the batt, allowing convection. A too-long batt bunches and folds, creating air pockets.
ü Split batt around wiring, rather than letting the wiring compress the batt to one side of the cavity.
ü Fiberglass insulation, exposed to the interior living space, must be covered with minimum half-inch drywall or other material that has an ASTM flame spread rating of 25 or less.
ü Fiberglass batts exposed to unoccupied spaces like attics must be covered with an air barrier such as house wrap or foam sheeting to prevent R-value degradation by convection and human exposure to fibers.
See “Fiberglass Batts and Blankets” on page 103.
Sprayed Open-Cavity Wall Insulation
Both fibrous and foam insulation can be sprayed into open wall cavities. Varieties include the following.
• Fiberglass or cellulose mixed with water and glue at a special nozzle sprayed into the open wall cavity with the excess shaved off (fibrous damp-spray insulation).
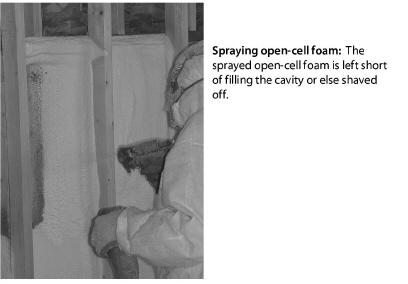
• Open-cell or closed-cell polyurethane foam sprayed into an open wall cavity and either held short of filling the whole cavity or with the excess foam shaved off after it cures.
Blowing Open Wall Cavities behind Netting or Fabric
Blowing dry fibrous insulation behind netting or fabric is a common way of insulating open walls before drywall application, especially with cellulose. However, you must install the insulation to a sufficient density to resist settling.
ü Verify density of at least 3.5 pcf (or per manufacturer’s recommendation) for cellulose or 2.2 pcf (or per manufacturer’s recommendation) for fiberglass.
ü Select a restrainer netting or fabric that will allow the above densities without bulging excessively.
ü Fasten the netting or fabric with power-driven staples, 1.5 inches apart.
ü Roll bulging insulation with a roller to facilitate drywall installation.
5.3.4 Insulated Wall Sheathing
|
SWS Detail: 4.1103.3 Insulated Sheathing and Insulated Siding Installation |
Insulated wall sheathing covers the wall surface with insulation, reducing thermal bridging through structural framing. Insulated sheathing is an excellent retrofit, when you replace the siding and windows.
Insulating wall sheathing is usually foam board, such as polystyrene or polyisocyanurate. Always fill the wall cavity with insulation before installing insulated sheathing.
Fastening Insulating Sheathing
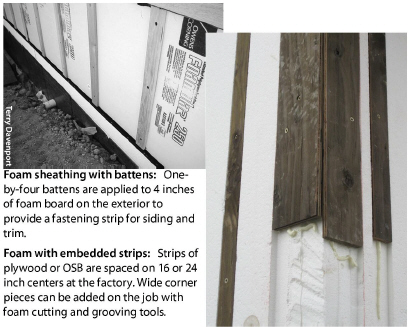
Fastening the insulating sheathing requires one of the following to secure the insulation to the wood sheathing or masonry under it.
• A batten board
• An embedded strip
• A broad staple
• A long screw with a large washer
• A special adhesive (masonry)
Use appropriate fasteners for wood or masonry materials. Wood battens or embedded strips allow attachment of a variety of siding materials. The embedded strips work best with steel, aluminum, or vinyl siding, which are lightweight and drain water through weep holes in every unit of siding.
5.3.5 Wall Insulation in a Retrofitted Frame Wall
While not likely cost effective in weatherization, retrofitters seeking superior energy performance sometimes build a wood-frame wall attached to the interior or exterior of the existing wall. Common insulation choices include all the wall-insulation choices discussed previously. Vapor retarders and air barriers must be incorporated into the new wall assembly as appropriate for the climate and existing wall characteristics. The exterior side of a retrofitted insulated frame should have sheathing and a water resistive barrier like house wrap.

5.3.6 Insulating Unreinforced Brick Walls
|
SWS Detail: 4.1103.3 Insulated Sheathing and Insulated Siding Installation |
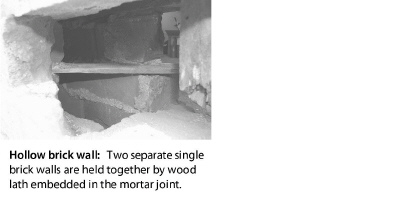
Unreinforced means that the builders used no steel or other metal reinforcement. There are three types of unreinforced brick walls.
1. Traditional brick walls with header bricks that hold two layers of stretcher bricks together. Larger buildings may have three or more brick layers instead of two.
2. Various types of hollow brick walls with usually one layer of brick on either side of an air space.
3. Wood-frame brick veneer walls with a single layer of brick veneer that is attached to a typical wood frame wall.
All three of these brick assemblies may have structural problems depending on the condition of the bricks and mortar joints. Mortar can turn to dust over the decades; hollow brick walls can be frighteningly fragile; and small movements can topple 100-year-old brick veneer. Consult a structural engineer before making any modification to an unreinforced brick building.
Insulation Receipt or Certificate
Provide the client with an insulation receipt or certificate, with insulation type and number of bags installed, installed thickness, coverage area, and insulation R-value. See “Insulation Receipt or Certificate” on page 102.