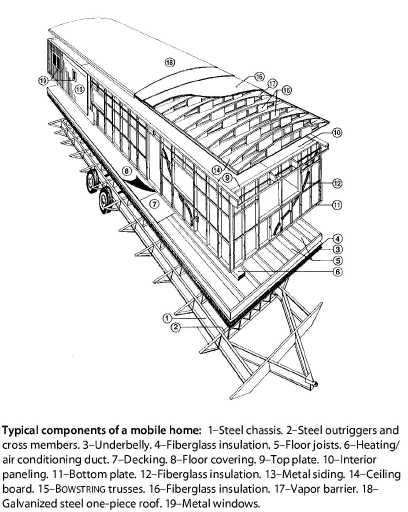
Mobile homes are covered by their own details and outcomes in the SWS, which refers to mobile homes as manufactured homes. These two names refer to the same type of housing. We prefer the term “mobile home.” In this chapter, we cover mobile-home air sealing, insulation, windows, doors, and heating systems.
Mobile home furnaces are similar to furnaces for site-built homes in some ways and different in other ways. Mobile home combustion furnaces have been sealed-combustion since the early 1970s. Gas furnaces are either the old atmospheric sealed-combustion type or the newer fan-assisted mid-efficiency type. Some older less-efficient sealed-combustion furnaces had draft fans too. For information on electric furnaces, see “Electric Furnaces” on page 393.
Mobile-home oil furnaces are a close relative to oil furnaces in site-built homes. However, they should have a housing that fits around the burner’s air shutter and provides outdoor air directly to the burner. See “Oil Burner Safety and Efficiency Service” on page 321.
Mobile-home furnaces are different from conventional furnaces in the following ways.
• A great majority of mobile homes are equipped with downflow furnaces, designed specifically for mobile homes.
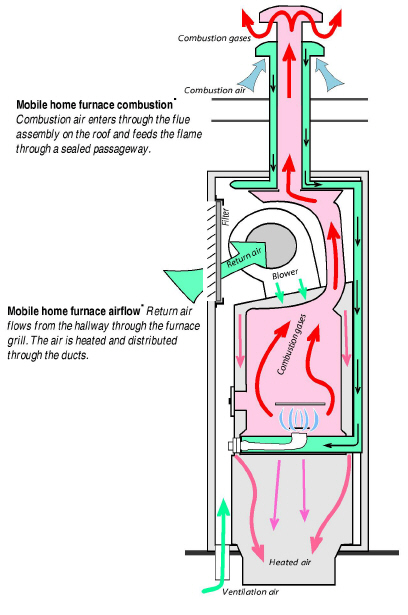
• Mobile home combustion furnaces are sealed-combustion units that use outdoor combustion air, unlike most furnaces in site-built homes. They don’t have draft diverters or barometric draft controls.
• Gas-fired furnaces have kits attached, containing alternative orifices, to burn either propane or gas.
• Return air enters the furnace through a large opening in the furnace rather than through return ducts.
Important Note: Install only furnaces—designed for mobile homes—in mobile homes.
12.1.1 Furnace Maintenance and Energy Efficiency
Mobile home furnaces should comply with this guidebook’s combustion safety and efficiency standards. See “Gas Burner Safety & Efficiency Service” on page 317 and “Oil Burner Safety and Efficiency Service” on page 321.
Mobile home furnaces must be replaced by furnaces designed and listed for use in mobile homes. If a heat exchanger is available to replace the existing cracked heat exchanger, consider heat-exchanger replacement as a repair priority instead of replacing the furnace.
Consider replacing the existing furnace with a sealed-combustion, downflow, condensing furnace. One manufacturer makes condensing furnaces, approved for mobile homes.
Consider replacing a mobile home furnace when you observe any of the following.
• The furnace has a cracked heat exchanger.
• Repair and retrofit exceed half of the replacement cost.
• The furnace is not operating and not repairable.
Mobile home furnaces require an outdoor source of combustion air. Mobile home furnaces have either a manufactured chimney that includes a passageway for combustion air or a combustion-air chute connecting the burner with the crawl space.
✓ Install a new furnace base unless you are sure that the existing base exactly matches the new furnace.
✓ Attach the furnace base firmly to the duct, and seal all seams between the base and duct with mastic and fabric tape before installing the furnace.
✓ Support the main duct underneath the furnace with additional strapping if necessary.
✓ When replacing mobile home furnaces, note the differences between old furnace and new, in the way each supplies itself with combustion air.
✓ Install a new chimney that is manufactured specifically for the new furnace.
✓ Often the old chimney opening doesn’t exactly line up with the new furnace’s flue. In these cases either use an offset pipe, provided by the manufacturer, or else cut the opening larger so that the new chimney can be installed absolutely vertical. Also make sure the chimney cap is installed absolutely straight.
Mobile home furnaces have short chimneys, and their combustion process depends on a delicate balance between combustion air entering and combustion gases leaving. The furnace demands a vertical, leak-free chimney, and a properly installed chimney cap. Follow manufacturer’s installation instructions exactly.
12.2 Mobile Home Cooling and Ventilation Systems
Mobile home cooling systems are, in most ways, identical to single-family cooling systems, which we document in “Evaluating Ducted Central Air-Conditioning Systems” on page 401
12.2.1 Air-Conditioning Systems
Mobile home central air-conditioning (A/C) systems are very similar to those of single-family homes. Mobile home split-system central A/C systems have the condenser and compressor outdoors and the air handler indoors. Packaged A/C systems have all the components in one cabinet.
Consult the following field-guide topics as necessary.
• “Central Air-Conditioner Inspection” on page 403
• “Air-Conditioner Sizing” on page 406
• “Duct Leakage and System Airflow” on page 407
• “Evaluating Air-Conditioner Charge” on page 407
|
SWS Detail: 5.0109.5 Evaporative Coolers; 5.0108.5 Evaporative Coolers |
Evaporative coolers for mobile homes are essentially the same as those of single-family homes. See “Evaporative Coolers” on page 455.
12.2.3 Mobile Home Ventilation
|
SWS Detail: 6.03 Whole-Building Ventilation;6.0301.1 Fresh Air Intake In Forced Air System; 6.0302.1 Individual Exhaust Fan Serving Entire Dwelling; 4.0188.2 Unconditioned Attic Ventilation |
Consult the SWS links above and the links listed below for information on mobile home ventilation systems.
• “Whole-Dwelling Ventilation Requirement” on page 419
• “Exhaust Ventilation” on page 434
• “Adaptive Ventilation” on page 440
Consult the SWS links above and the links listed below for information on mobile home ventilation systems.
• See “When to Install Attic Ventilation” on page 445.
• See “Attic Ventilation as a Solution for Moisture Problems” on page 445.
• See “Attic Ventilation Requirements” on page 446.
Crawl Space Ventilation
See “Naturally Ventilated Crawl Spaces” on page 449.
The location and relative importance of mobile home air leaks was a mystery before blower doors. Some mobile homes are fairly airtight, and others are very leaky. Air leakage serves as ventilation in most mobile homes. Comply with the whole-building ventilation standards outlined in “ASHRAE Standard 62.2–2016 Ventilation” on page 418.
A duct airtightness tester, which pressurizes the ducts and measures their air leakage, is the best way to measure and evaluate duct air sealing. See “Evaluating Duct Air Leakage” on page 362. For simply locating duct leaks, the blower door used in conjunction with a pressure pan does a good job. See "Pressure Pan Testing" on page 364.
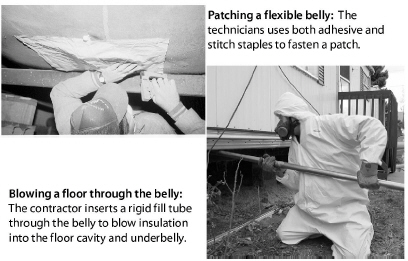
Most mobile home duct sealing is performed through the belly. This work is more difficult once the belly has been re-insulated. Inspect the ductwork and seal any major leaks, such as disconnected trunk lines, before insulating the belly.
|
Air Sealing Procedure |
Typical CFM50 Reduction |
|---|---|
|
Patching large air leaks in the floor, walls and ceiling |
200–900 |
|
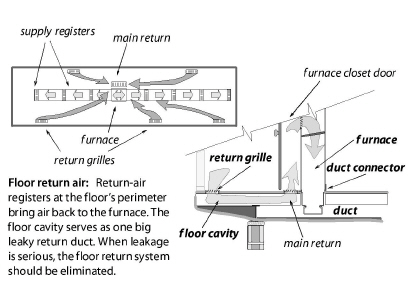
Sealing floor cavity used as return-air plenum (See “Floor return air” on page 519.) |
300–900 |
|
Sealing leaky water-heater closet |
200–600 |
|
Sealing leaky supply ducts |
100–500 |
|
Installing tight interior storm windows |
100–250 |
|
50–150 |
Workers reduce mobile home air leakage when they install insulation combined with proper air-sealing in roofs, walls, and belly cavities. Prioritize your efforts by performing these tasks in this order.
1. Evaluate the insulation levels. If adding insulation is cost-effective, perform the usual pre-insulation air sealing measures that also prevent spillage of insulation out of the cavity.
2. Seal ducts before you insulate the belly.
3. Install cavity insulation.
4. Re-check the air leakage rate.
5. Perform additional air sealing as needed.
12.3.1 Shell Air-Leak Locations and Sealing
Air-Leak Locations
Blower doors have pointed out the following shell locations as the most serious air leakage sites.
✓ Plumbing penetrations in floors, walls, and ceilings. Water-heater closets with exterior doors are particularly serious air leaks, with large openings between bathrooms and other areas
✓ Torn or missing underbelly, exposing air leaks in the floor to the ventilated crawl space
✓ Large gaps around furnace and water heater chimneys
✓ Severely deteriorated floors in water heater compartments
✓ Gaps around the electrical service panel box, light fixtures, and fans
✓ Interior or exterior wall sheeting materials loose or penetrated
✓ Joints between the halves of double-wide mobile homes and between the main dwelling and additions
General Air Sealing Specifications
✓ Select sealants that are compatible with their intended surfaces, allowing for differential expansion and contraction.
✓ Consider the need for ignition barriers when using significant quantities or spray foam.
✓ Select low volatile-organic-compound (VOC) sealants for indoor use.
✓ For patching, select materials that adequately support their load and function as permanent air barriers. Provide additional reinforcing materials as necessary.
✓ Patch fabric belly material and rigid asphalt-impregnated belly board with similar water resistive materials.
Soft Belly Patching and Air Sealing
Soft underbellies use a water-resistant tear-resistant fabric to function as an air barrier and protective layer for the floor cavity with crosswise floor joists. Because the duct runs lengthwise, it hangs down and the underbelly bulges at the duct.
✓ Span each belly section with an uninterrupted section of belly material, creating as few seams as possible.
✓ Lap any seams in the belly material at least 6 inches, seal with a continuous bead of sealant, and fasten mechanically every 2 inches.
✓ Attach fabric belly material at opposite ends of spanned section using rigid support material, such as wooden furring strips. Wrapping it around the rigid support 2 times and mechanically fastening every 6 inches.
✓ Attach fabric belly material to all available floor joists and reinforce the joint with rigid supports.
Hard bellies use a water-resistant rigid material such as asphalt-impregnated fiberboard. That material attaches to the floor joists of mobile homes with lengthwise floor joists. Patch the existing material with a similar material, and fasten the patch to the floor joists with mechanical fasteners.
✓ Remove any material from the sealing-and-patching area that could prevent full adhesion between the sealant and patch material.
✓ Attach continuous rigid insulation when possible to the floor joists, and install rigid supports to prevent the insulation’s detachment.
✓ Seal joints in the rigid material and under its seams with a compatible sealant.
✓ Patch any hole larger than 1 square foot, by first cutting a rectangular hole in the existing material. The available floor joists should border that hole. Then mechanical fasteners attach the rectangular close-fitting patch to adjoining floor joists.
✓ Use mechanical fasteners with washers or integrated caps to prevent fasteners from pulling through the rigid belly material. Space the fasteners 6 inches apart.
|
SWS Detail: 5.0105.3 Crossover Duct Repair or Replacement; 5.0105.4 Replace Return Air Systems That Use Building Cavities; 5.0105.5 Replace MH Duct Boots |
Blower doors and duct testers have pointed to the following duct locations as the most serious energy problems.
✓ Joints between the furnace and the main duct — If necessary, cut open the main duct from underneath to access and seal leaks between the furnace, duct connector, and main duct. With electric furnaces you access the duct connector by removing the resistance elements. For furnaces with empty A-coil compartments, you can simply remove the access panel to seal the duct connector.
✓ Floor cavities used as return-air plenums — These floor return systems should be eliminated and replaced with return-air through the hall or a large grille in the furnace-closet door.
✓ Joints between the main duct and the short duct sections joining the main duct to a floor register
✓ Joints between register boots and floor
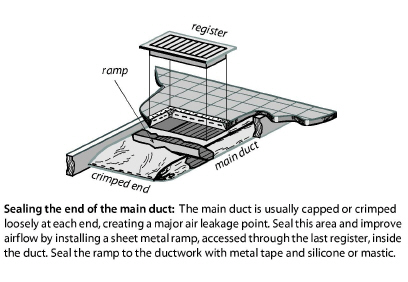
✓ The poorly sealed ends of the duct trunk, which often extend beyond the last supply register
✓ Disconnected, damaged or poorly joined crossover ducts
✓ Supply and return ducts for outdoor air conditioner units
✓ Holes cut in floors.
✓ New ductwork added to supply heat to room additions
Seal floor penetrations and ductwork before doing any belly repair. If you disturb pollutants in the crawl space such as mold and dust, these pollutants can spread to the whole home through duct leaks and holes in the floor.
See “Pressure Pan Testing” on page 364. See “Sealing Supply Ducts” on page 374.

Mobile home supply duct leaks pressurize the belly cavity. Follow these steps to perform this rough test to determine if duct leaks are present and their general location.
✓ Repair the rodent barrier.
✓ Turn on the air handler.
✓ Insert a manometer hose into the belly through the rodent barrier and test the pressure with-reference-to the outdoors.
✓ Start near the furnace, and work your way toward the ends alongside the trunk line. A pressure rise gives you a rough idea of the location of leaks, size of leaks, and tightness of the nearby rodent barrier.
✓ Repair the ducts and re-test.

Address all significant moisture problems before insulating. The most important single moisture-control measure is installing a ground-moisture barrier. See also "Preparing for Foundation or Floor Insulation" on page 227.
Select insulation that has a flame spread and smoke development index of 25/450 or less.
For each separate insulated building assembly, post a dated line item in a receipt signed by the installer. This posted line item must include: installed insulation type, coverage area, installed thickness, minimum settled thickness, installed R-value, and number of bags installed.
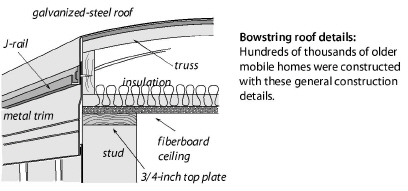
12.4.1 Insulating Mobile Home Roof Cavities
Blowing a closed mobile home roof cavity is similar to blowing a closed wall cavity, only the insulation doesn’t have to be as dense. Use fiberglass blowing wool because cellulose is too heavy and absorbs water too readily for use around a mobile home’s lightweight sheeting materials.
If existing insulation is attached to the underside of the roof, blow the insulation below it. If existing insulation lays on the ceiling, blow the insulation above it. If you find insulation at both the ceiling and roof, blow the new insulation in between the two existing layers of insulation.
Roof Insulation Methods
There are three common and effective methods for blowing mobile home roof cavities.
1. Cutting a square hole in the metal roof and blowing fiberglass through a flexible fill-tube.
2. Disconnecting the metal roof at its edge and blowing fiberglass through a rigid fill-tube.
3. Blowing fiberglass through holes drilled in the ceiling.
Existing Insulation
• If existing blanket insulation sits above the trusses, blow the new insulation below the existing blanket.
• If existing blanket insulation sits on the ceiling, blow the new insulation above the existing blanket.
• If existing blanket insulation is installed at both locations, blow the new insulation in between the two existing blankets.
Preparation and Completion of Roof-Insulation Blowing
Perform these steps before insulating mobile home roofs.
✓ Reinforce weak areas in the ceiling.
✓ Inspect the ceiling and seal all penetrations.
✓ Verify that the ceiling is intact, able to support insulation weight, and air sealed.
✓ Replace all broken rooftop vents, or remove them and seal the holes.
✓ Maintain safe clearances between insulation and recessed light fixtures and ceiling fans.
✓ Verify that chimneys are zero-clearance triple-wall chimneys. Otherwise maintain clearances specified by the manufacturers of non-zero-clearance chimneys. See “Manufactured Chimneys” on page 340.
✓ Select insulation that has a flame spread and smoke development index of 25/450 or less.
✓ Install closures/patches over all access holes that are airtight, durable, and aesthetically acceptable.
✓ If you removed existing trim, reinstall it to original condition.
✓ For accessible mobile-home attics, follow the procedures in 5.2.1: Preparing for Attic Insulation - Pg. 156.
✓ Post a dated receipt signed by the installer that includes: Insulation type, coverage area, installed depth, installed R-value, and number of bags installed near the circuit-breaker box, where the home’s original specs may be posted.
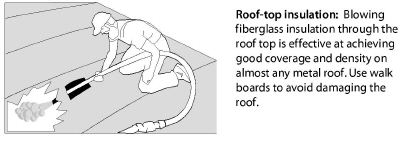
Blowing Through a Square Opening
Blowing through the roof top does a good job of filling the critical edge area with insulation, and the patches are easy to install if you have the right materials. It is important to complete the work during good weather, however, since the roof will be vulnerable to rain or snow during the job. Before considering this procedure, read“Preparation and Completion of Roof-Insulation Blowing” on page 522.
If the roof contains a strongback running the length of the roof, the holes should be centered over the strongback, which is usually near the center of the roof’s width. A strongback is a 1-by-4 or a 1-by-6, installed at a right angle to the trusses near their center point, that adds strength to the roof structure.
1. Cut 10-inch square holes at the roof’s apex on top of every second truss. Each square hole permits access to two truss cavities.
2. Use a 2-inch or 2-1/2-inch diameter fill-tube. Insert the fill-tube and push it forcefully out toward the edge of the cavity.
3. Blow fiberglass insulation into each cavity.
4. Stuff the area under each square hole with a piece of unfaced fiberglass batt so that the finished roof patch will stand a little higher than the surrounding roof.
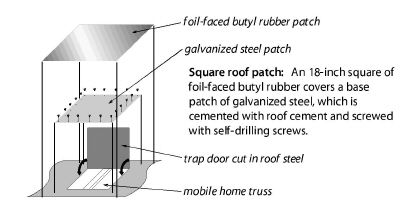
5. Patch the hole with a 14-inch-square piece of stiff galvanized steel, sealed with an appropriate sealant and screwed into the existing metal roof.
6. Cover the first patch with a second patch, consisting of an 18-inch-square piece of foil-faced butyl rubber.
Blowing Through a Round Hole on the Roof
Consider this alternative to cutting a square hole as suggested above. Before considering this procedure, read“Preparation and Completion of Roof-Insulation Blowing” on page 522.
1. Drill a 3-inch or larger hole between each truss.
2. Use a 2-inch or 2-1/2-inch diameter fill-tube. Insert the fill-tube, and push it forcefully out toward the edge of the cavity.
3. Blow fiberglass insulation into each cavity to fill the entire cavity.
4. Patch the holes with galvanized steel, plastic caps, and roofing material that is compatible with the existing roof.
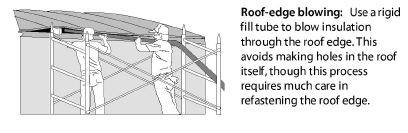
Blowing a Mobile Home Roof from the Edge
Erect scaffold to do this procedure safely and efficiently. Mobile home metal roofs are usually fastened only at the edge, where the roof joins the wall. Before considering this procedure, read“Preparation and Completion of Roof-Insulation Blowing” on page 522.
1. Remove the screws from the metal j-rail at the roof edge. Also remove staples or other fasteners, and scrape off putty tape.
2. Pry the metal roof up far enough to insert a 2-inch-diameter, 10- to 14-foot-long rigid fill-tube. Two common choices are steel muffler pipe and aluminum irrigation pipe. Inspect the cavity with a bright light to identify any wires or piping that could be damaged by the fill tube.
3. Blow insulation through the fill-tube into the cavity. Turn off the insulation-material feed and blower on the blowing machine when the tube is a couple feet from the roof edge, in order to avoid blowing insulation out through the opening in the roof edge. Stuff the last foot or two with unfaced fiberglass batts.
4. Fasten the roof edge back to the wall using galvanized roofing nails, a new metal j-rail, new putty tape, and larger screws. The ideal way to re-fasten the metal roof edge is with air-driven galvanized staples, which is the way most roof edges were attached originally.
The re-installation of the roof edge is the most important part of this procedure. You must replace the putty tape and re-install the roof edge as it was originally. This usually involves installing a layer of putty tape or a bead of high quality caulk under the metal roof and another between the metal roof edge and the j-rail.
The advantages of blowing through the edge is that if you have the right tools, including a powered stapler, this method can be very fast and doesn’t require cutting into the roof. The disadvantages of this procedure are that you need scaffolding to work at the edges, and it won’t work on roof systems with a central strongback that stops the fill tube from reaching all the way across the roof.
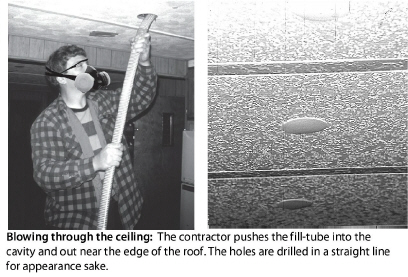
Blowing a Mobile Home Roof from Indoors
The advantage to this method is that you are indoors, out of the weather. The disadvantages include being indoors where you can make a mess — or worse, damage something.
Blowing the roof cavity from indoors requires drilling straight rows of 3-inch or 4-inch holes and blowing insulation into the roof cavity through a fill tube. Before considering this procedure, read“Preparation and Completion of Roof-Insulation Blowing” on page 522.
Follow this procedure.
1. Setup a dust-control enclosure for all interior access locations that limits insulation and construction dust.
2. Drill a 3-inch or 4-inch hole in an unseen location to discover whether the roof structure contains a strongback that would prevent blowing the roof cavity from a single row of holes.
3. Devise a way to drill a straight row of holes down the center of the ceiling. If a strongback exists, drill two rows of holes at the quarter points of the width of the ceiling.
4. If a longitudinal ceiling trim piece exists, remove trim piece and drill behind the trim.
5. Insert a flexible plastic fill tube into the cavity, and push it as far as possible toward the edge of the roof.
6. Fill the cavity with tightly packed fiberglass insulation.
7. Cap the holes with manufactured plastic caps and caulk the caps. Be careful not to damage the holes so that the plastic hole covers fit properly. You can also install a piece of painted wood trim over the line of holes.

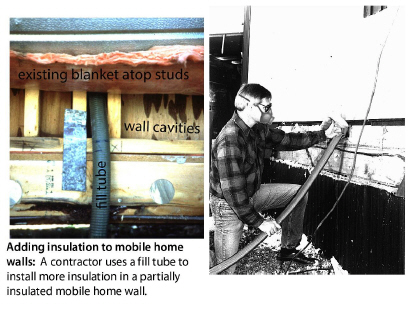
12.4.2 Mobile Home Sidewall Insulation
|
SWS Details: 4.0202.3 MH - Fiberglass Batts; 4.0202.4 MH - Blown Fiberglass; 4.0202.5 MH - Blown Fiberglass Through Penetrations |
The sidewalls of many mobile homes aren’t completely filled with insulation. This reduces the nominal R-value of the existing wall insulation because of convection currents and air leakage. Consider the following steps for adding insulation to partially filled mobile home walls.
Sidewall-Insulation Preparation
See “Fiberglass Batts and Blankets” on page 121.
1. Select fiberglass insulation that has a flame spread and smoke development index of 25/450 or less.
2. Check the interior paneling and trim to make sure they are securely fastened to the wall. Remove objects from the interior surfaces of the walls being insulated. Repair holes in interior paneling and caulk cracks at seams to prevent indoor air from entering the wall.
3. Note the location of electrical boxes, wire, to avoid contacting them when you push the fill tube up the wall. Don’t insulate next to heat-producing devices like wall heaters.
4. Remove the bottom horizontal row of screws from the exterior siding. If the vertical joints in the siding interlock, fasten the bottom of the joints together with1/2-inch sheet metal screws to prevent the joints from coming apart. Pull the siding and existing insulation away from the studs, and insert the fill tube into the cavity with the point of its tip against the interior paneling.
5. With 4-by-8 wood siding, drill holes in the exterior siding around the perimeter of the home, parallel to the bottom plate an equal distance apart. Locate the holes under the lowest window sill.
6. For vinyl or metal lap siding, remove a piece of siding near the bottom of the wall. Carefully drill or cut holes in the sheathing to access the cavity.
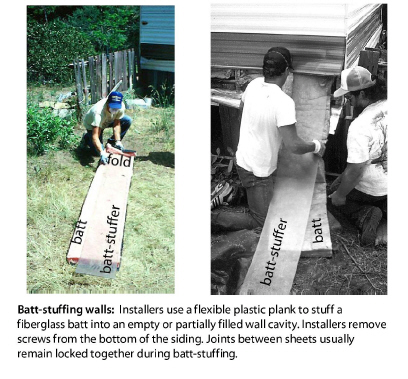
Stuffing Fiberglass Batts into Wall Cavities
Batt stuffing can be a fast and efficient wall-insulation method for older homes with metal siding. Stuffing won’t work on every home or in every stud cavity, so you must blow insulation into those un-stuffable wall cavities.
Most batt stuffers are made of clear polycarbonate plastic. Insulators often bend the top of the plastic sheet to make the batt travel better up the wall.
1. Remove the bottom row of screws from the metal siding. If necessary, remove the screws from that attach the siding to the bottom-most belt rail. This can create additional room to stuff the batt if needed.
2. Drive a self-drilling sheet-metal screw into the bottom of each vertical siding joint to prevent these clinched joints from separating during the batt-stuffing process. The joints can be difficult to rejoin.
3. Lay a batt on the ground, and place the batt stuffer on top of the batt. Allow the batt to overhang the stuffer, and fold the batt over the stuffer approximately one foot or less.
4. Clamp the batt to the batt stuffer with your gloved hand and place the stuffer and the batt into the bottom of the stud cavity. The batt stuffer hangs out the bottom of the wall.
5. Use one hand to push from the batt stuffer’s bottom and the other hand to hold the batt and stuffer steady as it moves up the wall to the top plate.
6. Remove the batt stuffer and force the extra batt into the bottom of the cavity or cut it off.
7. Refasten the siding, using thicker or longer screws if necessary.

Blowing Fiberglass into Walls
Follow these procedures to blow insulation into the cavities.
1. Push the a flexible fill tube up into the wall cavity until it hits the top plate of the wall. The tube should go in to the wall cavity 7-to-8 feet. Insert the tube so that its natural curvature presses its tip against the interior paneling. When you press the angled tip of the fill tube against the smooth paneling, it is unlikely to snag the existing insulation on its way up the wall. If the fill tube hits a belt rail or other obstruction, twisting the tube helps its tip move past the obstruction.
2. Stuff a piece of fiberglass batt into the bottom of the wall cavity around the tube to prevent insulation from blowing out of the wall cavity. Leave the batt in-place at the bottom of the wall, when you pull the fill tube out of the cavity. This piece of batt acts first as temporary gasket for the hose, and second to insulate the very bottom of the cavity after you remove the hose. This batt also eliminates the need to blow fiberglass insulation all the way to the cavity’s bottom, preventing possible spillage and overfilling. If you happen to overfill the bottom of the cavity, reach up inside the wall to pack or remove some fiberglass insulation, particularly any that lies between loose siding and studs.
3. Pull the tube down and out of the cavity about 6 inches at a time. Listen for the blower fan to indicate strain from back-pressure in the wall. Watch for the fiberglass insulation to slow its flow rate through the blower hose at the same time. Also watch for slight bulging of the exterior siding. These signs tell the installer when to pull the tube down.
4. Carefully refasten the siding using the same holes. Select screws that are slightly longer and thicker than the original screws. Repair sheathing, if present and if damaged, with similar material and compatible sealant.

12.4.3 Mobile Home Floor Insulation
Mobile-home floor insulation is a good energy-saving measure in cool climates. The existing insulation usually fastens to the bottom of the floor joists, leaving much of the cavity uninsulated and subject to air convection. This greatly reduces the insulation’s R-value. Blown-in belly insulation also tends to reduce duct leakage.
Preparing for Mobile Home Floor Insulation
Before installing floor insulation, inspect the floor and do these repairs.
✓ Repair plumbing leaks.
✓ Seal all holes in the floor.
✓ Inspect and seal ducts.
✓ Repair the underbelly for both airtightness and support of insulation. See “Soft Belly Patching and Air Sealing” on page 516 and “Hard Belly Patching” on page 516 for details.
✓ Install a 6-mil ground-moisture barrier in the crawl space.
✓ Verify that gas, water, and electrical lines are secured at least every 4 feet to a floor joist or framing member.
✓ Identify any plumbing lines, and avoid installing insulation between them and the living space if freezing could be an issue. This may require running a piece of belly-paper under the pipes, and insulating the resulting cavity. This cavity bundles the pipes into the dwelling’s heated envelope.
✓ Select insulation that has a flame spread and smoke development index of 25/450 or less.

Insulating the Floor
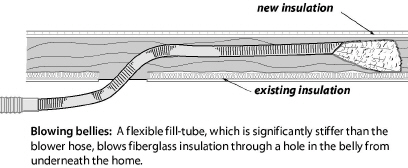
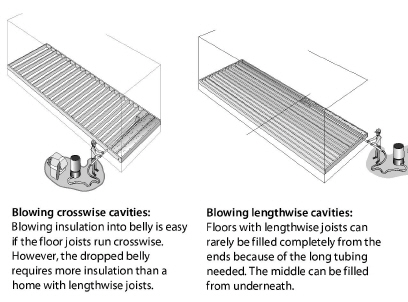
Blowing Insulation into Floors
Two methods of blowing insulation into mobile home floors are common. Blown fiberglass is recommended over cellulose for either method.
1. Drilling through the 2-by-6 rim joist and blowing fiberglass through a rigid fill tube into the belly.
2. Blowing fiberglass insulation through a flexible fill tube or a rigid fill tube into the floor cavity through the underbelly.
When blowing through holes from underneath the home, consider blowing through the underbelly’s damaged areas before patching them. After blowing insulation, patch all pre-existing holes and access holes in the belly. See “Shell Air-Leak Locations and Sealing” on page 515.
Installing Fiberglass Batts in Floors
Unfaced fiberglass batts may also be used to insulate floor sections where the insulation and under belly are missing. This is a good approach when it isn’t cost-effective to insulate the entire belly.
Secure batts using fasteners and structural supports that don’t over-compress the insulation and that have a minimum service life of 20 years — strapping, netting, wood lath, for example.
12.5 Mobile Home Windows and Doors
Repairing or replacing windows and doors is often part of a mobile-home weatherization job. Installing storm windows or replacing existing windows is expensive per square foot and isn’t as cost-effective as insulation. However, storm windows and replacement windows are all energy conservation measures for mobile homes that are worth considering.
12.5.1 Mobile Home Storm Windows
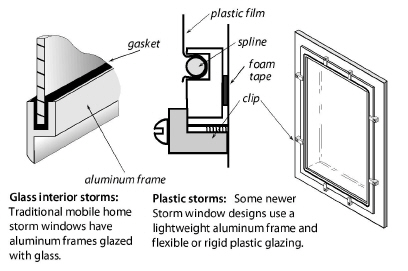
Interior storm windows are common in mobile homes. These stationary interior storms serve awning and jalousie windows. Sliding interior storm windows pair with exterior sliding prime windows.
✓ Interior storm windows double the R-value of a single-pane window. They also reduce infiltration, especially in the case of leaky jalousie prime windows.
✓ Interior storm windows must be operable and egress-rated in egress locations. See “Fire Egress Windows” on page 262.
✓ Consider repairing existing storm windows rather than replacing them unless the existing storm windows can’t be re-glazed or repaired.
✓ When sliding primary windows are installed, use a sliding storm window that slides from the same side as the primary window. Sliding storm windows stay in place and aren’t removed seasonally, and are therefore less likely to be lost or broken.
✓ Interior storm windows will be operable and egress rated in egress locations.

12.5.2 Replacing Mobile Home Windows
Replacement windows should have lower U-factors than the windows they are replacing. Inspect condition of rough opening members before replacing windows. Replace deteriorated, weak, or waterlogged framing members.
Prepare the replacement window by lining the perimeter of the inner lip with 1/8-inch thick putty tape. Caulk exterior window frame perimeter to wall after installing the window.
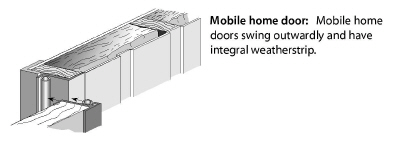
Mobile home doors come in two basic types: the mobile home door and the house-type door. Mobile home doors swing outwardly, and house-type doors swing inwardly. House-type doors are available with pre-hung storm doors included.
Existing or replacement mobile home doors should be air-tight, water-tight, and easy to operate.
✓ Replace missing or damaged weatherstripping, drip cap, or flashing to ensure that water or air can’t penetrate the opening.
✓ Properly adjust the door so that it closes securely, but does not crush or deform its weatherstripping.
✓ See also "Door Repair and Weatherstrip" on page 265.
✓ See also "Replacement Door Installation" on page 275.
12.6 Cool Roofs for Mobile Homes
Cool-roof coatings reduce summer cooling costs 10-20%, and improve comfort. They are a good choice for mobile homes with low slope roofs. See also "Cool Roofs" on page 183.
Cool-roof coatings are usually bright white, and must have a reflectivity of at least 60% to meet the Energy Star standard. Cool roof coatings are usually water-based acrylic elastomers, and are applied with a roller or brush on a pole.
Cool-roof coatings can coat most low-sloped roofing such as metal, built-up asphalt, bitumen, or single ply membranes. Some existing roof materials require a primer to achieve acceptable adhesion — check the manufacturer’s recommendations. Observe these requirements for coatings.
✓ Carry Energy Star labeling.
✓ Are durable, flexible, reflective, and list in their specifications: ASTM D412, ASTM D1737, and UL 790 Class A or LEED New Construction Reflective Roof standard.
Cool Roof Installation.
✓ Verify roof is clean, dry, and structurally sound
✓ Apply roof-coating in accordance with manufacturer specifications, including a primer if recommended.
✓ Buy the highest quality coatings, and look for those that are specifically formulated as mobile home roof coatings.
✓ Buy the highest quality coatings, and look for those that are specifically formulated as mobile home roof coatings.
Surface preparation is critical when applying any coating. The underlying roofing materials must be clean so the coating sticks. Do repairs if the existing roofing is cracked or blistered. Roof coating won’t stick to dirty or greasy surfaces. Observe the following specifications when installing cool roof coatings.
Prepare the Roof
✓ Make roof repairs and seal all penetrations before application.
✓ Strip roof of debris, algae, and loose coatings.
✓ Pressure-wash the roof or scrub the roof with a water/tri-sodium phosphate (tsp) solution.
✓ For metal roofs, sand badly rusted areas down to bare metal. Install metal patches over any areas that are rusted through, followed by polyester-reinforced patches.
✓ Protect any nearby windows, siding, or trim from splatters. For spray applications, mask adjoining areas where over-spray is possible, and move vehicles away from the home.
Install the Roof Coating
✓ For patching, use the thicker patch coat material compatible with cool-roof coating, if available.
✓ Reinforce joints around skylights, pipe flashing, roof drains, wall transitions, or HVAC equipment. Use polyester fabric and roof-repair coating for these reinforcements by laying dry fabric into a layer of wet coating. Smooth the patches down with a squeegee or brush to remove bubbles or wrinkles. Allow repairs to cure for at least one day before applying the topcoats.
✓ Install the coating in dry weather. If rain, heavy dew, or freezing weather happens within 24 hours of installation, this weakens the coating’s bond to the roof.
✓ For roller application, use a large brush for the edges, and a shaggy 1 to 1 1/2-inch roller on a pole. Coat the lower parts of roof jacks and other penetrations.
✓ Install at least two coats, with second coat applied in the opposite direction to the first to get more complete coverage. Allow a day for drying between coats.
|
SWS Detail: 4.0388.1 Foundation Skirting; 2.0202.3 Pier and Skirting Foundations - Ground Cover |
The primary purpose of skirting is to shelter the crawl space, keep animals out, and prevent weather from damaging the dwelling. Skirting must be vented to reduce moisture accumulation in many climates, so there may not be much value in insulating it.
Installation and repair of mobile home skirting is seldom cost-effective and may not be allowed in WAP budgets.
Comply with these SWS specifications if you repair or install skirting.
Preparation for Skirting
✓ Remove debris and vegetation from the home’s perimeter and level the ground.
✓ Select materials that compatible with existing surfaces, as well as corrosion-, pest-, and rot-resistant.
✓ Select materials that can contact the ground without deteriorating.
✓ Install a ground-moisture barrier to prevent excessive moisture as specified in “Ground-Moisture Barriers” on page 42.
✓ Verify that installation area is free of active water leaks, fuel leaks, and pest infestations.
✓ Verify that installation area is free of uncovered electrical junctions, and improperly terminated devices: ventilation fans, dryers, plumbing stacks, condensate lines.
Skirting Installation
✓ Install supports to prevent failure under wind or snow loads but that allow for expansion, contraction, and frost heaving.
✓ Fasten skirting to comply with manufacturer’s specifications, using corrosion resistant fasteners.
✓ Install flashing that directs water away from the dwelling and the skirting if necessary.
✓ Seal flashing to the dwelling with compatible sealant.
✓ Seal all seams, joints, connections, penetrations in the skirting with compatible materials: caulking, metal mesh, steel wool, for example.
Note: If you plan to install insulated skirting, read carefully the SWS standards at the beginning of this sections.